> ## Documentation Index
> Fetch the complete documentation index at: https://docs.near.org/llms.txt
> Use this file to discover all available pages before exploring further.
# Your First Smart Contract
> Create your first contract using your favorite language.
export const Github = ({url, start, end, fname, withSourceLink = true}) => {
const [code, setCode] = useState(null);
function toRaw(ref) {
const fullUrl = ref.slice(ref.indexOf('https'));
const [url] = fullUrl.split('#');
const [org, repo, , branch, ...pathSeg] = new URL(url).pathname.split('/').slice(1);
return `https://raw.githubusercontent.com/${org}/${repo}/${branch}/${pathSeg.join('/')}`;
}
async function fetchCode(url, fromLine, toLine) {
let res;
if (typeof window !== 'undefined') {
const validUntil = localStorage.getItem(`${url}-until`);
if (validUntil && Number(validUntil) > Date.now()) {
res = localStorage.getItem(url);
}
}
if (!res) {
try {
res = await (await fetch(url)).text();
if (typeof window !== 'undefined') {
localStorage.setItem(url, res);
localStorage.setItem(`${url}-until`, String(Date.now() + 60000));
}
} catch {
return 'Error fetching code, please try reloading';
}
}
let body = res.split('\n');
const from = fromLine ? Number(fromLine) - 1 : 0;
const to = toLine ? Number(toLine) : body.length;
body = body.slice(from, to);
const precedingSpace = body.reduce((prev, line) => {
if (line.length === 0) return prev;
const spaces = line.match(/^\s+/);
if (spaces) return Math.min(prev, spaces[0].length);
return 0;
}, Infinity);
return body.map(line => line.slice(precedingSpace === Infinity ? 0 : precedingSpace)).join('\n');
}
function buildSourceUrl(url, start, end) {
const base = url.split('#')[0];
if (start && end) return `${base}#L${start}-L${end}`;
if (start) return `${base}#L${start}`;
return base;
}
useEffect(() => {
const rawUrl = toRaw(url);
fetchCode(rawUrl, start, end).then(res => setCode(res));
}, [url, start, end]);
const sourceUrl = buildSourceUrl(url, start, end);
const startLine = start ? Number(start) : 1;
const fileName = fname ?? sourceUrl.split('/').pop();
return
{}
{start && end &&
Lines {start}–{end}
}
{}
{code === null ?
Loading...
:
{code.split('\n').map((line, i) =>
|
{startLine + i}
|
{line || ' '}
|
)}
}
{}
{withSourceLink &&
}
 [](https://nearplay.app/embed/3450a8a0-57dc-4d3a-b5d0-7bed58a0c2a9)
***
## Prerequisites
Before starting, make sure to set up your development environment.
```bash theme={"theme":{"light":"github-light","dark":"github-dark"}}
# Install Rust: https://www.rust-lang.org/tools/install
curl --proto '=https' --tlsv1.2 -sSf https://sh.rustup.rs | sh
# Contracts will be compiled to wasm, so we need to add the wasm target
rustup target add wasm32-unknown-unknown
# Install NEAR CLI-RS to deploy and interact with the contract
curl --proto '=https' --tlsv1.2 -LsSf https://github.com/near/near-cli-rs/releases/latest/download/near-cli-rs-installer.sh | sh
# Install cargo near to help building the contract
curl --proto '=https' --tlsv1.2 -LsSf https://github.com/near/cargo-near/releases/latest/download/cargo-near-installer.sh | sh
```
```bash theme={"theme":{"light":"github-light","dark":"github-dark"}}
# Install Node.js using nvm (more options in: https://nodejs.org/en/download)
curl -o- https://raw.githubusercontent.com/nvm-sh/nvm/v0.39.7/install.sh | bash
nvm install latest
# ⚠️ For Mac Silicon users only, Rosetta is needed to compile contracts
# /usr/sbin/softwareupdate --install-rosetta --agree-to-license
# Install NEAR CLI to deploy and interact with the contract
npm install -g near-cli-rs@latest
```
```bash theme={"theme":{"light":"github-light","dark":"github-dark"}}
# Install Python (if not already installed)
# Use your system's package manager or download from https://www.python.org/downloads/
# Install Emscripten (required for compiling Python contracts to WebAssembly)
# For Linux/macOS:
git clone https://github.com/emscripten-core/emsdk.git
cd emsdk
./emsdk install latest
./emsdk activate latest
source ./emsdk_env.sh
# Add to your .bashrc or .zshrc for permanent installation:
# echo 'source "/path/to/emsdk/emsdk_env.sh"' >> ~/.bashrc
cd ..
# For Windows:
# Download and extract: https://github.com/emscripten-core/emsdk
# Then in Command Prompt:
# cd emsdk
# emsdk install latest
# emsdk activate latest
# emsdk_env.bat
# Verify installation with:
emcc --version
# Install uv for Python package management
curl -LsSf https://astral.sh/uv/install.sh | sh
# Install NEAR CLI-RS to deploy and interact with the contract
curl --proto '=https' --tlsv1.2 -LsSf https://github.com/near/near-cli-rs/releases/latest/download/near-cli-rs-installer.sh | sh
```
```bash theme={"theme":{"light":"github-light","dark":"github-dark"}}
#For Linux arm/x64
sudo apt update && sudo apt upgrade -y
sudo apt install -y build-essential curl wget git libssl-dev pkg-config checkinstall
sudo apt install bison
#For Mac
xcode-select --install
brew update
brew install mercurial
brew install binaryen
bash < <(curl -s -S -L https://raw.githubusercontent.com/moovweb/gvm/master/binscripts/gvm-installer)
gvm install go1.25.4 -B
gvm use go1.25.4 --default
curl -LO https://github.com/vlmoon99/near-cli-go/releases/latest/download/install.sh && bash install.sh
```
***
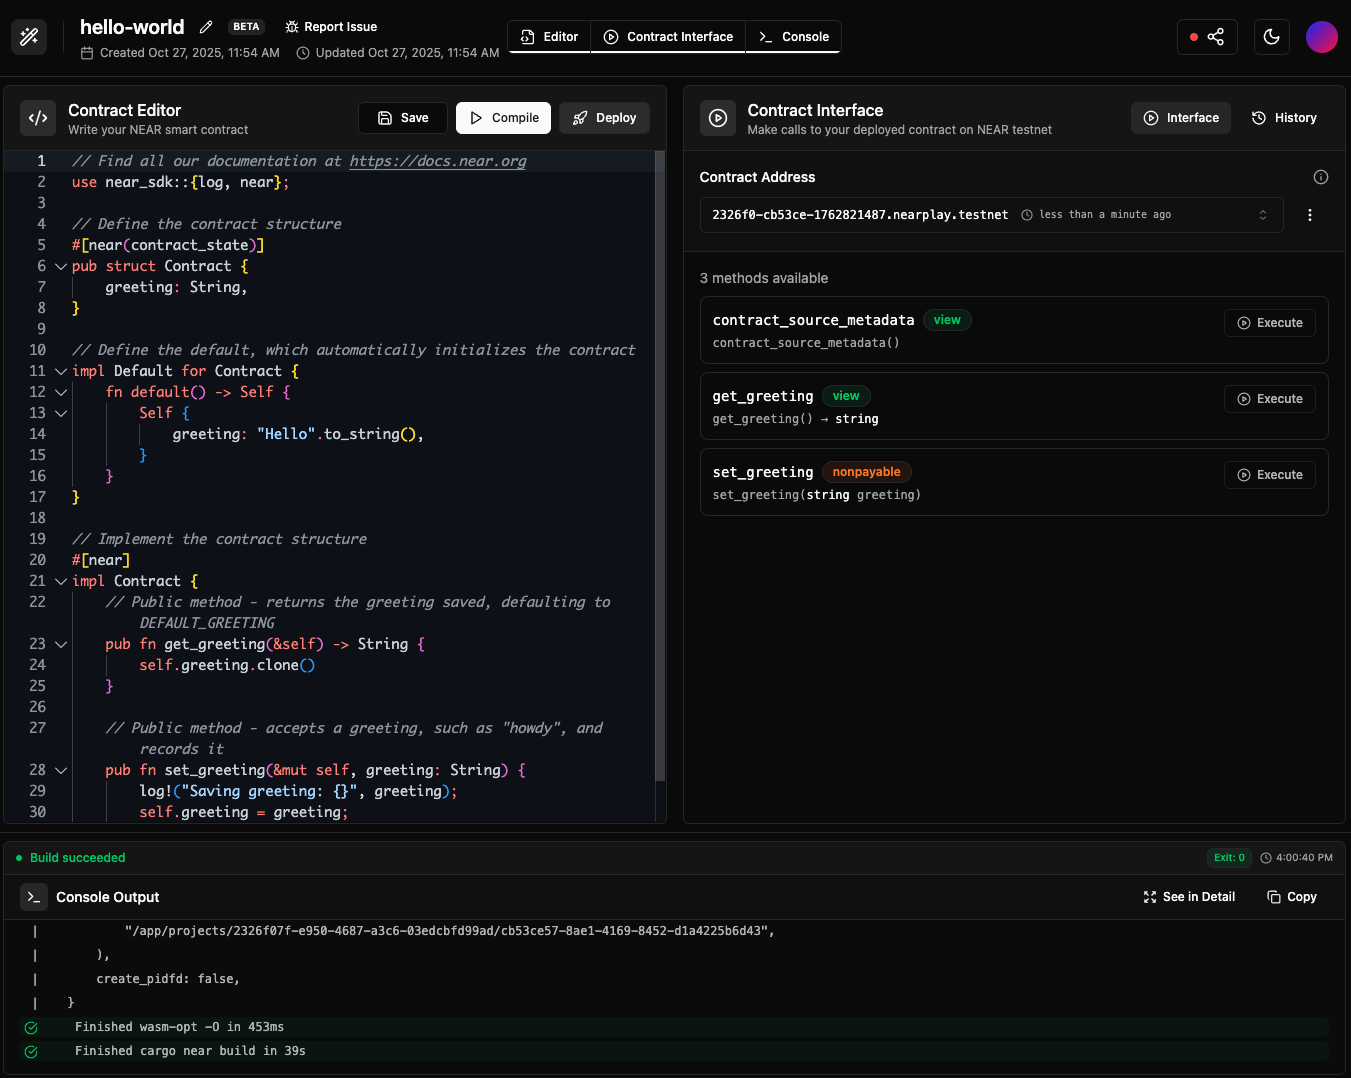
## Creating the Contract
Create a smart contract by using one of the scaffolding tools and following their instructions:
```bash theme={"theme":{"light":"github-light","dark":"github-dark"}}
cargo near
```
[](https://nearplay.app/embed/3450a8a0-57dc-4d3a-b5d0-7bed58a0c2a9)
***
## Prerequisites
Before starting, make sure to set up your development environment.
```bash theme={"theme":{"light":"github-light","dark":"github-dark"}}
# Install Rust: https://www.rust-lang.org/tools/install
curl --proto '=https' --tlsv1.2 -sSf https://sh.rustup.rs | sh
# Contracts will be compiled to wasm, so we need to add the wasm target
rustup target add wasm32-unknown-unknown
# Install NEAR CLI-RS to deploy and interact with the contract
curl --proto '=https' --tlsv1.2 -LsSf https://github.com/near/near-cli-rs/releases/latest/download/near-cli-rs-installer.sh | sh
# Install cargo near to help building the contract
curl --proto '=https' --tlsv1.2 -LsSf https://github.com/near/cargo-near/releases/latest/download/cargo-near-installer.sh | sh
```
```bash theme={"theme":{"light":"github-light","dark":"github-dark"}}
# Install Node.js using nvm (more options in: https://nodejs.org/en/download)
curl -o- https://raw.githubusercontent.com/nvm-sh/nvm/v0.39.7/install.sh | bash
nvm install latest
# ⚠️ For Mac Silicon users only, Rosetta is needed to compile contracts
# /usr/sbin/softwareupdate --install-rosetta --agree-to-license
# Install NEAR CLI to deploy and interact with the contract
npm install -g near-cli-rs@latest
```
```bash theme={"theme":{"light":"github-light","dark":"github-dark"}}
# Install Python (if not already installed)
# Use your system's package manager or download from https://www.python.org/downloads/
# Install Emscripten (required for compiling Python contracts to WebAssembly)
# For Linux/macOS:
git clone https://github.com/emscripten-core/emsdk.git
cd emsdk
./emsdk install latest
./emsdk activate latest
source ./emsdk_env.sh
# Add to your .bashrc or .zshrc for permanent installation:
# echo 'source "/path/to/emsdk/emsdk_env.sh"' >> ~/.bashrc
cd ..
# For Windows:
# Download and extract: https://github.com/emscripten-core/emsdk
# Then in Command Prompt:
# cd emsdk
# emsdk install latest
# emsdk activate latest
# emsdk_env.bat
# Verify installation with:
emcc --version
# Install uv for Python package management
curl -LsSf https://astral.sh/uv/install.sh | sh
# Install NEAR CLI-RS to deploy and interact with the contract
curl --proto '=https' --tlsv1.2 -LsSf https://github.com/near/near-cli-rs/releases/latest/download/near-cli-rs-installer.sh | sh
```
```bash theme={"theme":{"light":"github-light","dark":"github-dark"}}
#For Linux arm/x64
sudo apt update && sudo apt upgrade -y
sudo apt install -y build-essential curl wget git libssl-dev pkg-config checkinstall
sudo apt install bison
#For Mac
xcode-select --install
brew update
brew install mercurial
brew install binaryen
bash < <(curl -s -S -L https://raw.githubusercontent.com/moovweb/gvm/master/binscripts/gvm-installer)
gvm install go1.25.4 -B
gvm use go1.25.4 --default
curl -LO https://github.com/vlmoon99/near-cli-go/releases/latest/download/install.sh && bash install.sh
```
***
## Creating the Contract
Create a smart contract by using one of the scaffolding tools and following their instructions:
```bash theme={"theme":{"light":"github-light","dark":"github-dark"}}
cargo near
```
 *Creating a project using `cargo near new`*
```bash theme={"theme":{"light":"github-light","dark":"github-dark"}}
npx create-near-app@latest
```
*Creating a project using `cargo near new`*
```bash theme={"theme":{"light":"github-light","dark":"github-dark"}}
npx create-near-app@latest
```
 *Creating a project using `npx create-near-app@latest`*
When prompted to choose a template, select the basic `Auction` template to scaffold the auction contract
Python quickstart tutorial is coming soon!
In the meantime, please check out the [hello-near](https://github.com/near-examples/hello-near-examples/tree/main/contract-py) example.
```bash theme={"theme":{"light":"github-light","dark":"github-dark"}}
near-go create --project-name auction --module-name auction --project-type smart-contract-empty
```
*Creating a project using `near-go create`*
This will generate a project with the following structure:
```bash theme={"theme":{"light":"github-light","dark":"github-dark"}}
auction/
└── contract/
├── go.mod # Go module definition with near-sdk-go dependency
├── go.sum
└── main.go # Main contract file — replace this with the auction contract below
```
```bash theme={"theme":{"light":"github-light","dark":"github-dark"}}
cd auction/contract
```
Replace the contents of `main.go` with the auction contract code shown in the sections below.
For this tutorial we chose to name the project `auction`, but feel free to use any name you prefer
***
## Anatomy of the Contract
The auction smart contract allows users to place bids, track the highest bidder and claim tokens at the end of the auction.
Let's take a look at the different components of the contract and how they work together to implement this functionality.
### Contract State & Initialization
The contract stores the highest bid, auction end time, auctioneer address, and a flag to track if proceeds have been claimed. In order to set these parameters, an `init` function is provided, which must be called first to initialize the contract state.
### Placing Bids
In order to place a bid, users will need to call the `bid` function while attaching a deposit representing their bid amount.
The `bid` function will then validate that the auction is ongoing, if the user bid a higher amount than the one stored, it will record the new bid and refund the previous bidder.
### Claiming Proceeds
Once the auction ends, any user can call `claim` to transfer the winning bid to the auctioneer:
### View Methods
At all times, users can query the current state of the auction by calling its view methods (`get_highest_bid`, `get_auction_end_time`, `get_auctioneer`, `get_claimed`):
***
## Test the Contract
Lets make sure the contract is working as expected by running its tests. Simply run the `test` command, the contract will then be compiled and deployed to a local sandbox for testing:
```bash theme={"theme":{"light":"github-light","dark":"github-dark"}}
cargo test
```
```bash theme={"theme":{"light":"github-light","dark":"github-dark"}}
npm run test
```
Make sure that you are using `node v24 / 22 / 20`, and that you have installed `Rosetta` if you have a Mac with Apple Silicon
```bash theme={"theme":{"light":"github-light","dark":"github-dark"}}
uv run pytest
```
```bash theme={"theme":{"light":"github-light","dark":"github-dark"}}
near-go test project
```
Feel free to check the test files to see how they interact with the contract. In short, a local NEAR sandbox is created, the contract is deployed, and different methods are called to verify the expected behavior.
***
## Build & Deploy the Contract
Now that we know the tests are passing, let us deploy the contract! First, we need to compile it into WebAssembly:
```bash theme={"theme":{"light":"github-light","dark":"github-dark"}}
cargo near build non-reproducible-wasm
```
```bash theme={"theme":{"light":"github-light","dark":"github-dark"}}
npm run build
```
```bash theme={"theme":{"light":"github-light","dark":"github-dark"}}
# Build with nearc through the uv executor (no installation needed)
uvx nearc contract.py
```
The above command will compile your Python contract into WebAssembly (WASM) that can be deployed to the NEAR blockchain.
The default `nearc` build configuration is appropriate for most contracts. You don't need to install nearc separately as we're using `uvx` to run it directly.
This step requires [Emscripten](https://emscripten.org/) to be installed and accessible in your `PATH`. If you encounter errors during compilation, verify that Emscripten is properly installed with `emcc --version`.
Common compilation errors and solutions:
* `emcc: command not found` - Emscripten is not in your PATH. Run `source /path/to/emsdk/emsdk_env.sh` to add it temporarily.
* `error: invalid version of emscripten` - Your Emscripten version might be too old. Try updating with `./emsdk install latest && ./emsdk activate latest`.
* `Could not find platform micropython-dev-wasm32` - This typically means the Emscripten installation is incomplete or not properly activated.
```bash theme={"theme":{"light":"github-light","dark":"github-dark"}}
near-go build
```
**Near Go SDK Build Process**
1. All code from the main package, including imports from other modules, is combined into a single **generated\_build.go** file.
2. The **generated\_build.go** file is compiled into `wasm32-unknown-unknown` via **TinyGo**.
**Customizing the Build**
The default `near-go build` command works for most standard projects, compiling source code from the current directory into `main.wasm`.
However, if you want to specify a custom output name or **inspect the intermediate glue code** (generated JSON serialization and SDK integration wrappers) for debugging purposes, you can use the available flags:
```bash theme={"theme":{"light":"github-light","dark":"github-dark"}}
near-go build --output my_contract.wasm --keep-generated
```
### Create an Account
Let us now create a NEAR account where we will deploy the contract:
```bash theme={"theme":{"light":"github-light","dark":"github-dark"}}
# Replace with a name for your contract account
near create-account --useFaucet
```
**Already have a testnet account?**
If you already have a `testnet` account and would like to use it instead, you can log in with the command `near login`.
When working on `WSL` - or any other headless Linux environment - you might encounter issues when trying to create an account as the `cli` tries to save the keys into the system's keychain.
In such cases, you can try the following command to create the account:
```bash theme={"theme":{"light":"github-light","dark":"github-dark"}}
near account create-account sponsor-by-faucet-service autogenerate-new-keypair save-to-legacy-keychain network-config testnet create
```
### Deploy it!
With the contract ready, we can now deploy it to the `testnet` account we created earlier:
```bash theme={"theme":{"light":"github-light","dark":"github-dark"}}
near deploy ./target/near/auction.wasm
```
```bash theme={"theme":{"light":"github-light","dark":"github-dark"}}
near deploy ./build/auction.wasm
```
```bash theme={"theme":{"light":"github-light","dark":"github-dark"}}
near deploy ./auction.wasm
```
```bash theme={"theme":{"light":"github-light","dark":"github-dark"}}
near deploy ./main.wasm
```
**Congrats!** Your contract now lives in the NEAR testnet network.
***
## Interacting with the Contract
To interact with your deployed smart contract, you can call its functions through the command line.
#### Initialize the Contract
Let us initialize the auction by setting when it ends and who receives the funds (the auctioneer):
```bash theme={"theme":{"light":"github-light","dark":"github-dark"}}
# Get a timestamp for 5 minutes from now (in nanoseconds)
FIVE_MINUTES_FROM_NOW=$(( $(date +%s%N) + 5 * 60 * 1000000000 ))
# Initialize the auction
near call init "{\"end_time\": \"$FIVE_MINUTES_FROM_NOW\", \"auctioneer\": \"influencer.testnet\"}" --useAccount
```
Feel free to replace `influencer.testnet` with any valid testnet account — this is where the winning bid will be sent
#### Place a Bid
We can now place a bid in the auction by calling the `bid` method while attaching some NEAR deposit. On each bid, the highest bid and bidder information will be recorded in the contract's [storage](./anatomy/storage).
```bash theme={"theme":{"light":"github-light","dark":"github-dark"}}
# Create a new account to place the bid
near create-account --useFaucet
# Place a bid of 0.01 NEAR
near call bid '{}' --deposit 0.01 --useAccount
```
Note how in this case we are using the `` account (remember to rename it!) to call the `bid` function, while attaching a deposit of `0.01` NEAR as our bid
#### Get Highest Bid
The `get_highest_bid` function only reads from the contract state, so it does not require a transaction or signature:
```bash theme={"theme":{"light":"github-light","dark":"github-dark"}}
near view get_highest_bid '{}'
```
```json theme={"theme":{"light":"github-light","dark":"github-dark"}}
{
"bidder": "",
"amount": "10000000000000000000000"
}
```
Feel free to create as many bidder accounts as you want and place more bids to see how the highest bid changes!
#### Claim
After the auction ends, anyone can call the `claim` method, which will transfer the `highest bid` amount to the auctioneer and end the auction.
```bash theme={"theme":{"light":"github-light","dark":"github-dark"}}
near call claim '{}' --useAccount
```
**Who won?**
After the auction ends, the highest bidder can be determined by simply calling the `get_highest_bid` method again
***
## Common Questions
#### What about mainnet?
You can deploy a contract to mainnet using the same commands, just make sure to create a mainnet account and use `--networkId mainnet` flag in the `near` CLI commands.
#### How much does it cost to deploy?
The cost of deploying a contract depends on the contract's size, approximately 1Ⓝ \~100Kb.
#### Can I update a contract after deploying?
Yes. Redeploy with `near deploy `. The account stays the same, code updates.
#### Which language should I choose?
We **strongly recommend [Rust](https://www.rust-lang.org/)** for production apps — it provides the most mature tooling, best performance, and strongest safety guarantees when handling real assets on-chain. If you are prototyping or learning, you can use **JavaScript**, **Python**, or **Go**.
#### How do I test without deploying?
All languages support sandbox testing (shown in this guide). Tests run locally with a simulated NEAR environment.
***
## Moving Forward
Check the auction frontend tutorial to learn how to build a simple web app that interacts with the auction contract
Follow the auction NFT tutorial to award the highest bidder a Non-Fungible Token (NFT) and allow users to bid using Fungible Tokens (FT)
Check our Anatomy of a Contract page to understand the different components that make up a NEAR smart contract
*Creating a project using `npx create-near-app@latest`*
When prompted to choose a template, select the basic `Auction` template to scaffold the auction contract
Python quickstart tutorial is coming soon!
In the meantime, please check out the [hello-near](https://github.com/near-examples/hello-near-examples/tree/main/contract-py) example.
```bash theme={"theme":{"light":"github-light","dark":"github-dark"}}
near-go create --project-name auction --module-name auction --project-type smart-contract-empty
```
*Creating a project using `near-go create`*
This will generate a project with the following structure:
```bash theme={"theme":{"light":"github-light","dark":"github-dark"}}
auction/
└── contract/
├── go.mod # Go module definition with near-sdk-go dependency
├── go.sum
└── main.go # Main contract file — replace this with the auction contract below
```
```bash theme={"theme":{"light":"github-light","dark":"github-dark"}}
cd auction/contract
```
Replace the contents of `main.go` with the auction contract code shown in the sections below.
For this tutorial we chose to name the project `auction`, but feel free to use any name you prefer
***
## Anatomy of the Contract
The auction smart contract allows users to place bids, track the highest bidder and claim tokens at the end of the auction.
Let's take a look at the different components of the contract and how they work together to implement this functionality.
### Contract State & Initialization
The contract stores the highest bid, auction end time, auctioneer address, and a flag to track if proceeds have been claimed. In order to set these parameters, an `init` function is provided, which must be called first to initialize the contract state.
### Placing Bids
In order to place a bid, users will need to call the `bid` function while attaching a deposit representing their bid amount.
The `bid` function will then validate that the auction is ongoing, if the user bid a higher amount than the one stored, it will record the new bid and refund the previous bidder.
### Claiming Proceeds
Once the auction ends, any user can call `claim` to transfer the winning bid to the auctioneer:
### View Methods
At all times, users can query the current state of the auction by calling its view methods (`get_highest_bid`, `get_auction_end_time`, `get_auctioneer`, `get_claimed`):
***
## Test the Contract
Lets make sure the contract is working as expected by running its tests. Simply run the `test` command, the contract will then be compiled and deployed to a local sandbox for testing:
```bash theme={"theme":{"light":"github-light","dark":"github-dark"}}
cargo test
```
```bash theme={"theme":{"light":"github-light","dark":"github-dark"}}
npm run test
```
Make sure that you are using `node v24 / 22 / 20`, and that you have installed `Rosetta` if you have a Mac with Apple Silicon
```bash theme={"theme":{"light":"github-light","dark":"github-dark"}}
uv run pytest
```
```bash theme={"theme":{"light":"github-light","dark":"github-dark"}}
near-go test project
```
Feel free to check the test files to see how they interact with the contract. In short, a local NEAR sandbox is created, the contract is deployed, and different methods are called to verify the expected behavior.
***
## Build & Deploy the Contract
Now that we know the tests are passing, let us deploy the contract! First, we need to compile it into WebAssembly:
```bash theme={"theme":{"light":"github-light","dark":"github-dark"}}
cargo near build non-reproducible-wasm
```
```bash theme={"theme":{"light":"github-light","dark":"github-dark"}}
npm run build
```
```bash theme={"theme":{"light":"github-light","dark":"github-dark"}}
# Build with nearc through the uv executor (no installation needed)
uvx nearc contract.py
```
The above command will compile your Python contract into WebAssembly (WASM) that can be deployed to the NEAR blockchain.
The default `nearc` build configuration is appropriate for most contracts. You don't need to install nearc separately as we're using `uvx` to run it directly.
This step requires [Emscripten](https://emscripten.org/) to be installed and accessible in your `PATH`. If you encounter errors during compilation, verify that Emscripten is properly installed with `emcc --version`.
Common compilation errors and solutions:
* `emcc: command not found` - Emscripten is not in your PATH. Run `source /path/to/emsdk/emsdk_env.sh` to add it temporarily.
* `error: invalid version of emscripten` - Your Emscripten version might be too old. Try updating with `./emsdk install latest && ./emsdk activate latest`.
* `Could not find platform micropython-dev-wasm32` - This typically means the Emscripten installation is incomplete or not properly activated.
```bash theme={"theme":{"light":"github-light","dark":"github-dark"}}
near-go build
```
**Near Go SDK Build Process**
1. All code from the main package, including imports from other modules, is combined into a single **generated\_build.go** file.
2. The **generated\_build.go** file is compiled into `wasm32-unknown-unknown` via **TinyGo**.
**Customizing the Build**
The default `near-go build` command works for most standard projects, compiling source code from the current directory into `main.wasm`.
However, if you want to specify a custom output name or **inspect the intermediate glue code** (generated JSON serialization and SDK integration wrappers) for debugging purposes, you can use the available flags:
```bash theme={"theme":{"light":"github-light","dark":"github-dark"}}
near-go build --output my_contract.wasm --keep-generated
```
### Create an Account
Let us now create a NEAR account where we will deploy the contract:
```bash theme={"theme":{"light":"github-light","dark":"github-dark"}}
# Replace with a name for your contract account
near create-account --useFaucet
```
**Already have a testnet account?**
If you already have a `testnet` account and would like to use it instead, you can log in with the command `near login`.
When working on `WSL` - or any other headless Linux environment - you might encounter issues when trying to create an account as the `cli` tries to save the keys into the system's keychain.
In such cases, you can try the following command to create the account:
```bash theme={"theme":{"light":"github-light","dark":"github-dark"}}
near account create-account sponsor-by-faucet-service autogenerate-new-keypair save-to-legacy-keychain network-config testnet create
```
### Deploy it!
With the contract ready, we can now deploy it to the `testnet` account we created earlier:
```bash theme={"theme":{"light":"github-light","dark":"github-dark"}}
near deploy ./target/near/auction.wasm
```
```bash theme={"theme":{"light":"github-light","dark":"github-dark"}}
near deploy ./build/auction.wasm
```
```bash theme={"theme":{"light":"github-light","dark":"github-dark"}}
near deploy ./auction.wasm
```
```bash theme={"theme":{"light":"github-light","dark":"github-dark"}}
near deploy ./main.wasm
```
**Congrats!** Your contract now lives in the NEAR testnet network.
***
## Interacting with the Contract
To interact with your deployed smart contract, you can call its functions through the command line.
#### Initialize the Contract
Let us initialize the auction by setting when it ends and who receives the funds (the auctioneer):
```bash theme={"theme":{"light":"github-light","dark":"github-dark"}}
# Get a timestamp for 5 minutes from now (in nanoseconds)
FIVE_MINUTES_FROM_NOW=$(( $(date +%s%N) + 5 * 60 * 1000000000 ))
# Initialize the auction
near call init "{\"end_time\": \"$FIVE_MINUTES_FROM_NOW\", \"auctioneer\": \"influencer.testnet\"}" --useAccount
```
Feel free to replace `influencer.testnet` with any valid testnet account — this is where the winning bid will be sent
#### Place a Bid
We can now place a bid in the auction by calling the `bid` method while attaching some NEAR deposit. On each bid, the highest bid and bidder information will be recorded in the contract's [storage](./anatomy/storage).
```bash theme={"theme":{"light":"github-light","dark":"github-dark"}}
# Create a new account to place the bid
near create-account --useFaucet
# Place a bid of 0.01 NEAR
near call bid '{}' --deposit 0.01 --useAccount
```
Note how in this case we are using the `` account (remember to rename it!) to call the `bid` function, while attaching a deposit of `0.01` NEAR as our bid
#### Get Highest Bid
The `get_highest_bid` function only reads from the contract state, so it does not require a transaction or signature:
```bash theme={"theme":{"light":"github-light","dark":"github-dark"}}
near view get_highest_bid '{}'
```
```json theme={"theme":{"light":"github-light","dark":"github-dark"}}
{
"bidder": "",
"amount": "10000000000000000000000"
}
```
Feel free to create as many bidder accounts as you want and place more bids to see how the highest bid changes!
#### Claim
After the auction ends, anyone can call the `claim` method, which will transfer the `highest bid` amount to the auctioneer and end the auction.
```bash theme={"theme":{"light":"github-light","dark":"github-dark"}}
near call claim '{}' --useAccount
```
**Who won?**
After the auction ends, the highest bidder can be determined by simply calling the `get_highest_bid` method again
***
## Common Questions
#### What about mainnet?
You can deploy a contract to mainnet using the same commands, just make sure to create a mainnet account and use `--networkId mainnet` flag in the `near` CLI commands.
#### How much does it cost to deploy?
The cost of deploying a contract depends on the contract's size, approximately 1Ⓝ \~100Kb.
#### Can I update a contract after deploying?
Yes. Redeploy with `near deploy `. The account stays the same, code updates.
#### Which language should I choose?
We **strongly recommend [Rust](https://www.rust-lang.org/)** for production apps — it provides the most mature tooling, best performance, and strongest safety guarantees when handling real assets on-chain. If you are prototyping or learning, you can use **JavaScript**, **Python**, or **Go**.
#### How do I test without deploying?
All languages support sandbox testing (shown in this guide). Tests run locally with a simulated NEAR environment.
***
## Moving Forward
Check the auction frontend tutorial to learn how to build a simple web app that interacts with the auction contract
Follow the auction NFT tutorial to award the highest bidder a Non-Fungible Token (NFT) and allow users to bid using Fungible Tokens (FT)
Check our Anatomy of a Contract page to understand the different components that make up a NEAR smart contract
At the time of this writing, this example works with the following versions:
* node: `22.18.0`
* rustc: `1.86.0`
* near-cli-rs: `0.22.0`
* cargo-near: `0.16.1`
* Python: `3.13`
* near-sdk-py: `0.7.3`
* uvx nearc: `0.9.2`
* emscripten: `4.0.9` (required for Python contracts)
* Go: `1.25.4`
* near-go (near-cli-go): `v0.1.1`
* near-sdk-go: `v0.1.1`