Việc Upgrade một Contract
Trong hướng dẫn này, bạn sẽ nâng cấp những gì bạn đã làm trước đây để implement chức năng mint trên một bộ khung smart contract. Bạn đã đến thời điểm mà NFT có thể được mint và wallet đã chính thức xác nhận là bạn sở hữu một NFT. Tuy nhiên, không có cách nào để hiển thị các token vì contract của bạn không implement method mà wallet đang cố gắng call.
Giới thiệu
Hôm nay, bạn sẽ tìm hiểu về cách deploy các bản sửa lỗi cho các smart contract và bạn sẽ sử dụng kiến thức đó để implement function nft_tokens_for_owner trên contract mà bạn đã deploy trong hướng dẫn trước.
Tổng quan về việc nâng cấp các contract
Khi được thực hiện đúng, việc nâng cấp các contract có thể là một công cụ vô cùng mạnh mẽ. Nếu làm sai, bạn có thể sẽ gặp phải rất nhiều phiền toái. Bạn cần phải phân biệt được code và state của một smart contract. Khi một contract được deploy trên một contract có sẵn, điều duy nhất thay đổi là code. State sẽ vẫn như cũ và từ đó mà rất nhiều vấn đề gây đau đầu cho developer xuất hiện.
NEAR Runtime sẽ đọc serialized state từ disk và sẽ cố gắng load nó bằng cách sử dụng code của contract hiện tại. Khi code của bạn thay đổi, nó có thể không tìm được cách để thực hiện việc này.
Bạn cần nâng cấp các contract của mình một cách chiến lược và đảm bảo rằng runtime sẽ có thể đọc state hiện tại của bạn bằng code mới của contract. For more information about upgrading contracts and some best practices, see the NEAR SDK's upgrading contracts write-up.
Các sửa đổi đến contract của chúng ta
Để wallet hiển thị đúng các NFT của bạn, bạn cần phải implement method nft_tokens_for_owner. Việc này sẽ cho phép bất cứ ai có thể truy vấn danh sách các NFT của một account ID cụ thể được phân trang.
Để thực hiện điều này, hãy chia nó thành một số nhiệm vụ con nhỏ hơn. Trước tiên, bạn cần có quyền truy cập vào danh sách tất cả các token ID do người dùng sở hữu. Thông tin này có thể được tìm thấy trong data structure tokens_per_owner. Bây giờ bạn đã có một tập hợp các token ID, bạn cần convert chúng thành các object JsonToken vì đó là những gì bạn sẽ trả về từ function.
May mắn thay, bạn đã viết function nft_token, nơi mà nhận một token ID và trả về một JsonToken trong file nft_core.rs. Như bạn có thể đoán, để có được danh sách các object JsonToken, bạn cần phải lặp qua các token ID do người dùng sở hữu và sau đó convert từng token ID thành một JsonToken và lưu nó vào một list.
Đối với phân trang, Rust có một số function tuyệt vời để bỏ qua starting index và lấy n element đầu tiên của một iterator.
Let's move over to the enumeration.rs file and implement that logic:
loading...
Deploying lại một contract
Now that you've implemented the necessary logic for nft_tokens_for_owner, it's time to build and re-deploy the contract to your account. Using the build script, deploy the contract as you did in the previous tutorial:
yarn build && near deploy $NFT_CONTRACT_ID out/main.wasm
This should output a warning saying that the account has a deployed contract and will ask if you'd like to proceed. Simply type y and hit enter.
This account already has a deployed contract [ AKJK7sCysrWrFZ976YVBnm6yzmJuKLzdAyssfzK9yLsa ]. Do you want to proceed? (y/n)
Once the contract has been redeployed, let's test and see if the state migrated correctly by running a simple view function:
near view $NFT_CONTRACT_ID nft_metadata
This should return an output similar to the following:
{
  spec: 'nft-1.0.0',
  name: 'NFT Tutorial Contract',
  symbol: 'GOTEAM',
  icon: null,
  base_uri: null,
  reference: null,
  reference_hash: null
}
Go team! At this point, you can now test and see if the new function you wrote works correctly. Let's query for the list of tokens that you own:
near view $NFT_CONTRACT_ID nft_tokens_for_owner '{"account_id": "'$NFT_CONTRACT_ID'", "limit": 5}'
Example response:
[
  {
    token_id: 'token-1',
    owner_id: 'goteam.examples.testnet',
    metadata: {
      title: 'My Non Fungible Team Token',
      description: 'The Team Most Certainly Goes :)',
      media: 'https://bafybeiftczwrtyr3k7a2k4vutd3amkwsmaqyhrdzlhvpt33dyjivufqusq.ipfs.dweb.link/goteam-gif.gif',
      media_hash: null,
      copies: null,
      issued_at: null,
      expires_at: null,
      starts_at: null,
      updated_at: null,
      extra: null,
      reference: null,
      reference_hash: null
    }
  }
]
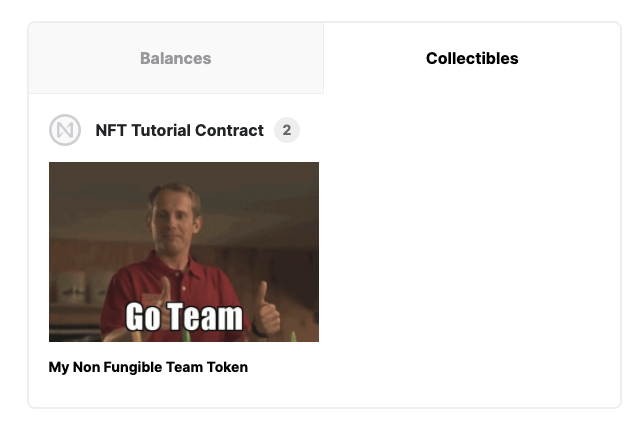
Xem các NFT trong wallet
Now that your contract implements the necessary functions that the wallet uses to display NFTs, you should be able to see your tokens on display in the collectibles tab.
Kết luận
In this tutorial, you learned about the basics of upgrading contracts. Then, you implemented the necessary modifications to your smart contract and redeployed it. Finally you navigated to the wallet collectibles tab and viewed your NFTs.
In the next tutorial, you'll implement the remaining functions needed to complete the enumeration standard.
At the time of this writing, this example works with the following versions:
- near-cli:
4.0.4 - NFT standard: NEP171, version
1.1.0