> ## Documentation Index
> Fetch the complete documentation index at: https://docs.near.org/llms.txt
> Use this file to discover all available pages before exploring further.
# Run Your Own Localnet
> Learn how to run a localnet on NEAR.
Now that we understand what a localnet is, let's walk through the complete workflow of running it and testing it with a simple smart contract and a frontend application.
For this tutorial, we'll use `near-sandbox`, since it's the easiest and fastest option to start with. Our goal for this tutorial is to set up a local network, create a wallet account on it, deploy a contract, and finally run [a frontend application](https://github.com/near-examples/hello-localnet) that interacts with this contract directly through the local blockchain.
Also check the [localnet tutorial](https://github.com/near/mpc/blob/main/docs/localnet/localnet.md) by the NEAR MPC team
### Prerequisites
Before we begin, make sure you have a few essential tools installed.
* [near-cli-rs](https://github.com/near/near-cli-rs) - the CLI for interacting with the NEAR blockchain;
* [cargo-near](https://github.com/near/cargo-near) - the CLI that simplifies building/deploying Rust smart contracts.
### Walkthrough
#### Step 1. Setup and boot up sandbox node
First, run the following command:
```sh theme={"theme":{"light":"github-light","dark":"github-dark"}}
npx near-sandbox --home /tmp/near-sandbox init
```
This command prepares a fresh configuration inside the home folder, which is `/tmp/near-sandbox` in the command above. Once it's finished, you'll find several files created in that directory:
* `config.json` - main node configuration, defining network ports, storage paths, runtime settings, etc
* `genesis.json` - defines the initial blockchain state, including default account `near` and the validator account (by default, it's `test.near`)
* `validator_key.json` - validator's keypair used to produce blocks
* `node_key.json` - keypair used for signing network packets
This initialization process is a one-time setup. Once the configuration is in place, you can start and stop the node as many times as you like, the blockchain state will persist inside this folder.
After initialization, start the node:
```sh theme={"theme":{"light":"github-light","dark":"github-dark"}}
npx near-sandbox --home /tmp/near-sandbox run
```
The node will boot up and begin producing blocks locally.
To confirm that your node is actually running, you can query its `status` RPC endpoint with the following command `curl http://127.0.0.1:3030/status`.
#### Step 2. Import `test.near` account
In this step, we'll import the default `test.near` account that was created during `near-sandbox` initialization. We'll need this account later to deploy our smart contract, so let's prepare it now.
First, make sure your `near-cli-rs` knows how to connect to your local network. If you already have a `localnet` configuration, you can skip this step. Otherwise, you have two options:
```sh theme={"theme":{"light":"github-light","dark":"github-dark"}}
near config add-connection --network-name localnet --connection-name localnet-sandbox --rpc-url http://localhost:3030/ --wallet-url http://localhost/ --explorer-transaction-url http://localhost/
```
The CLI will ask 8 questions. Answer as follows for a basic localnet setup:
| Question | Answer |
| ------------------------------------------------------------ | --------------------------------------------- |
| Do you want to input an API key? | No, the RPC endpoint does not require API key |
| Is there a "linkdrop" program on this network? | I dont know |
| Do you want to enter the NEAR Social DB contract account ID? | No |
| Do you want to enter the faucet URL? | No |
| Do you want to enter the meta transaction relayer URL? | No |
| Do you want to enter the fastnear API url? | No |
| Do you want to enter the staking pools factory account ID? | No |
| Do you want to enter the coingecko API url? | No |
Open your `near-cli` config file (located at `~/.config/near-cli/config.toml` on Linux, `~/Library/Application Support/near-cli/config.toml` on macOS) and append the following block:
```toml theme={"theme":{"light":"github-light","dark":"github-dark"}}
[network_connection.localnet-sandbox]
network_name = "localnet"
rpc_url = "http://localhost:3030/"
wallet_url = "http://localhost/"
explorer_transaction_url = "http://localhost/"
```
This is equivalent to running the CLI command above and is useful in non-interactive environments (CI, scripts, containers).
The `wallet_url` and `explorer_transaction_url` are set to placeholder values since no local wallet or explorer is running. For a full description of all available connection fields and when each one is needed, see the [Localnet configuration values](/tools/cli#localnet-configuration-values) section in the CLI reference.
To confirm that the connection was set up correctly, you can view information about the `test.near` account with the following command `near account view-account-summary test.near network-config localnet-sandbox now`.
When you initialized the `near-sandbox`, it created a file named `validator_key.json` inside the home directory. This file contains the secret key for the `test.near` account, which we'll need to import into `near-cli-rs`.
To view the key, run:
```sh theme={"theme":{"light":"github-light","dark":"github-dark"}}
cat /tmp/near-sandbox/validator_key.json
```
You'll see output similar to this:
```json theme={"theme":{"light":"github-light","dark":"github-dark"}}
{
"account_id": "test.near",
"public_key": "ed25519:...",
"secret_key": "ed25519:..."
}
```
Copy the `secret_key` value and import it into `near-cli-rs` by running the following command (replace `` with the actual key):
```sh theme={"theme":{"light":"github-light","dark":"github-dark"}}
near account import-account using-private-key network-config localnet-sandbox
```
When you run the command above, you'll be prompted to enter the account ID. Type `test.near` and press Enter. You'll then be asked to choose a keychain for storing the credentials, select `Legacy Keychain`, as it stores the keys directly in the file system, which is the simplest and the most convenient option for `localnet`.
#### Step 3. Deploy the smart contract
In this step, we'll deploy a simple [Hello World smart contract](https://github.com/near-examples/hello-near-examples) to our `localnet`.
Before deploying, we need to create an accont to which a contract will be deployed. Since we've already imported the `test.near` account, we can use it as the parent account to create a new subaccount:
```sh theme={"theme":{"light":"github-light","dark":"github-dark"}}
near account create-account fund-myself hello-world.test.near '10 NEAR' autogenerate-new-keypair save-to-legacy-keychain sign-as test.near network-config localnet-sandbox sign-with-legacy-keychain send
```
This command creates a new account named `hello-world.test.near` with an initial balance of 10 NEAR.
Next, clone the Hello World repository and navigate to the contract directory:
```sh theme={"theme":{"light":"github-light","dark":"github-dark"}}
git clone git@github.com:near-examples/hello-near-examples.git
cd hello-near-examples/contract-rs
```
Once you're inside the repository, run the following command:
```sh theme={"theme":{"light":"github-light","dark":"github-dark"}}
cargo near deploy build-non-reproducible-wasm hello-world.test.near without-init-call network-config localnet-sandbox sign-with-legacy-keychain send
```
This command compiles the smart contract, optimizes the resulting `.wasm` file, and deploys it directly to the `hello-world.test.near` account on `localnet`.
To verify that the contract was deployed successfully, you can inspect the code of the `hello-world.test.near` account with the following command `near contract inspect hello-world.test.near network-config localnet-sandbox now`. If the deployment worked, you'll see a list of the contract's methods printed in the output, like `get_greeting` and `set_greeting`.
#### Step 4. Create user's wallet account
In this step, we'll create a user account inside a wallet that can connect to our `localnet`. This is important because frontend applications typically interact with contracts through a wallet connection. Not every NEAR wallet supports `localnet` connections, but for this tutorial, we'll use Intear Wallet, which is fully compatible.\\
Navigate to [https://wallet.intear.tech](https://wallet.intear.tech). If you don't have an account yet, create one or import any existing account. It doesn't matter which one, this step is just to get you inside the wallet interface.
Once you're in the wallet, open the `Settings` panel from the sidebar, then find the `Developer` tab. You'll see a `Localnet` subsection where you can add your own local network configuration. Click `Add`, and fill in the fields as follows: set the RPC URL to `http://127.0.0.1:3030` and the Network ID to `localnet`. Then click `Save`.
If everything is configured correctly, you should see a small, green `Online` badge appear next to the new network indicating that it's connected. Here's how it should look like:
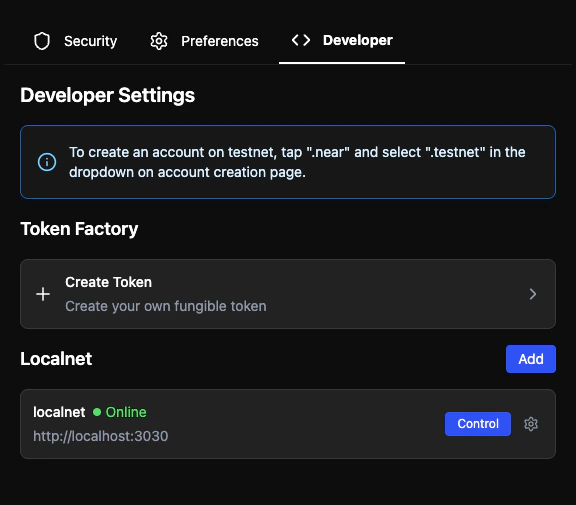 Next, click the `Control` button on the right side of the `localnet` entry. Find the `Create New Account section`, type a name for your new account (in our case, it's `user.local`) and click `Create`.
Once the request goes through, the new account will appear in your wallet. At this point, you have a valid account on your `localnet` that can sign transactions through Intear Wallet.
#### Step 5. Spin up and interact with frontend application
Start by cloning the repository:
```sh theme={"theme":{"light":"github-light","dark":"github-dark"}}
git clone https://github.com/near-examples/hello-localnet
cd hello-localnet
```
Once you're inside the repository, install the dependencies using `pnpm`:
```sh theme={"theme":{"light":"github-light","dark":"github-dark"}}
pnpm install --frozen-lockfile
```
Then, start the development Next.js server:
```sh theme={"theme":{"light":"github-light","dark":"github-dark"}}
pnpm dev
```
Navigate to [http://localhost:3000/hello-near](http://localhost:3000/hello-near), and at the top-right corner, click `Login`. When prompted to select a wallet, choose `Intear Wallet`, Web version. And make sure you connect using the account created earlier, in our case, it's `user.local.`
Once connected, you'll see an input field and a button to update the greeting. Type any new greeting into the input and click `Save`. You'll be redirected to the wallet to approve a transaction. Once approved, the transaction will be sent and executed on `localnet` node.
Return to the frontend and notice that the greeting has changed.
***
You've now gone through the entire process of setting up a local NEAR environment — from running the Sandbox and deploying a contract to connecting a wallet and interacting with it through a frontend. With this setup, you can experiment freely, test your contracts safely, and build end-to-end decentralized applications without touching mainnet or testnet.
Next, click the `Control` button on the right side of the `localnet` entry. Find the `Create New Account section`, type a name for your new account (in our case, it's `user.local`) and click `Create`.
Once the request goes through, the new account will appear in your wallet. At this point, you have a valid account on your `localnet` that can sign transactions through Intear Wallet.
#### Step 5. Spin up and interact with frontend application
Start by cloning the repository:
```sh theme={"theme":{"light":"github-light","dark":"github-dark"}}
git clone https://github.com/near-examples/hello-localnet
cd hello-localnet
```
Once you're inside the repository, install the dependencies using `pnpm`:
```sh theme={"theme":{"light":"github-light","dark":"github-dark"}}
pnpm install --frozen-lockfile
```
Then, start the development Next.js server:
```sh theme={"theme":{"light":"github-light","dark":"github-dark"}}
pnpm dev
```
Navigate to [http://localhost:3000/hello-near](http://localhost:3000/hello-near), and at the top-right corner, click `Login`. When prompted to select a wallet, choose `Intear Wallet`, Web version. And make sure you connect using the account created earlier, in our case, it's `user.local.`
Once connected, you'll see an input field and a button to update the greeting. Type any new greeting into the input and click `Save`. You'll be redirected to the wallet to approve a transaction. Once approved, the transaction will be sent and executed on `localnet` node.
Return to the frontend and notice that the greeting has changed.
***
You've now gone through the entire process of setting up a local NEAR environment — from running the Sandbox and deploying a contract to connecting a wallet and interacting with it through a frontend. With this setup, you can experiment freely, test your contracts safely, and build end-to-end decentralized applications without touching mainnet or testnet.