Your First Smart Contract
Welcome! NEAR accounts can store small apps known as smart contracts. In this quick tutorial, we will guide you in creating your first contract on the NEAR testnet!
Join us in creating a friendly auction contract, which allows users to place bids, track the highest bidder and claim tokens at the end of the auction.
In this tutorial we provide instructions to create contracts in multiple languages.
We recommend using Rust for production apps due to its mature tooling. However, if you are just prototyping or learning, feel free to use JavaScript, Python, or Go!
Prefer an online IDE?
Want to jump right into the code without setting up a local dev environment?
Check out NEAR Playground for an easy-to-use online IDE with pre-configured templates.
Prerequisites
Before starting, make sure to set up your development environment.
Working on Windows?
See our blog post getting started on NEAR using Windows for a step-by-step guide on how to set up WSL and your environment
- 🦀 Rust
- 🌐 JavaScript
- 🐍 Python
- 🐹 GO
# Install Rust: https://www.rust-lang.org/tools/install
curl --proto '=https' --tlsv1.2 -sSf https://sh.rustup.rs | sh

# Contracts will be compiled to wasm, so we need to add the wasm target
rustup target add wasm32-unknown-unknown

# Install NEAR CLI-RS to deploy and interact with the contract
curl --proto '=https' --tlsv1.2 -LsSf https://github.com/near/near-cli-rs/releases/latest/download/near-cli-rs-installer.sh | sh

# Install cargo near to help building the contract
curl --proto '=https' --tlsv1.2 -LsSf https://github.com/near/cargo-near/releases/latest/download/cargo-near-installer.sh | sh
# Install Node.js using nvm (more options in: https://nodejs.org/en/download)
curl -o- https://raw.githubusercontent.com/nvm-sh/nvm/v0.39.7/install.sh | bash
nvm install latest

# ⚠️ For Mac Silicon users only, Rosetta is needed to compile contracts
# /usr/sbin/softwareupdate --install-rosetta --agree-to-license

# Install NEAR CLI to deploy and interact with the contract
npm install -g near-cli-rs@latest
# Install Python (if not already installed)
# Use your system's package manager or download from https://www.python.org/downloads/

# Install Emscripten (required for compiling Python contracts to WebAssembly)
# For Linux/macOS:
git clone https://github.com/emscripten-core/emsdk.git
cd emsdk
./emsdk install latest
./emsdk activate latest
source ./emsdk_env.sh
# Add to your .bashrc or .zshrc for permanent installation:
# echo 'source "/path/to/emsdk/emsdk_env.sh"' >> ~/.bashrc
cd ..

# For Windows:
# Download and extract: https://github.com/emscripten-core/emsdk
# Then in Command Prompt:
# cd emsdk
# emsdk install latest
# emsdk activate latest
# emsdk_env.bat

# Verify installation with:
emcc --version

# Install uv for Python package management
curl -LsSf https://astral.sh/uv/install.sh | sh

# Install NEAR CLI-RS to deploy and interact with the contract
curl --proto '=https' --tlsv1.2 -LsSf https://github.com/near/near-cli-rs/releases/latest/download/near-cli-rs-installer.sh | sh
#For Linux arm/x64
sudo apt update && sudo apt upgrade -y
sudo apt install -y build-essential curl wget git libssl-dev pkg-config checkinstall
sudo apt install bison

#For Mac
xcode-select --install
brew update
brew install mercurial
brew install binaryen

bash < <(curl -s -S -L https://raw.githubusercontent.com/moovweb/gvm/master/binscripts/gvm-installer)
gvm install go1.25.4 -B
gvm use go1.25.4 --default

curl -LO https://github.com/vlmoon99/near-cli-go/releases/latest/download/install.sh && bash install.sh
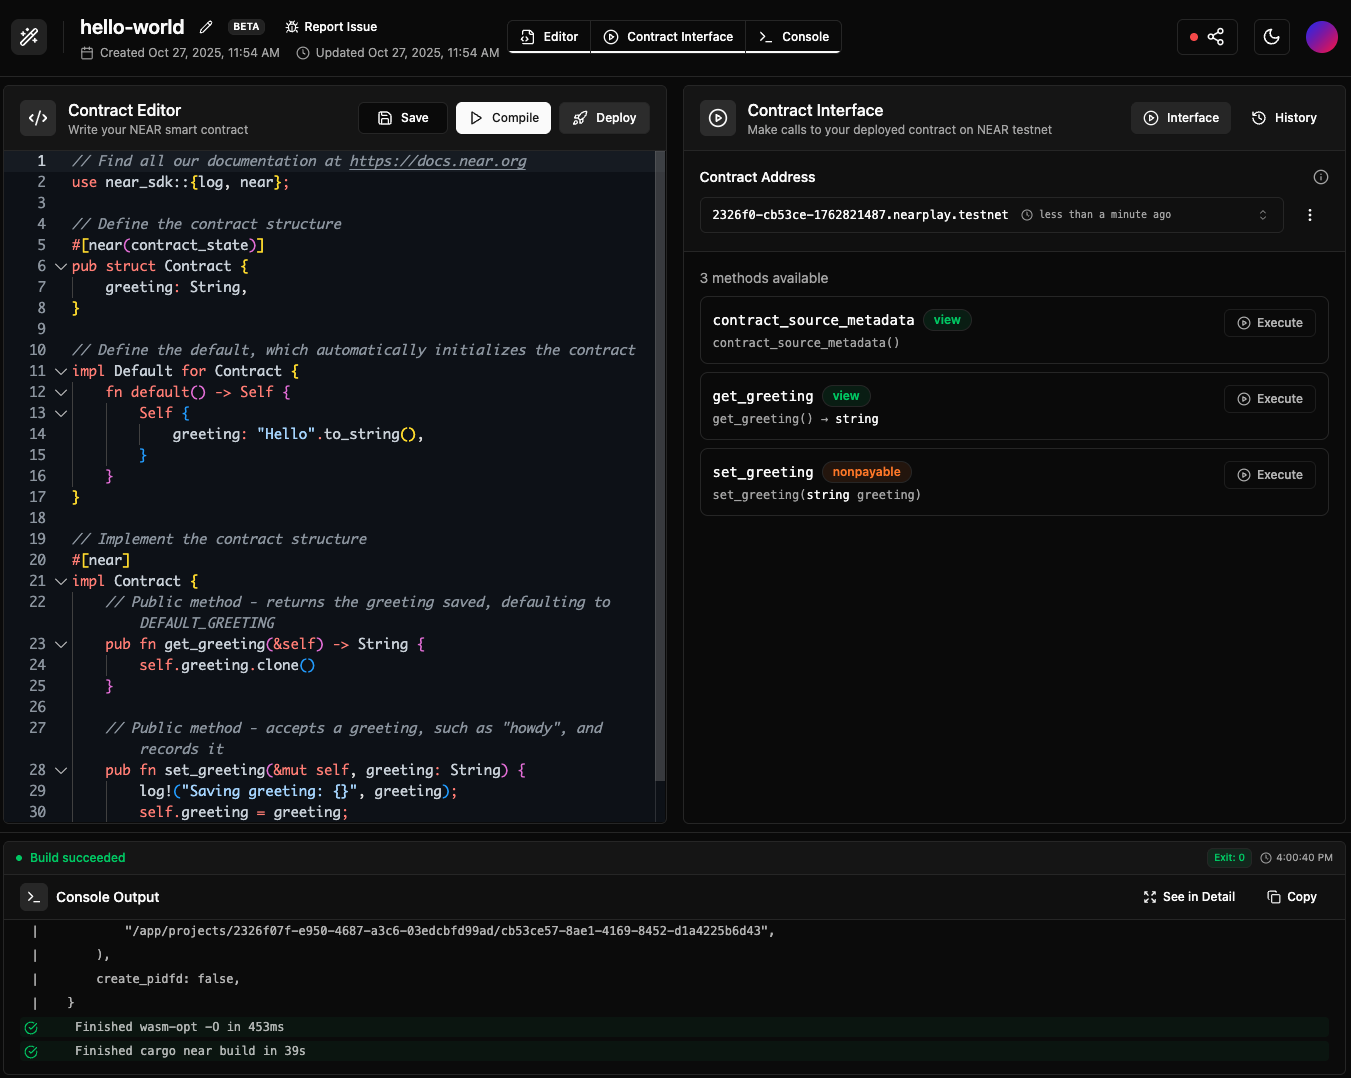
Creating the Contract
Create a smart contract by using one of the scaffolding tools and following their instructions:
- 🦀 Rust
- 🌐 JavaScript
- 🐍 Python
cargo near
 Creating a project using
 cargo near new
npx create-near-app@latest
 Creating a project using
 npx create-near-app@latest
When prompted to choose a template, select the basic Auction template to scaffold the auction contract
Python quickstart tutorial is coming soon!
In the meantime, please check out the hello-near example.
For this tutorial we chose to name the project auction, but feel free to use any name you prefer
Anatomy of the Contract
The auction smart contract allows users to place bids, track the highest bidder and claim tokens at the end of the auction.
Let's take a look at the different components of the contract and how they work together to implement this functionality.
Contract State & Initialization
The contract stores the highest bid, auction end time, auctioneer address, and a flag to track if proceeds have been claimed. In order to set these parameters, an init function is provided, which must be called first to initialize the contract state.
- 🦀 Rust
- 🌐 JavaScript
- 🐍 Python
Loading...
Loading...
Loading...
Placing Bids
In order to place a bid, users will need to call the bid function while attaching a deposit representing their bid amount.
The bid function will then validate that the auction is ongoing, if the user bid a higher amount than the one stored, it will record the new bid and refund the previous bidder.
- 🦀 Rust
- 🌐 JavaScript
- 🐍 Python
Loading...
Loading...
Loading...
Claiming Proceeds
Once the auction ends, any user can call claim to transfer the winning bid to the auctioneer:
- 🦀 Rust
- 🌐 JavaScript
- 🐍 Python
Loading...
Loading...
Loading...
View Methods
At all times, users can query the current state of the auction by calling its view methods (get_highest_bid, get_auction_end_time, get_auctioneer, get_claimed):
- 🦀 Rust
- 🌐 JavaScript
- 🐍 Python
Loading...
Loading...
Loading...
Test the Contract
Lets make sure the contract is working as expected by running its tests. Simply run the test command, the contract will then be compiled and deployed to a local sandbox for testing:
- 🦀 Rust
- 🌐 JavaScript
- 🐍 Python
cargo test
npm run test
Failing tests?
Make sure that you are using node v24 / 22 / 20, and that you have installed Rosetta if you have a Mac with Apple Silicon
uv run pytest
Feel free to check the test files to see how they interact with the contract. In short, a local NEAR sandbox is created, the contract is deployed, and different methods are called to verify the expected behavior.
Build & Deploy the Contract
Now that we know the tests are passing, let us deploy the contract! First, we need to compile it into WebAssembly:
- 🦀 Rust
- 🌐 JavaScript
- 🐍 Python
- 🐹 GO
cargo near build non-reproducible-wasm
npm run build
# Build with nearc through the uv executor (no installation needed)
uvx nearc contract.py
The above command will compile your Python contract into WebAssembly (WASM) that can be deployed to the NEAR blockchain.
The default nearc build configuration is appropriate for most contracts. You don't need to install nearc separately as we're using uvx to run it directly.
This step requires Emscripten to be installed and accessible in your PATH. If you encounter errors during compilation, verify that Emscripten is properly installed with emcc --version.
Common compilation errors and solutions:
emcc: command not found- Emscripten is not in your PATH. Runsource /path/to/emsdk/emsdk_env.shto add it temporarily.error: invalid version of emscripten- Your Emscripten version might be too old. Try updating with./emsdk install latest && ./emsdk activate latest.Could not find platform micropython-dev-wasm32- This typically means the Emscripten installation is incomplete or not properly activated.
near-go build
- All code from the main package, including imports from other modules, is combined into a single generated_build.go file.
- The generated_build.go file is compiled into
wasm32-unknown-unknownvia TinyGo.
The default near-go build command works for most standard projects, compiling source code from the current directory into main.wasm.
However, if you want to specify a custom output name or inspect the intermediate glue code (generated JSON serialization and SDK integration wrappers) for debugging purposes, you can use the available flags:
near-go build --output my_contract.wasm --keep-generated
Create an Account
Let us now create a NEAR account where we will deploy the contract:
# Replace <contract-acc.testnet> with a name for your contract account
near create-account <contract-acc.testnet> --useFaucet
If you already have a testnet account and would like to use it instead, you can log in with the command near login.
Got an error on Windows?
When working on WSL - or any other headless Linux environment - you might encounter issues when trying to create an account as the cli tries to save the keys into the system's keychain.
In such cases, you can try the following command to create the account:
near account create-account sponsor-by-faucet-service <your-account-id.testnet> autogenerate-new-keypair save-to-legacy-keychain network-config testnet create
Deploy it!
With the contract ready, we can now deploy it to the testnet account we created earlier:
- 🦀 Rust
- 🌐 JavaScript
- 🐍 Python
near deploy <contract-acc.testnet> ./target/near/auction.wasm
near deploy <contract-acc.testnet> ./build/auction.wasm
near deploy <created-account> ./auction.wasm
Congrats! Your contract now lives in the NEAR testnet network.
Interacting with the Contract
To interact with your deployed smart contract, you can call its functions through the command line.
Initialize the Contract
Let us initialize the auction by setting when it ends and who receives the funds (the auctioneer):
# Get a timestamp for 5 minutes from now (in nanoseconds)
FIVE_MINUTES_FROM_NOW=$(( $(date +%s%N) + 5 * 60 * 1000000000 ))

# Initialize the auction
near call <contract-acc.testnet> init "{\"end_time\": \"$FIVE_MINUTES_FROM_NOW\", \"auctioneer\": \"influencer.testnet\"}" --useAccount <contract-acc.testnet>
Feel free to replace influencer.testnet with any valid testnet account — this is where the winning bid will be sent
Place a Bid
We can now place a bid in the auction by calling the bid method while attaching some NEAR deposit. On each bid, the highest bid and bidder information will be recorded in the contract's storage.
# Create a new account to place the bid
near create-account <bidder-account.testnet> --useFaucet

# Place a bid of 0.01 NEAR
near call <contract-acc.testnet> bid '{}' --deposit 0.01  --useAccount <bidder-account.testnet>
Note how in this case we are using the <bidder-account.testnet> account (remember to rename it!) to call the bid function, while attaching a deposit of 0.01 NEAR as our bid
Get Highest Bid
The get_highest_bid function only reads from the contract state, so it does not require a transaction or signature:
near view <contract-acc.testnet> get_highest_bid '{}'
Expected Output
{
  "bidder": "<bidder-account.testnet>",
  "amount": "10000000000000000000000"
}
Feel free to create as many bidder accounts as you want and place more bids to see how the highest bid changes!
Claim
After the auction ends, anyone can call the claim method, which will transfer the highest bid amount to the auctioneer and end the auction.
near call <contract-acc.testnet> claim '{}' --useAccount <contract-acc.testnet>
After the auction ends, the highest bidder can be determined by simply calling the get_highest_bid method again
Common Questions
What about mainnet?
You can deploy a contract to mainnet using the same commands, just make sure to create a mainnet account and use --networkId mainnet flag in the near CLI commands.
How much does it cost to deploy?
The cost of deploying a contract depends on the contract's size, approximately 1Ⓝ ~100Kb.
Can I update a contract after deploying?
Yes. Redeploy with near deploy <account> <wasm-file>. The account stays the same, code updates.
Which language should I choose?
To build production apps prefer Rust, as it offers the most mature tooling and best performance. Otherwise, if you are just prototyping or learning, you can choose between your favorite language between JavaScript, Python or Go.
How do I test without deploying?
All languages support sandbox testing (shown in this guide). Tests run locally with a simulated NEAR environment.
Moving Forward
Create a Frontend
Check the auction frontend tutorial to learn how to build a simple web app that interacts with the auction contract
Extend the Contract
Follow the auction NFT tutorial to award the highest bidder a Non-Fungible Token (NFT) and allow users to bid using Fungible Tokens (FT)
Learn More about the SDK
Check our Anatomy of a Contract page to understand the different components that make up a NEAR smart contract
Versioning for this article
At the time of this writing, this example works with the following versions:
- node:
22.18.0 - rustc:
1.86.0 - near-cli-rs:
0.22.0 - cargo-near:
0.16.1 - Python:
3.13 - near-sdk-py:
0.7.3 - uvx nearc:
0.9.2 - emscripten:
4.0.9(required for Python contracts)