Creating a Circulating Supply
In the previous tutorial, you looked at what a fungible token was and how you could define one in your smart contract. In this tutorial, you'll learn how to create a circulating supply belonging to the contract owner and view all the tokens, with their metadata, in the NEAR wallet.
To get started, either work off the code you wrote in the previous tutorial or switch to the 2.define-a-token folder in our repo. If you haven't cloned the repository, refer to the Contract Architecture to start.
If you wish to see the finished code for this tutorial, you can find it in the 3.initial-supply folder.
Introduction
Every fungible token contract on NEAR has what's known as a circulating supply. This is the number of tokens that exist on the contract and are actively available to trade.
When creating your contract, there are many different ways you could implement this to start. A few examples could be:
- Specify a starting total supply and distribute it based on a set of parameters (Benji gets 20%, Josh gets 2.5%, and the rest goes to Mike).
- Have a first come first serve pool where everybody claims up to X amount of tokens.
- Create tokens on demand resulting in a steady increase of the circulating supply overtime up to a specified cap.
The simplest approach, however, is to specify a total supply when initializing the contract. The entire circulating supply is then created and sent to the owner of the contract. The owner would then be able to transfer or sell the tokens as they wish. Once the initial supply is created, no more FTs could be minted. This means that the circulating supply will always be equal to the total supply.
Modifications to contract
In order to implement this logic, you'll need to keep track of two things in your smart contract:
- A mapping of an account to the number of tokens they own.
- The total supply of tokens.
The mapping is so that you can easily check or modify the tokens owned by any given account at anytime within your contract. You'll also need to keep track of the total supply since it's required by the standard that you have a function to query for the supply of tokens on the contract.
Setting the supply
Head over to the src/lib.rs file and add the following code to the Contract struct.
Loading...
You'll now want to add the functionality for depositing the tokens into the owner's account. Do this by creating a helper function that takes an amount and an account ID and performs the deposit logic for you. First create a new file src/internal.rs such that your file structure now looks as follows.
src
  ├── ft_core.rs
  ├── internal.rs
  ├── lib.rs
  ├── metadata.rs
  └── storage.rs
In the internal.rs file, add the following code to create a function called internal_deposit which takes an AccountId and a NearToken as a balance and adds the amount to the account's current supply of FTs.
Loading...
Now that the functionality for depositing FTs is in place, switch back to the src/lib.rs file and add the internal module:
Loading...
In addition, add the following code to the new initialization function.
#[init]
pub fn new(
    owner_id: AccountId,
    total_supply: U128,
    metadata: FungibleTokenMetadata,
) -> Self {
    let casted_total_supply = NearToken::from_yoctonear(total_supply.0);
    // Create a variable of type Self with all the fields initialized.
    let mut this = Self {
        // Set the total supply
        total_supply: casted_total_supply,
        // Storage keys are simply the prefixes used for the collections. This helps avoid data collision
        accounts: LookupMap::new(StorageKey::Accounts),
        metadata: LazyOption::new(
            StorageKey::Metadata,
            Some(&metadata),
        ),
    };

    // Set the owner's balance to the total supply.
    this.internal_deposit(&owner_id, casted_total_supply);

    // Return the Contract object
    this
}
This will initialize the total supply to what you passed in and will call the internal_deposit function to add the total supply to the owner's account.
Getting the supply
Now that you've created a way to set the total supply, you'll also want a way to query for it as well as the balance for a specific user. The standard dictates that you should have two methods on your smart contract for doing these operations:
ft_total_supplyft_balance_of
Head on over to the src/ft_core.rs file and add the following code to these functions.
Loading...
At this point, you have everything you need to create an initial supply of tokens and query for the balance of a given account. There is, however, a problem that we need to solve. How will the wallet know that the total supply was created and is owned by the contract owner? How would it even know that our contract is a fungible token contract? If you were to deploy the contract and run through the setup process, you would be able to query for the information from the contract but you wouldn't see any FTs in the owner's NEAR wallet.
Events
Have you ever wondered how the wallet knows which FTs you own and how it can display them in the balances tab? Originally, an indexer used to listen for any function calls starting with ft_ on your account. These contracts were then flagged on your account as likely FT contracts.
When you navigated to your balances tab, the wallet would then query all those contracts for the number of FTs you owned using the ft_balance_of function you just wrote.
The problem
This method of flagging contracts was not reliable as each FT-driven application might have its own way of minting or transferring FTs. In addition, it's common for apps to transfer or mint many tokens at a time using batch functions.
The solution
A standard was introduced so that smart contracts could emit an event anytime FTs were transferred, minted, or burnt. This event was in the form of a log. No matter how a contract implemented the functionality, an indexer could now listen for those standardized logs.
As per the standard, you need to implement a logging functionality that gets fired when FTs are transferred or minted. In this case, the contract doesn't support burning so you don't need to worry about that for now.
It's important to note the standard dictates that the log should begin with "EVENT_JSON:". The structure of your log should, however, always contain the 3 following things:
- standard: the current name of the standard (e.g.
nep141) - version: the version of the standard you're using (e.g.
1.0.0) - event: a list of events you're emitting.
The event interface differs based on whether you're recording transfers or mints. The interface for both events is outlined below.
Transfer events:
- old_owner_id: the old owner of the FTs.
- new_owner_id: the new owner that the FTs are being transferred to.
- amount: the number of tokens transferred.
- Optional - memo: an optional message to include with the event.
Minting events:
- owner_id: the owner that the FTs are being minted to.
- amount: the amount of FTs being minted.
- Optional - memo: an optional message to include with the event.
Examples
In order to solidify your understanding of the standard, let's walk through two scenarios and see what the logs should look like.
Scenario A - simple mint
In this scenario, the Benji mints 50 FTs to himself and doesn't include a message. The log should look as follows.
EVENT_JSON:{
  "standard": "nep141",
  "version": "1.0.0",
  "event": "ft_mint",
  "data": [
    {"owner_id": "benji.testnet", "amount": "50"}
  ]
}
Scenario B - batch transfer
In this scenario, Benji wants to perform a batch transfer. He will send FTs to Jada, Mike, Josh, and Maria. The log is as follows.
EVENT_JSON:{
    "standard": "nep141",
    "version": "1.0.0",
    "event": "ft_transfer",
    "data": [
        {"old_owner_id": "benji.near", "new_owner_id": "josh.near", "amount": "1", "memo": "go team"},
        {"old_owner_id": "benji.near", "new_owner_id": "mike.near", "amount": "9000"},
        {"old_owner_id": "benji.near", "new_owner_id": "jada.near", "amount": "500"},
        {"old_owner_id": "benji.near", "new_owner_id": "maria.near", "amount": "500"}
    ]
}
Modifications to the contract
At this point, you should have a good understanding of what the end goal should be so let's get to work! Open the src directory and create a new file called events.rs. This is where your log structs will live.
Creating the events file
Copy the following into your file. This will outline the structs for your EventLog, FtMintLog, and FtTransferLog. In addition, we've added a way for EVENT_JSON: to be prefixed whenever you log the EventLog.
Loading...
Adding modules and constants
Now that you've created a new file, you need to add the module to the lib.rs file.
Loading...
Logging the total supply minted
Now that all the tools are set in place, you can implement the actual logging functionality. Since the contract will only be minting tokens at the very start when it's initialized, it's trivial where you should place the log. Open the src/lib.rs file and navigate to the bottom of the new initialization function. This is where you'll construct the log for minting.
Loading...
With that finished, you've successfully implemented the backbone of the events standard and it's time to start testing.
Deploying the contract
Since the current contract you have is already initialized, let's create a sub-account and deploy to that instead.
Creating a sub-account
Run the following command to create a sub-account events of your main account with an initial balance of 3 NEAR which will be transferred from the original to your new account.
near account create-account fund-myself events.$FT_CONTRACT_ID '3 NEAR' autogenerate-new-keypair save-to-legacy-keychain sign-as $FT_CONTRACT_ID network-config testnet sign-with-legacy-keychain send
Next, you'll want to export an environment variable for ease of development:
export EVENTS_FT_CONTRACT_ID=events.$FT_CONTRACT_ID
Build the contract as you did in the previous tutorials:
cd 2.define-a-token
cargo near build
Deploying and Initialization
It's time to deploy the contract, initialize it and mint the total supply. Let's create an initial supply of 1000 gtNEAR. Since it has 24 decimal places, you should put 1000 followed by 24 zeros in the total supply field.
cargo near deploy $EVENTS_FT_CONTRACT_ID with-init-call new_default_meta json-args '{"owner_id": "'$EVENTS_FT_CONTRACT_ID'", "total_supply": "1000000000000000000000000000"}' prepaid-gas '100.0 Tgas' attached-deposit '0 NEAR' network-config testnet sign-with-keychain send
You can check to see if everything went through properly by looking at the output in your CLI:
...
Transaction sent ...
--- Logs ---------------------------
Logs [events.aha_3.testnet]:
  EVENT_JSON:{"standard":"nep141","version":"1.0.0","event":"ft_mint","data":[{"owner_id":"events.goteam.testnet","amount":"1000000000000000000000000000","memo":"Initial token supply is minted"}]}
--- Result -------------------------
Empty result
------------------------------------

Contract code has been successfully deployed.
The "new_default_meta" call to <events.goteam.testnet> on behalf of <events.goteam.testnet> succeeded.
...
You can see that the event was properly logged!
Querying Supply Information
You can now test if your view functions work properly. First, try to query for the total supply.
near contract call-function as-read-only $EVENTS_FT_CONTRACT_ID ft_total_supply json-args {} network-config testnet now
This should return an output similar to the following:
'1000000000000000000000000000'
Hurray! Now you can check if the balance of the owner account works properly. If you call the following function, it should return the same number as the total supply.
near contract call-function as-read-only $EVENTS_FT_CONTRACT_ID ft_balance_of json-args '{"account_id": "'$EVENTS_FT_CONTRACT_ID'"}' network-config testnet now
Returns:
'1000000000000000000000000000'
If you query for the balance of some other account, it should return 0.
near contract call-function as-read-only $EVENTS_FT_CONTRACT_ID ft_balance_of json-args '{"account_id": "benjiman.testnet"}' network-config testnet now
Viewing FTs in the wallet
Now that your contract implements the necessary functions that the wallet uses to pickup your contract and display the FTs, you should be able to see your tokens on display in the balances tab.
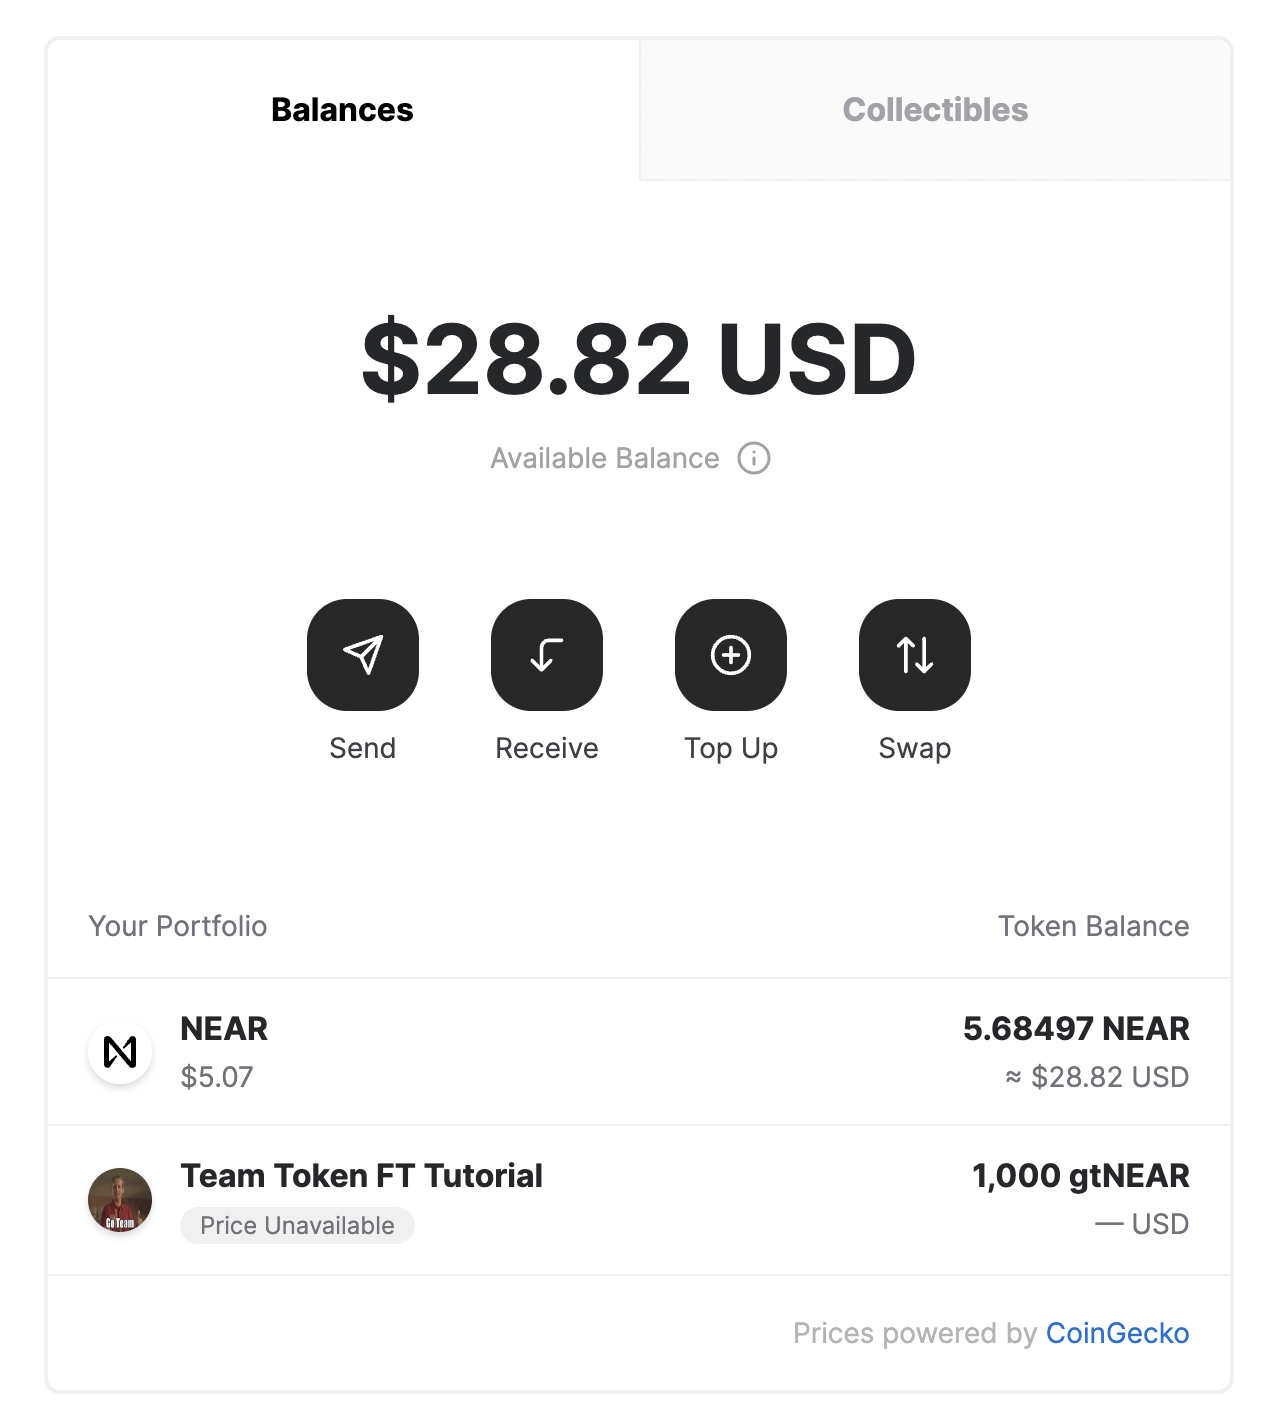
🎉🎉🎉 This is awesome! Go team! 🎉🎉🎉 You can now see your very first fungible tokens in the wallet!
Conclusion
Today you went through and created the logic for minting a total supply. You then implemented some of the core standard logic and the events standard. You created events for minting FTs on initialization. You then deployed and tested your changes and saw your very first FTs in the wallet!
In the next tutorial, you'll look at the basics of registering accounts so that they can transfer and receive FTs.
At the time of this writing, this example works with the following versions:
- rustc:
1.77.1 - near-sdk-rs:
5.1.0(with enabledlegacyfeature) - cargo-near:
0.6.1 - near-cli-rs:
0.11.0