Indexing Functions
QueryAPI is a fully managed service that allows you to create and manage indexers on-chain seamlessly.
Indexing
Let's review a very simple indexer, which will help you to understand how the indexer's indexing logic works.
import { Block } from "@near-lake/primitives";

/**
 * getBlock(block, context) applies your custom logic to a Block on Near and commits the data to a database.
 *
 * @param {block} Block - A Near Protocol Block
 * @param {context} - A set of helper methods to retrieve and commit state
 */
async function getBlock(block: Block, context) {
  const h = block.header().height;
  await context.set("height", h);
}
In the getBlock() function, you're given a block, which is a block on the Near blockchain, as
well as a context object, which gives you a set of helper methods to be able to commit
what you want to the database that QueryAPI has provisioned for you.
The code is going into the header of the block
and getting the block's height, and then is using the context object to set a key value store.
Next, if you check out the database schema:
CREATE TABLE
  "indexer_storage" (
    "function_name" TEXT NOT NULL,
    "key_name" TEXT NOT NULL,
    "value" TEXT NOT NULL,
    PRIMARY KEY ("function_name", "key_name")
  )
It's a very simple schema where you can store the function_name, key_name, and value.
That's all this indexer function is doing: it sets the height value equal to the current block's height.
Local Debug Mode
While you're iterating on your indexer development, it's critical to have some type of debugging functionality to be able to test with, and the Debug Mode is very helpful for that.
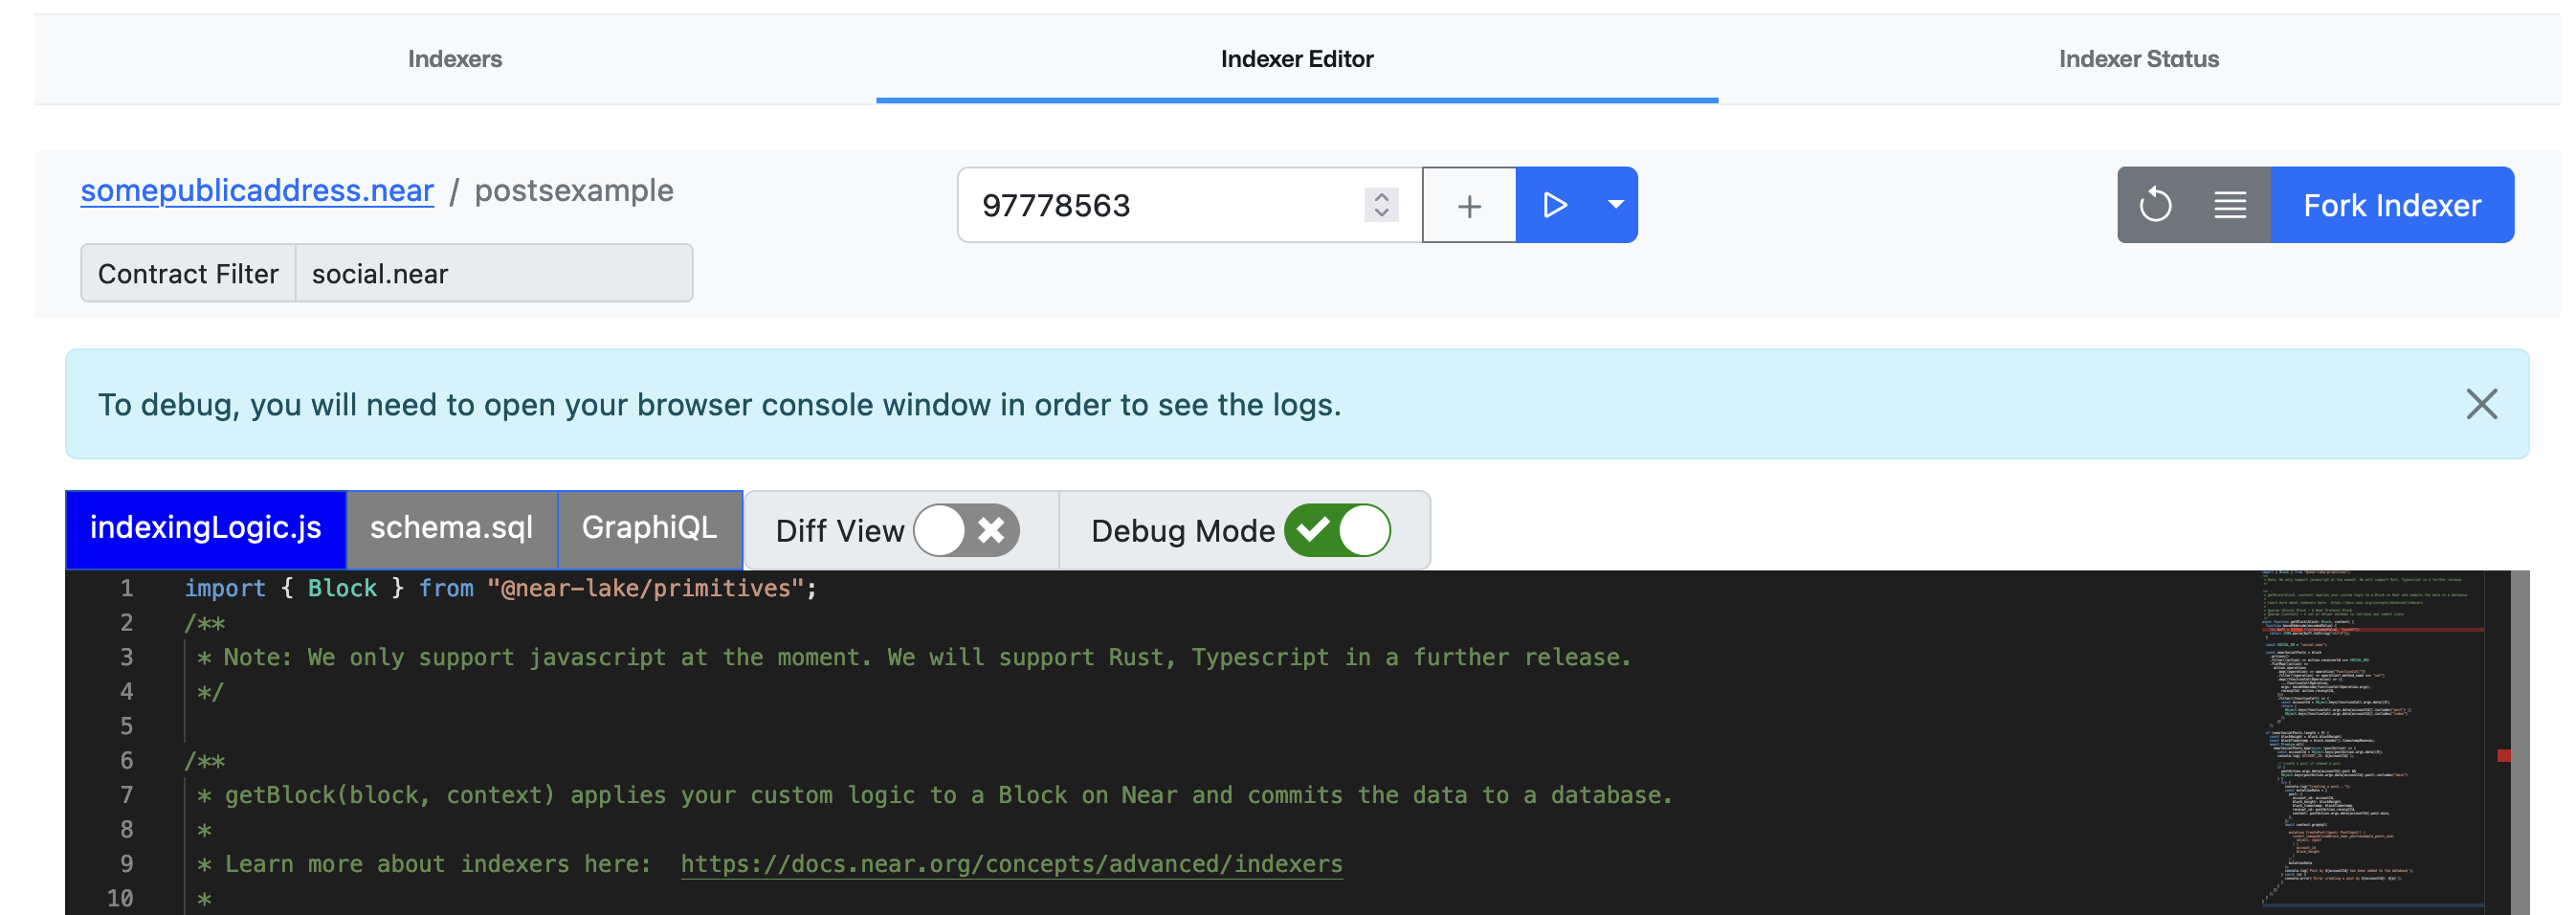
For example, if you want to test the simple indexer explained in the previous section using the local debugging mode:
- Enable Debug Mode on the Indexer Editor
- Add a block to your debug list (e.g.,
97779559) - Go into your web browser's Console
- Finally, click Play.
On your browser's Console, you should see the indexer's debug execution where it sets the height key to 97779559:
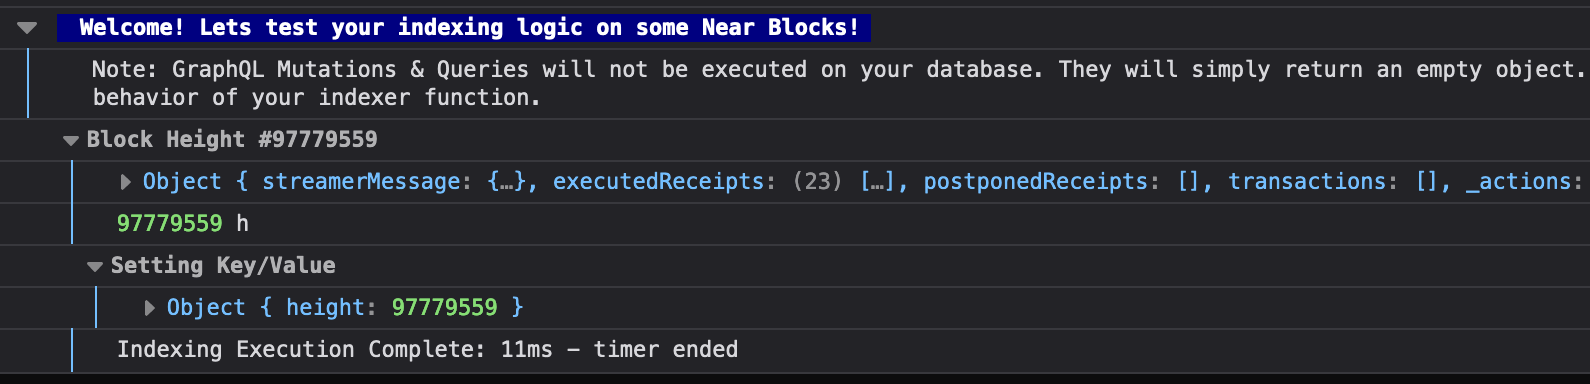
All debug mode tests are happening locally, so they do not reach the database. All your queries and mutations will return empty objects.
You can also click Follow the Network and it will show how your indexer logic works throughout.
Contract filters
A contract filter is used by QueryAPI to do backend optimizations to help do historical indexing faster. While creating an indexer, when you define a contract filter, QueryAPI will send any single transaction event that passes this filter to your indexer function so you can index it.
If you only want to index events from a single contract, simply define the contract name on the Contract Filter text box. In some cases you might want to either support indexing on multiple contracts, or simply support every single contract that exists on the Near blockchain.
Single contract filter
For example, if you check out the simple indexer, you'll see that in this case
you have a social.near contract filter.
In this example, the indexer is only concerned on indexing events from social.near's contract.
Multiple contracts filter
For example, if you want to index all the contracts from AstroDAO, where there is an account created
for each and every different DAO, you should define *.sputnik-dao.near as the contract filter.
Likewise, if you want to get events from every contract on the blockchain, simply define * as the filter.
Feed-indexer logic
Then we call context.graphql, which allows us to make arbitrary mutations and queries to our database that we provision for you. If you're interested in how to create GraphQL queries, there's a whole bunch of resources online. In this case, we are passing in our mutation data, which has a post object, and it's inserting it inside Postgres, I mean, inside of Postgres using GraphQL. But it's very easy to create these mutations.
Mutations in GraphQL
If you go to the GraphiQL tab, you can access the GraphiQL Explorer that provides a user friendly GraphQL playground, where you can view and create queries and mutations based on the DB schema that you defined for the indexer.
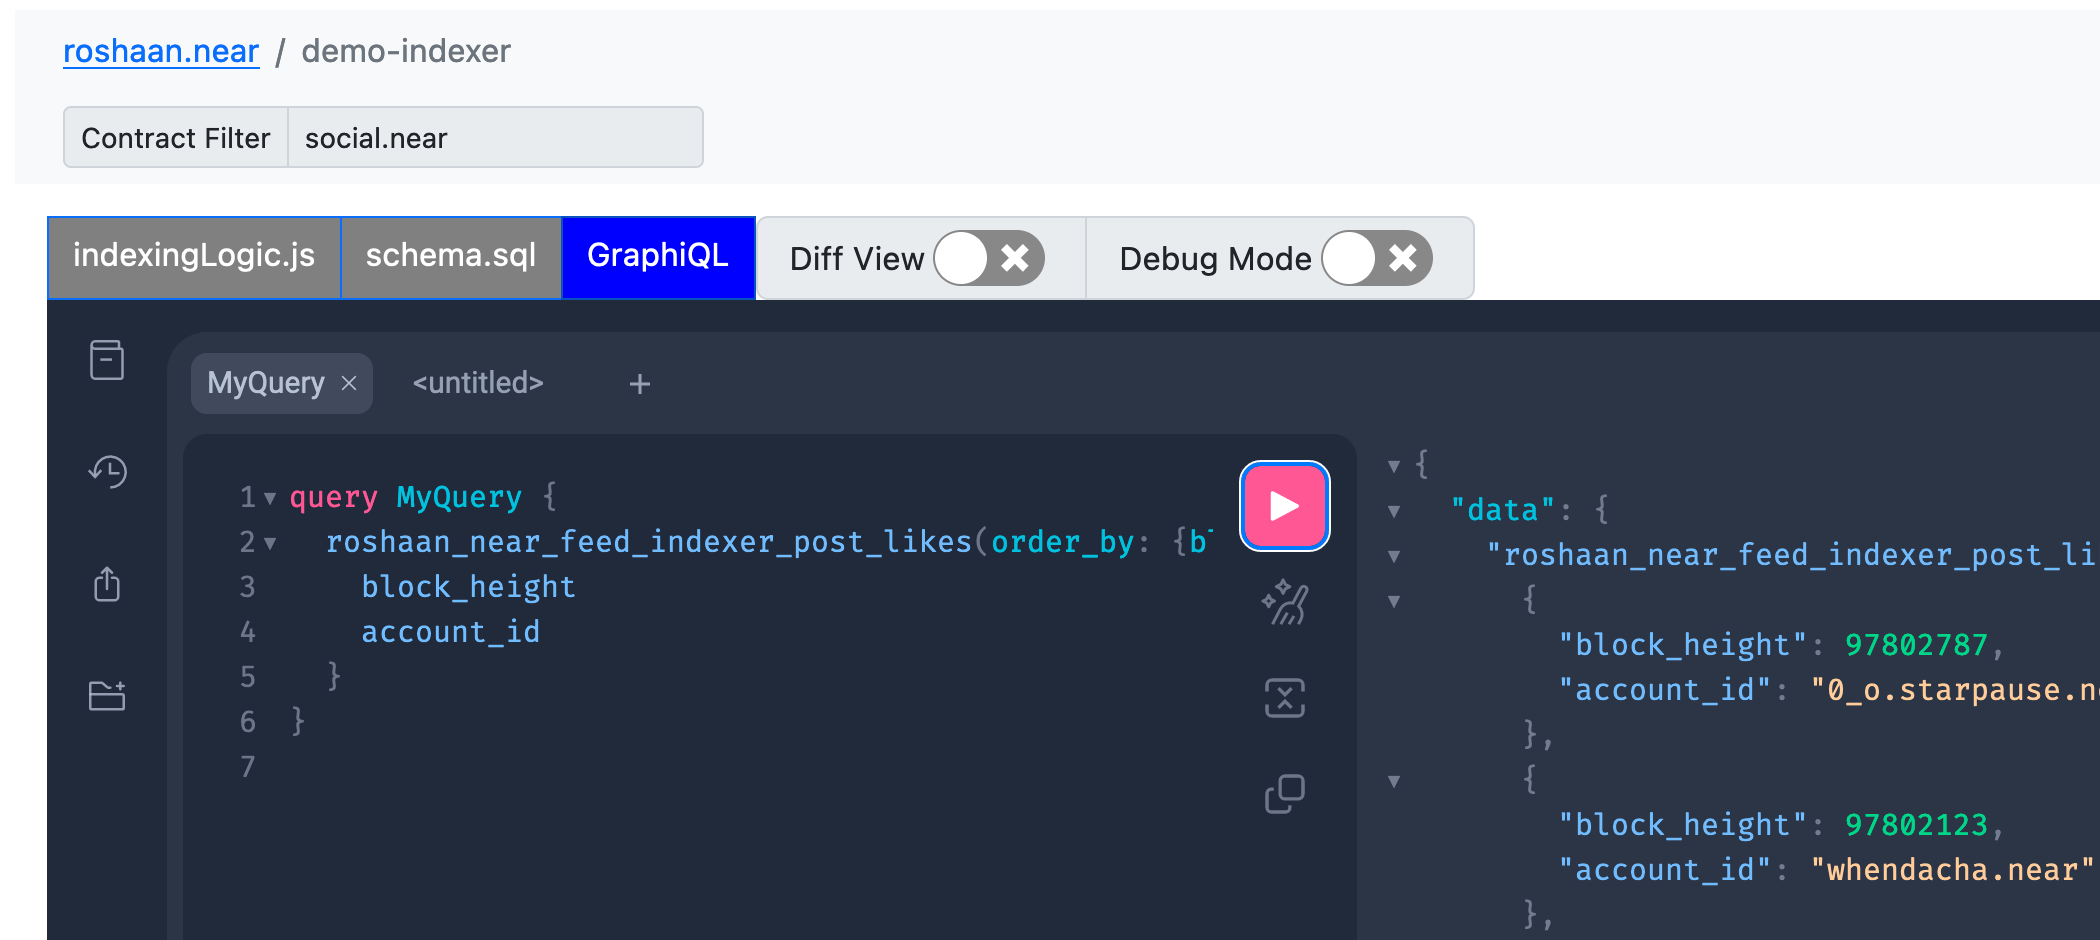
You can easily set some fields and select the returning data that you want, and the tool will build a query on the mutation panel on the right. Then you can copy the resulting query, either in your JavaScript code so that you pass actual data manually, or you pass in the mutation data object as a second parameter.
For example, if you go and add a new mutation, click +, then you can do a bunch of actions here, such as creating, deleting, or inserting posts into your table.
If you want to test your mutation, using Debug Mode you can add a specific block to the list, and then play it to see how it works. Based on the indexer logic you defined, you'll get a call to the GraphQL mutation with the object and data passed into it.
Tip: watch the video on how to create mutations in GraphQL.
Create a NEAR component from query
Creating a NEAR component from a GraphQL query is simple when using the GraphQL Playground. Just follow these steps:
- go to the GraphiQL tab
- select the query that you want to use
- click on the Show GraphiQL Code Exporter button
- get some default code here, copy it,
- go to the NEAR sandbox, paste it.
This will set up some boilerplate code to execute the GraphQL query, add the query that you had in your playground and then call that query, extract the data and render it using the render data function.
Once you have the NEAR component code, you can test it out by going to the sandbox, pasting the generated code, and then selecting Component Preview. Next, you can create a nice UI over this boilerplate code, and publish your new NEAR component.