NFTs for Web 2 Applications
At the first stage of our Web 3 transformation, let’s decentralize ownership of our digital assets using blockchain technology. By doing this, we can create a user-owned economy, where digital assets are exchanged and traded without any participation or control from the developers. Later, we’ll discuss how to bring it to the next level by adding Fungible Tokens into the mix.
As we discussed previously, in the Web 3 world, NFTs are used to represent ownership of an asset. This can be anything a user owns, e.g. in case of a game this can be a character, upgrade, crafting material, skin, etc. However, since NFTs are living on the blockchain, and the rest of the application resides on traditional servers, we need to find a way to connect these different worlds together.
Blockchain-Enabled Application Architecture
First of all, let’s outline a typical architecture of a Web 2 application. In most cases, a classic client-server model is used:
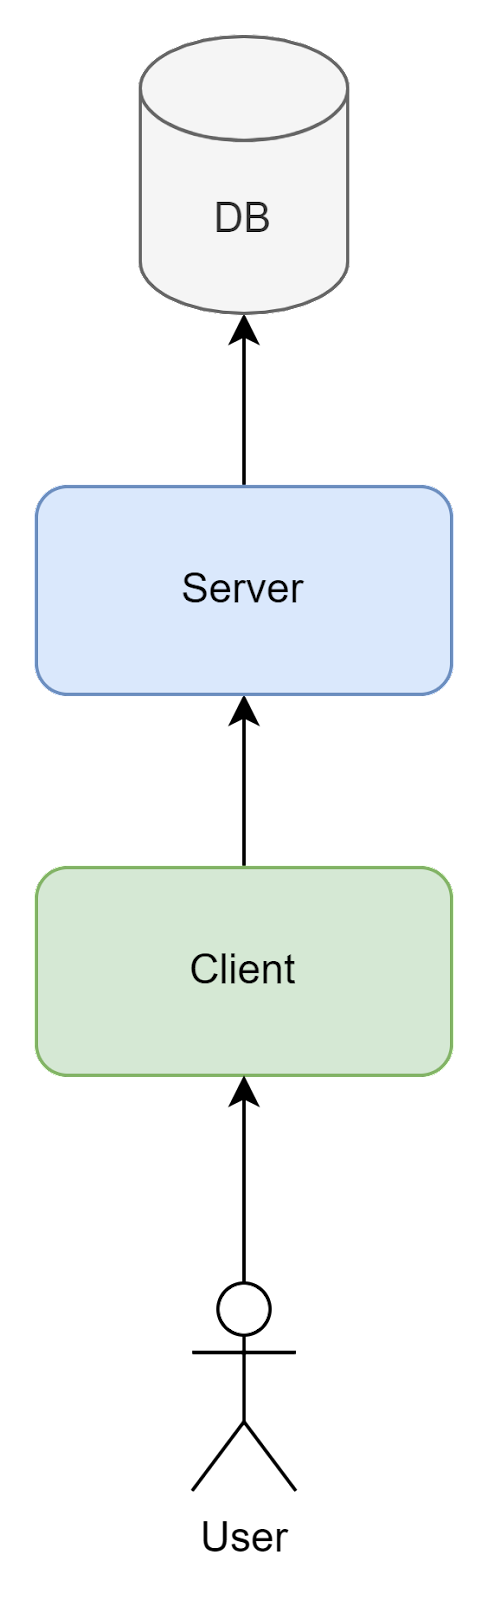
In such architecture, we usually have 3 layers:
- Database - stores application’s data. This can be a single database, or several databases of different types, but this is mostly an implementation detail - for our purposes we can view it as a single logical database.
- Server - a centralized web-server. It may be implemented using different architecture patterns (monolithic, microservices, serverless) and technologies, but again, we can consider it as a single logical server.
- Client - client side application user directly interacts with. Different client types are possible: web, mobile or desktop. There is a difference between these clients in regards to blockchain integration, which we’ll discuss later.
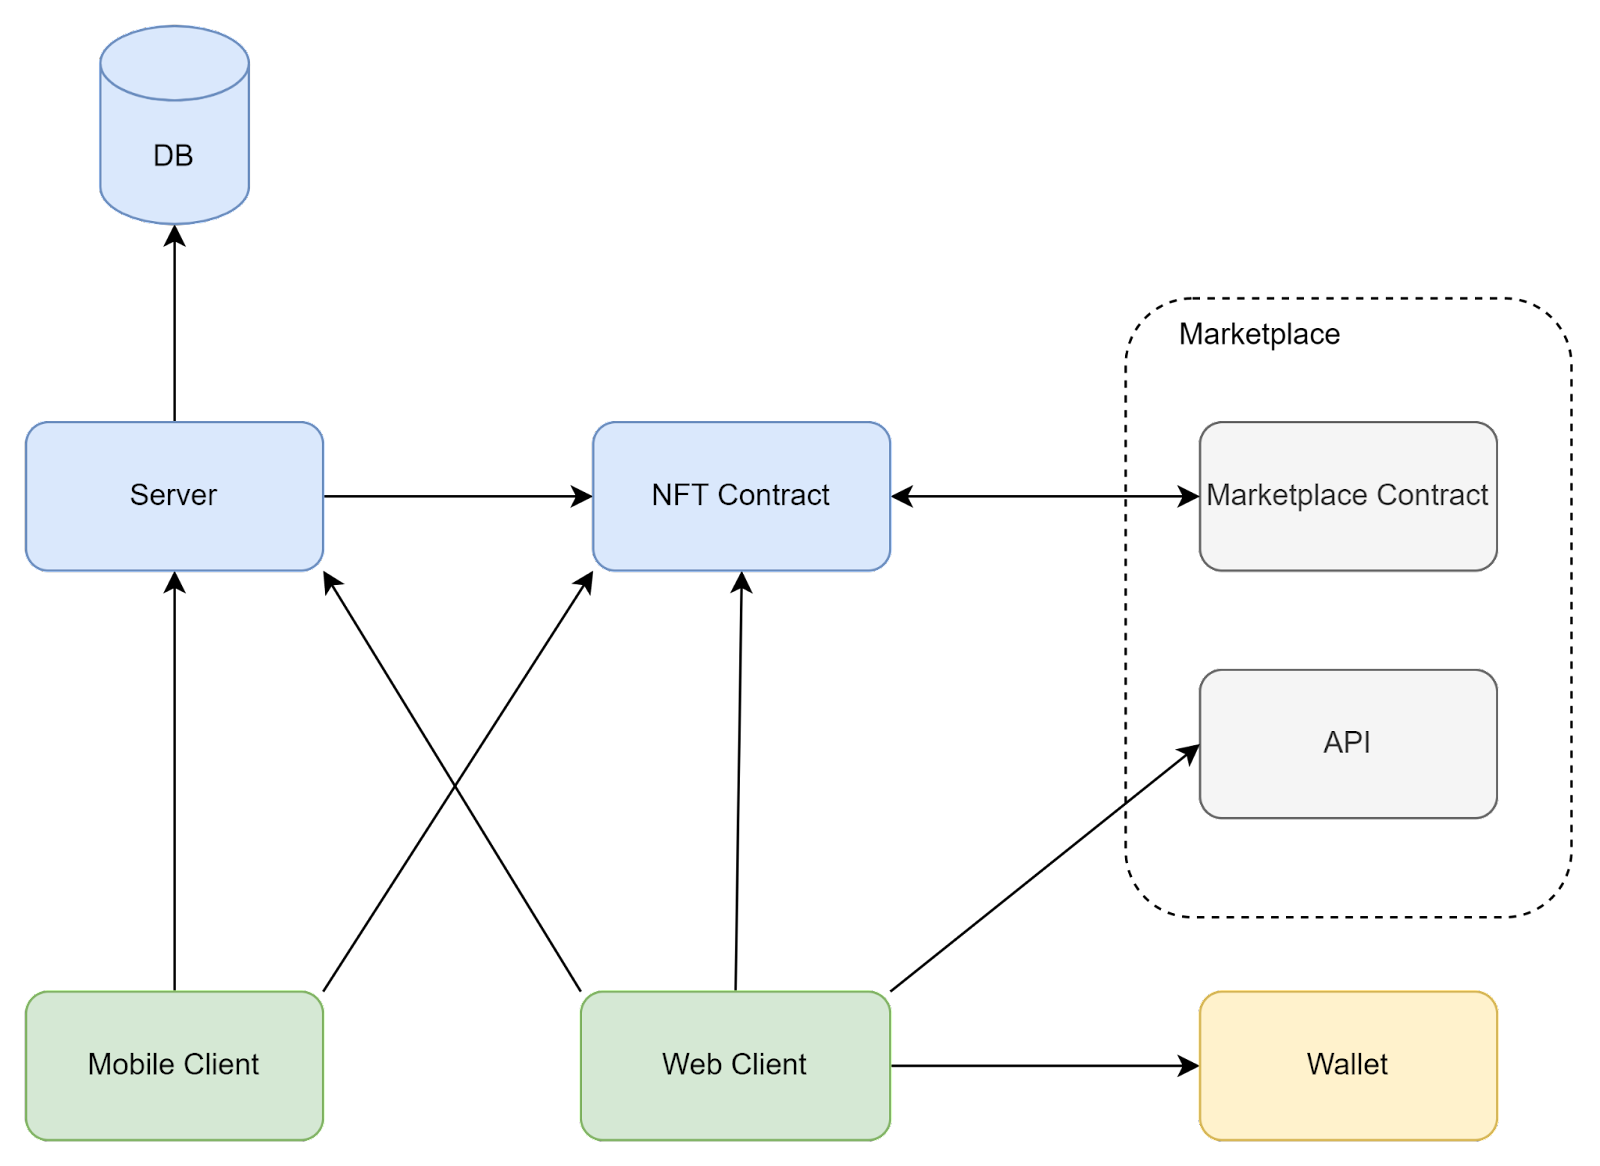
Now, let’s compare it to a dApp architecture:

We can notice that there is a common component in these architectures - the client application. This means we can use it as a junction point to connect them together.
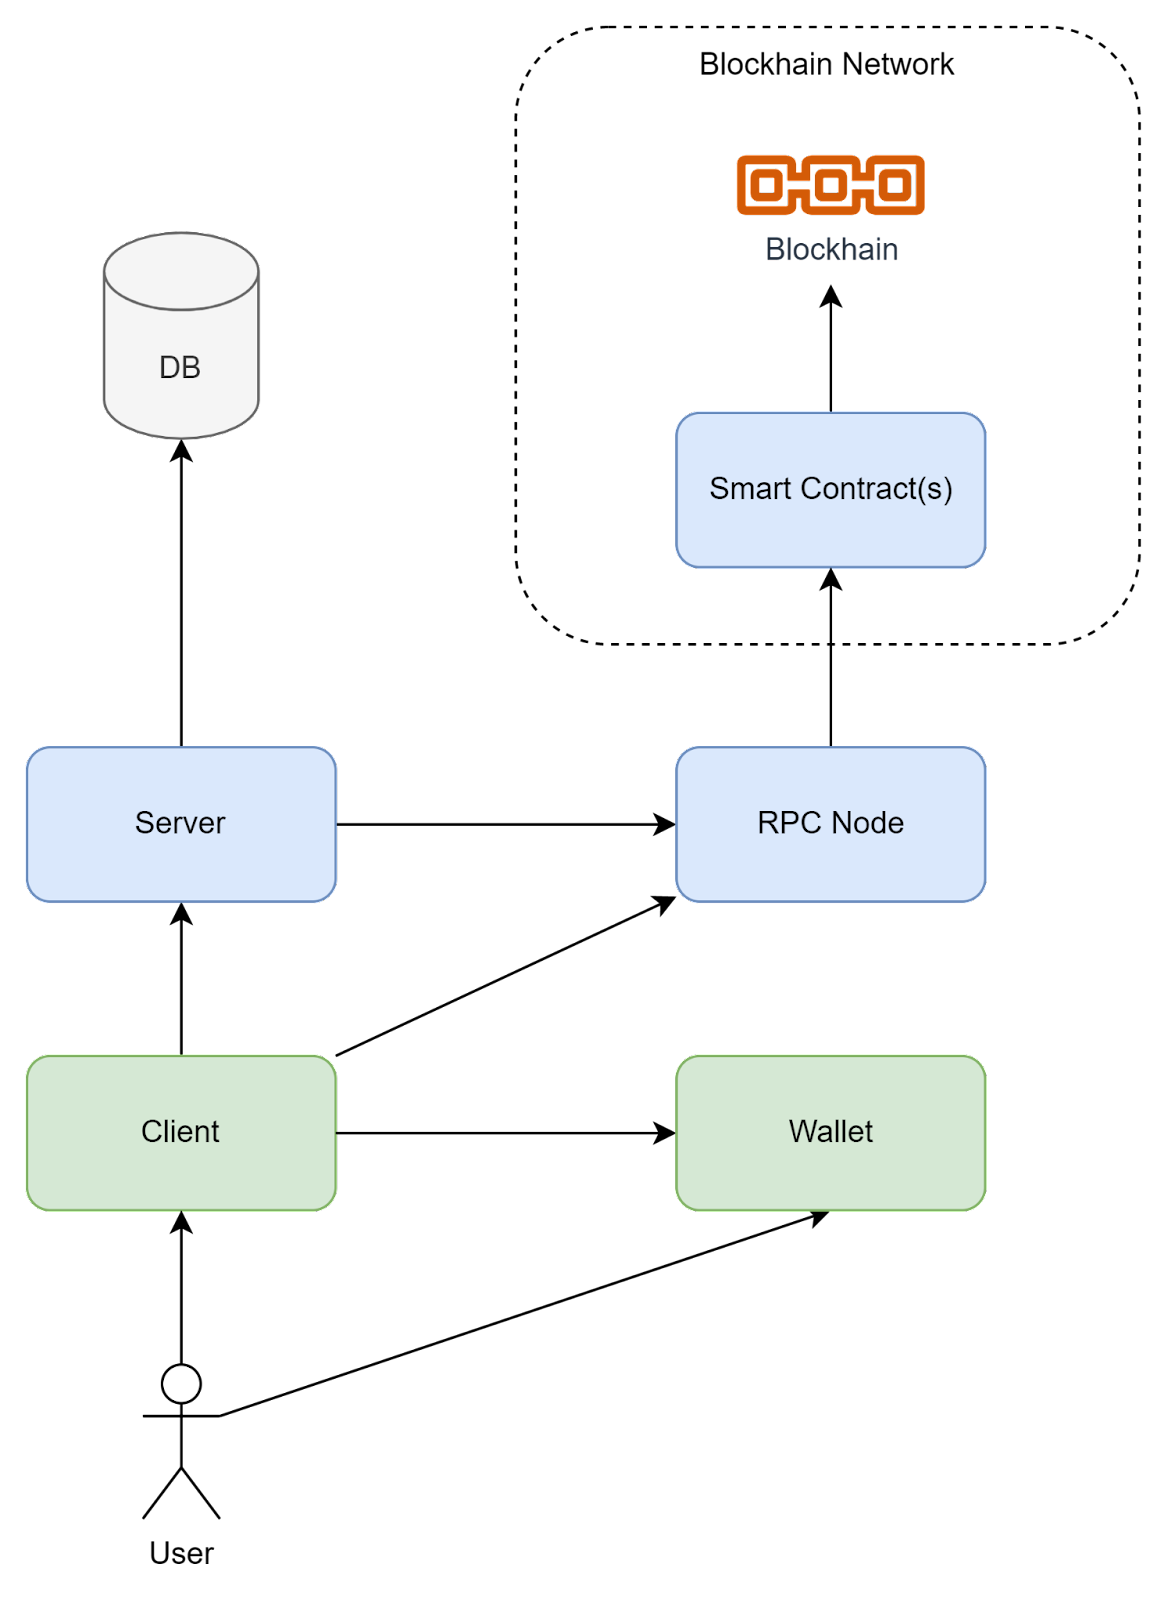
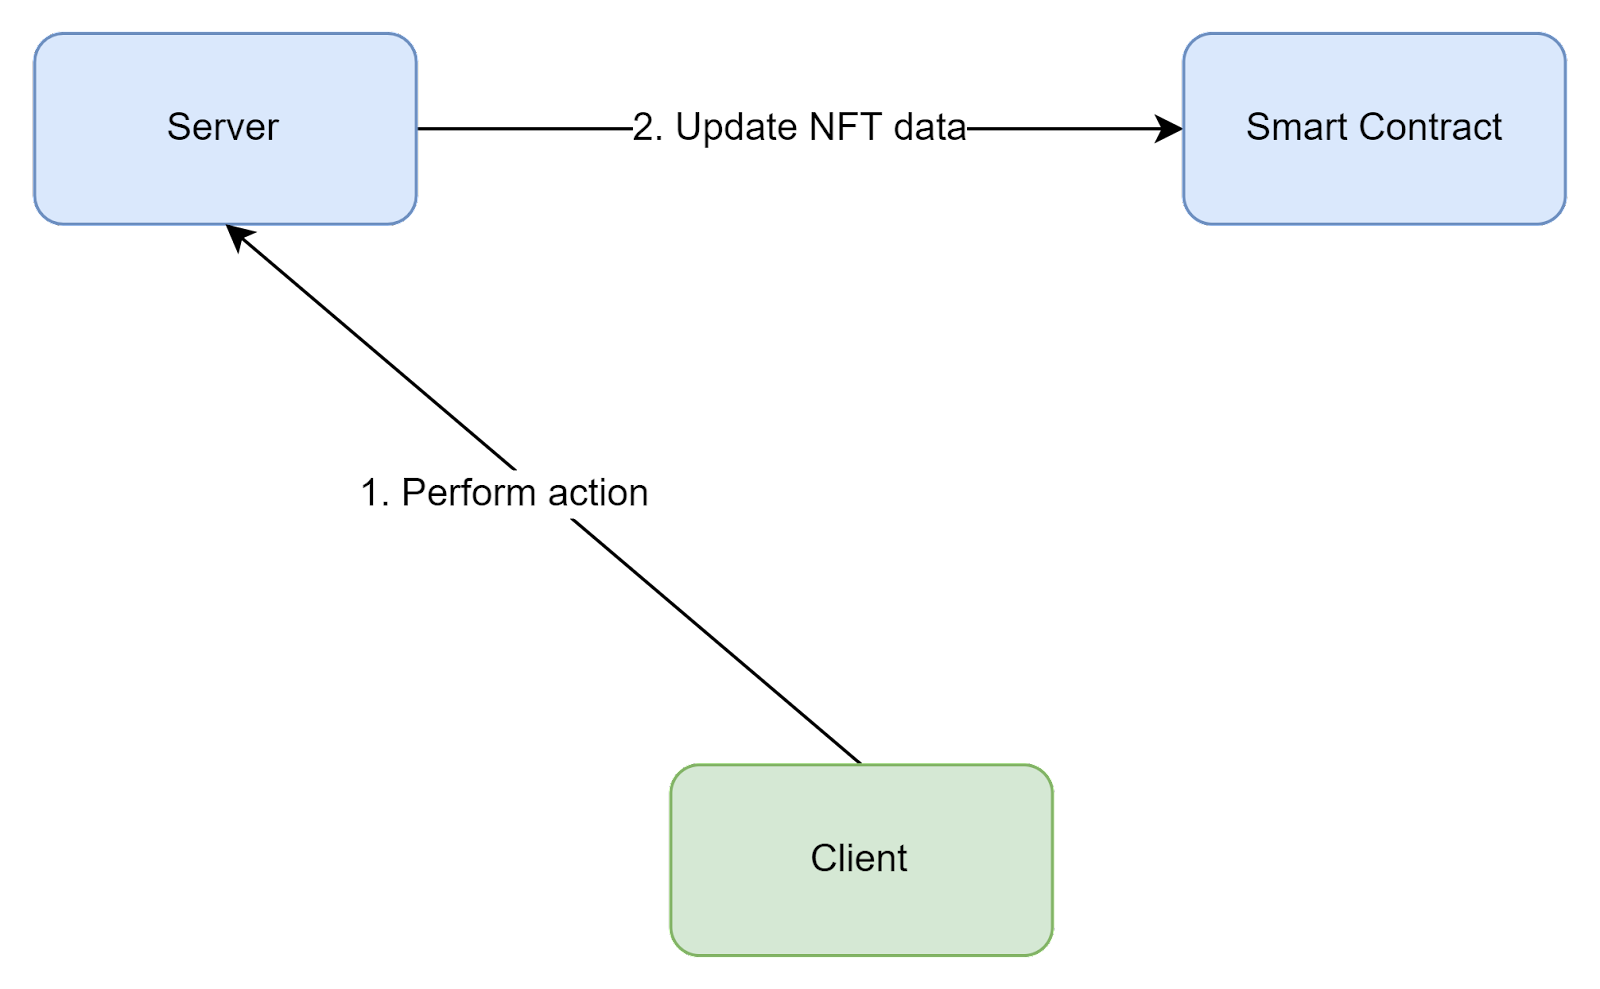
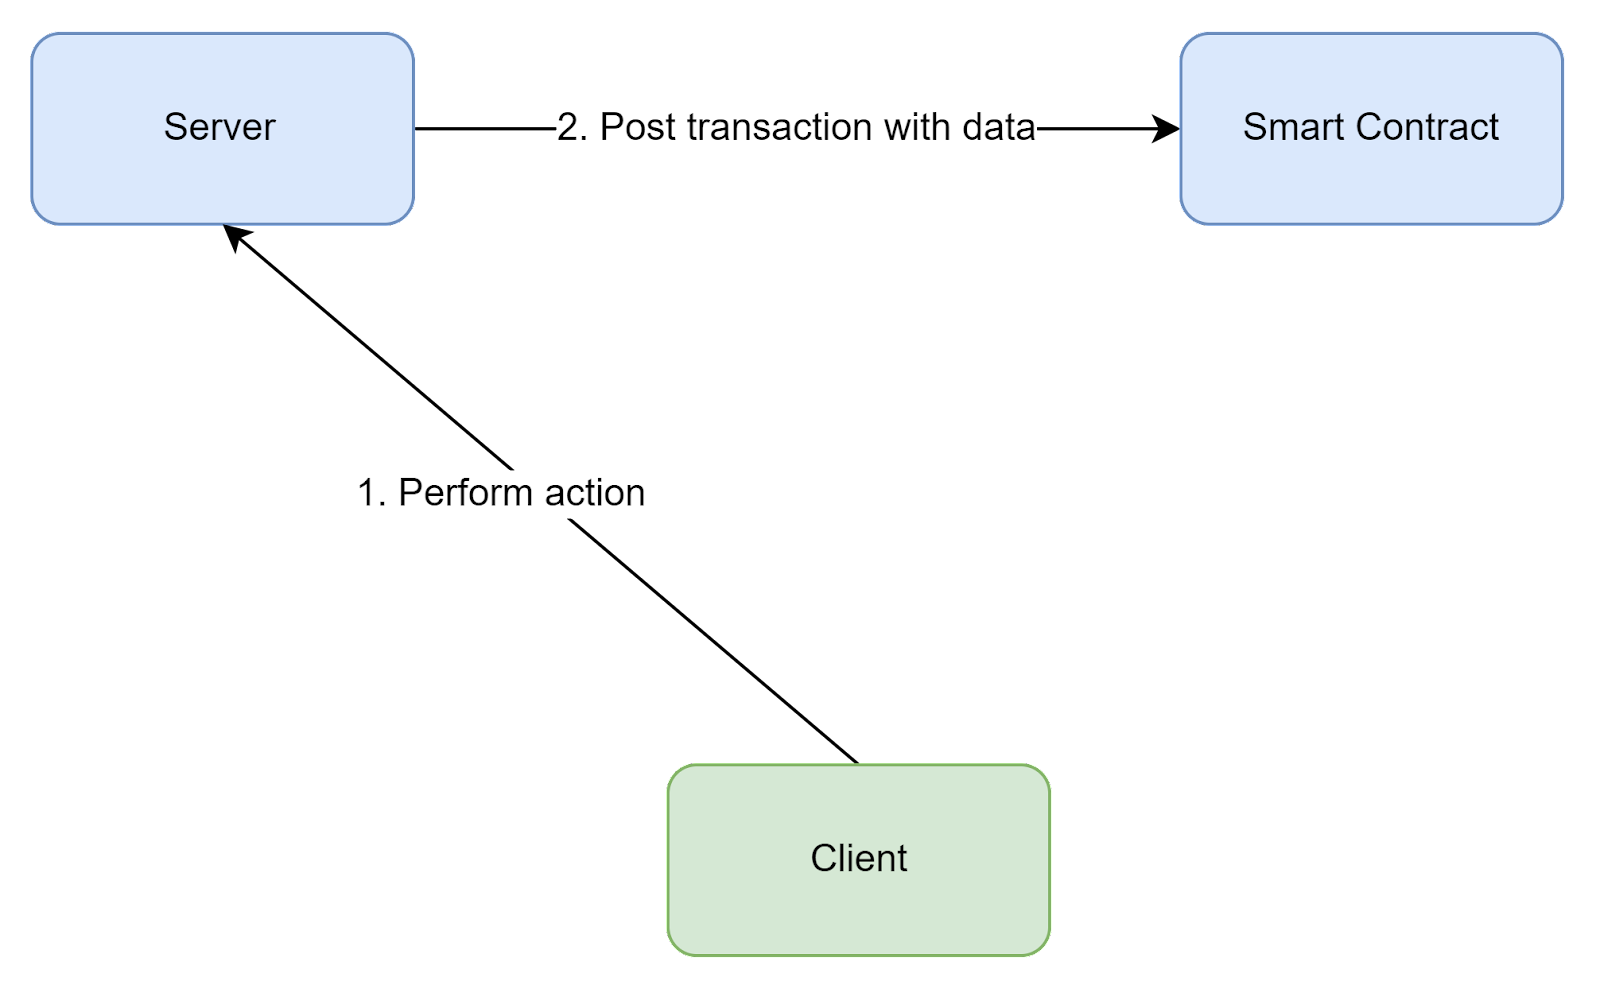
A keen reader may notice an additional connection between the Server and RPC Node. This is required because in a client-server architecture clients cannot be trusted. That’s why every action performed from the client should be validated by a backend server. But in our case everything is complicated by the fact that we essentially have two backends: Web 2 server and a smart contract, so two possible validation flows are possible:
- Client performs an action on a server, which involves blockchain data. In this case the server should talk to the blockchain and verify that valid data is provided.
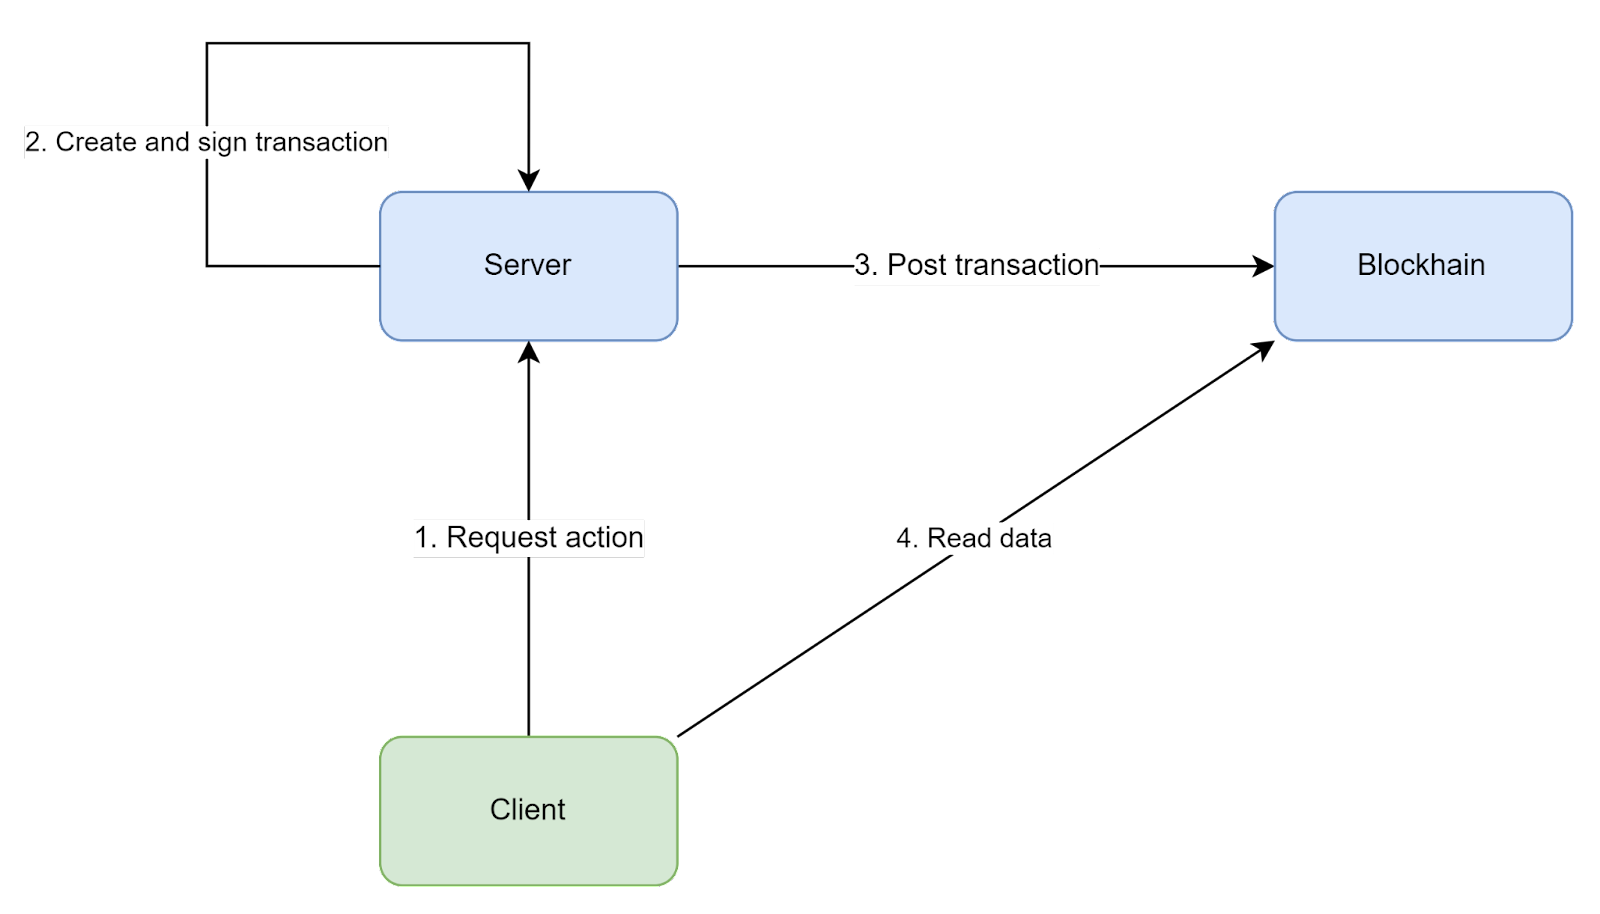
- Client performs an action on a smart contract, which involves server-owned data. Since the smart contract can’t talk to the server directly to verify it, we should use a different way to verify the authenticity of the data. In blockchain terminology, such a server is called an Oracle. We’ll explore how to implement both of these approaches later.
By now, we've reached the point where the type of our client begins to matter. Specifically, problems arise from the dApps payment model - user’s pay for the blockchain infrastructure using gas, so money goes directly to infrastructure providers. Also, users make payments directly on the blockchain, without using any intermediaries, like banks or payment services. This approach is at odds with mobile app stores (Google Play Store and Apple App Store) - they don’t allow any payments on their respective mobile platforms without their cut. Although some shifts in policy are starting to happen (e.g. Apple vs Epic Games duel), at the time of this writing getting blockchain-enabled applications into the stores will probably get vetoed by reviewers. There are some ways to bypass these limitations, e.g. by not using Play Store on Android, but all of these ways are either sub-par in terms of usability or involve some risk of getting banned by stores. That’s why for mobile applications an alternative approach is needed.
Sometimes, to move forward we need to take a step back. In our case, to solve a problem with mobile clients we can return to our initial concept of having two clients - one for blockchain integration, and another one for Web 2 server. Blockchain client can be a usual web application, which isn’t subject to any constraints from stores. It can also serve as a connection point between blockchain and our existing application.
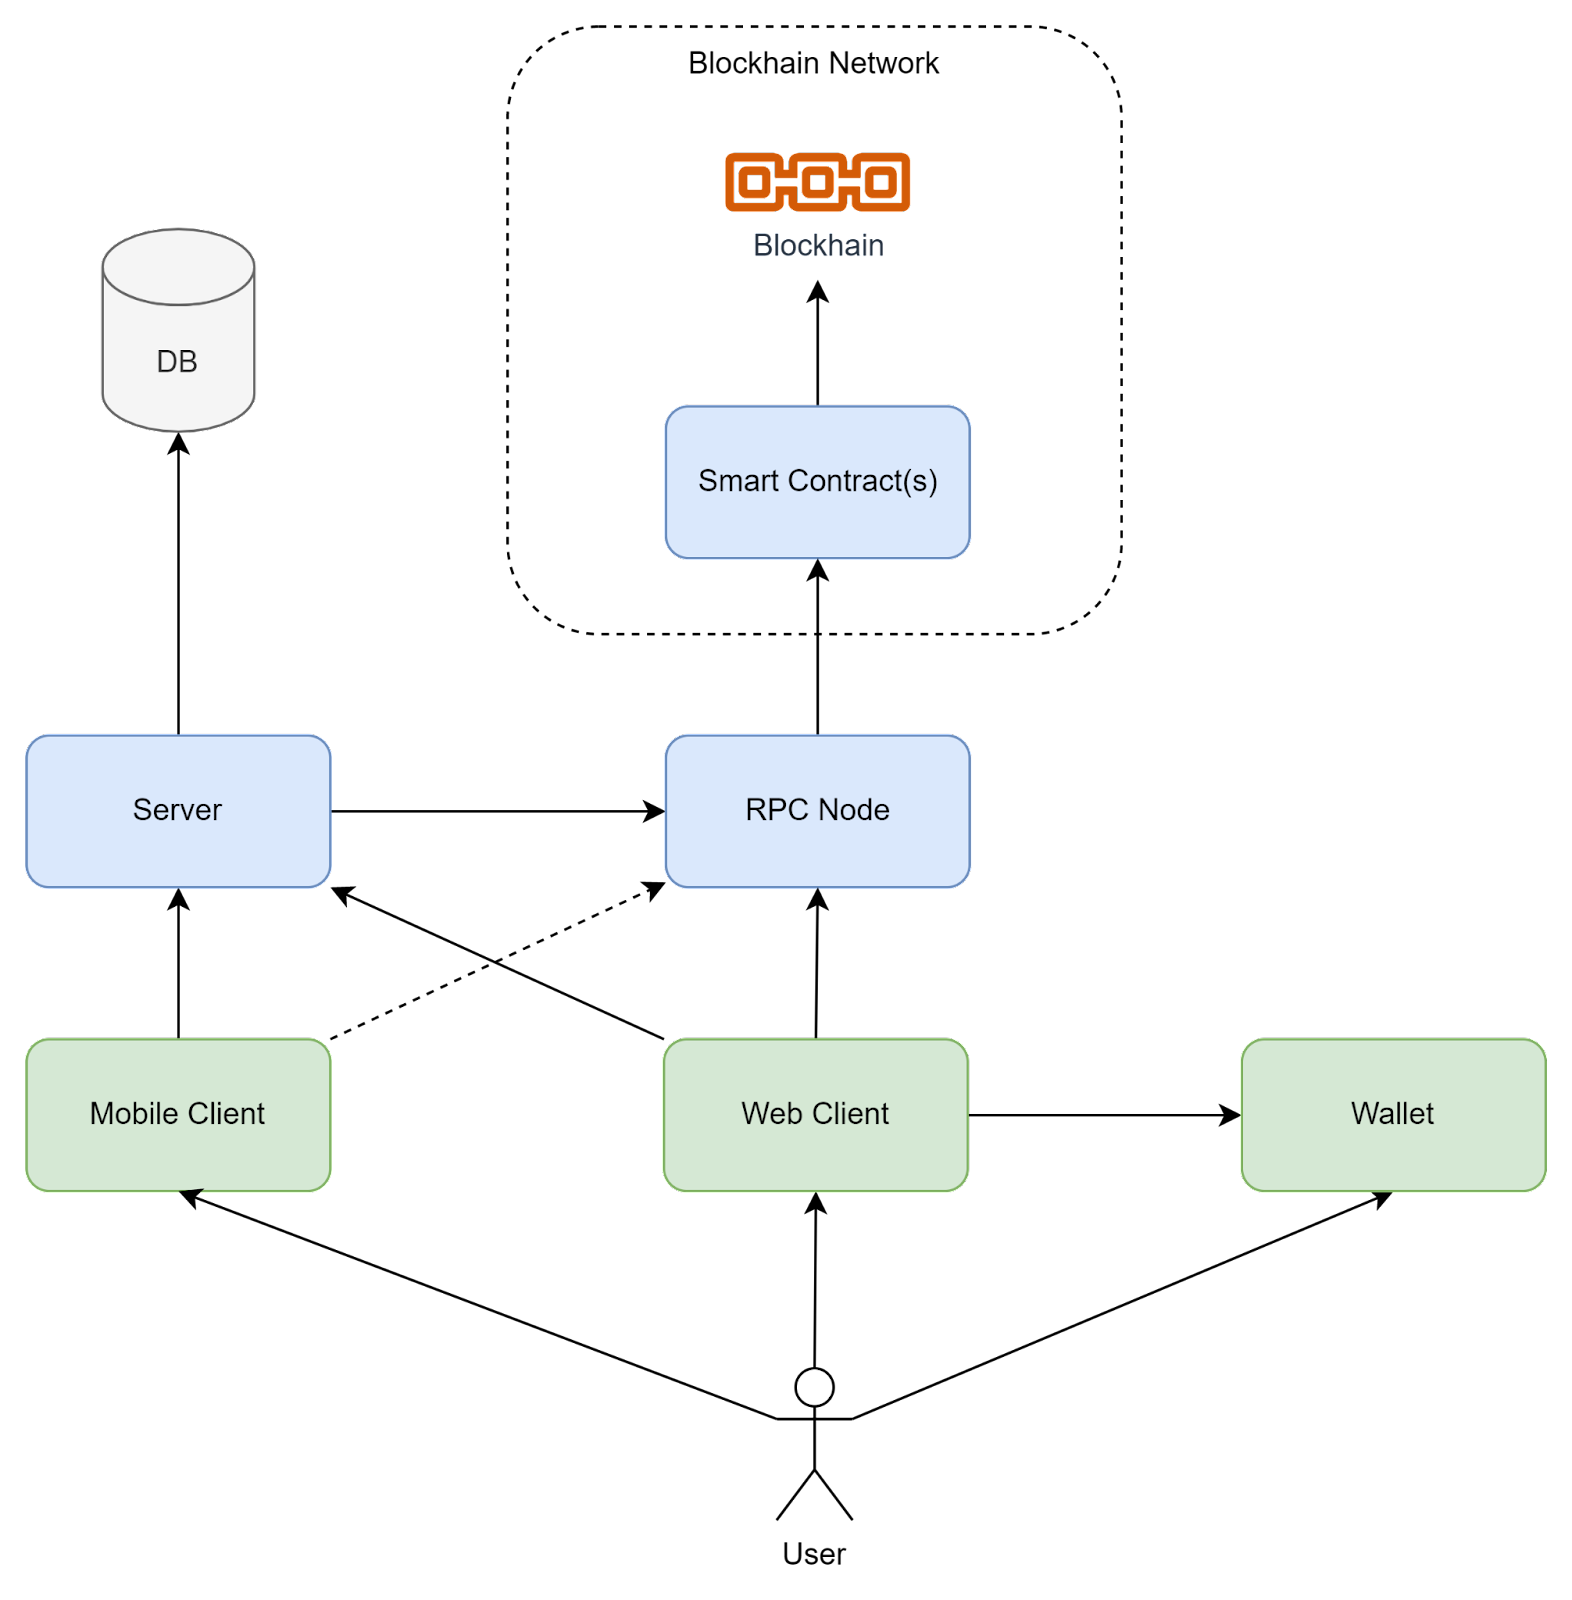
In this architecture the mobile client is still allowed to talk to the blockchain, but only in a read-only way, which doesn’t require wallet connection or any payments. All actions on the blockchain happen on the Web Client instead. Further in this guide we’ll use such dual-client architecture, since simpler architecture with a single client can be directly derived from it by merging two clients together.
At this point, our architecture covers almost everything we need to start building our application. However, since we want to build a user-owned economy, we need a marketplace where it’ll happen. An obvious choice is to put this marketplace into the web client, but there’s one gotcha. If we recall the smart contract’s storage model, it’s not suitable to serve complex data queries, so an indexer should be used to aggregate data from blockchain into a proper database.
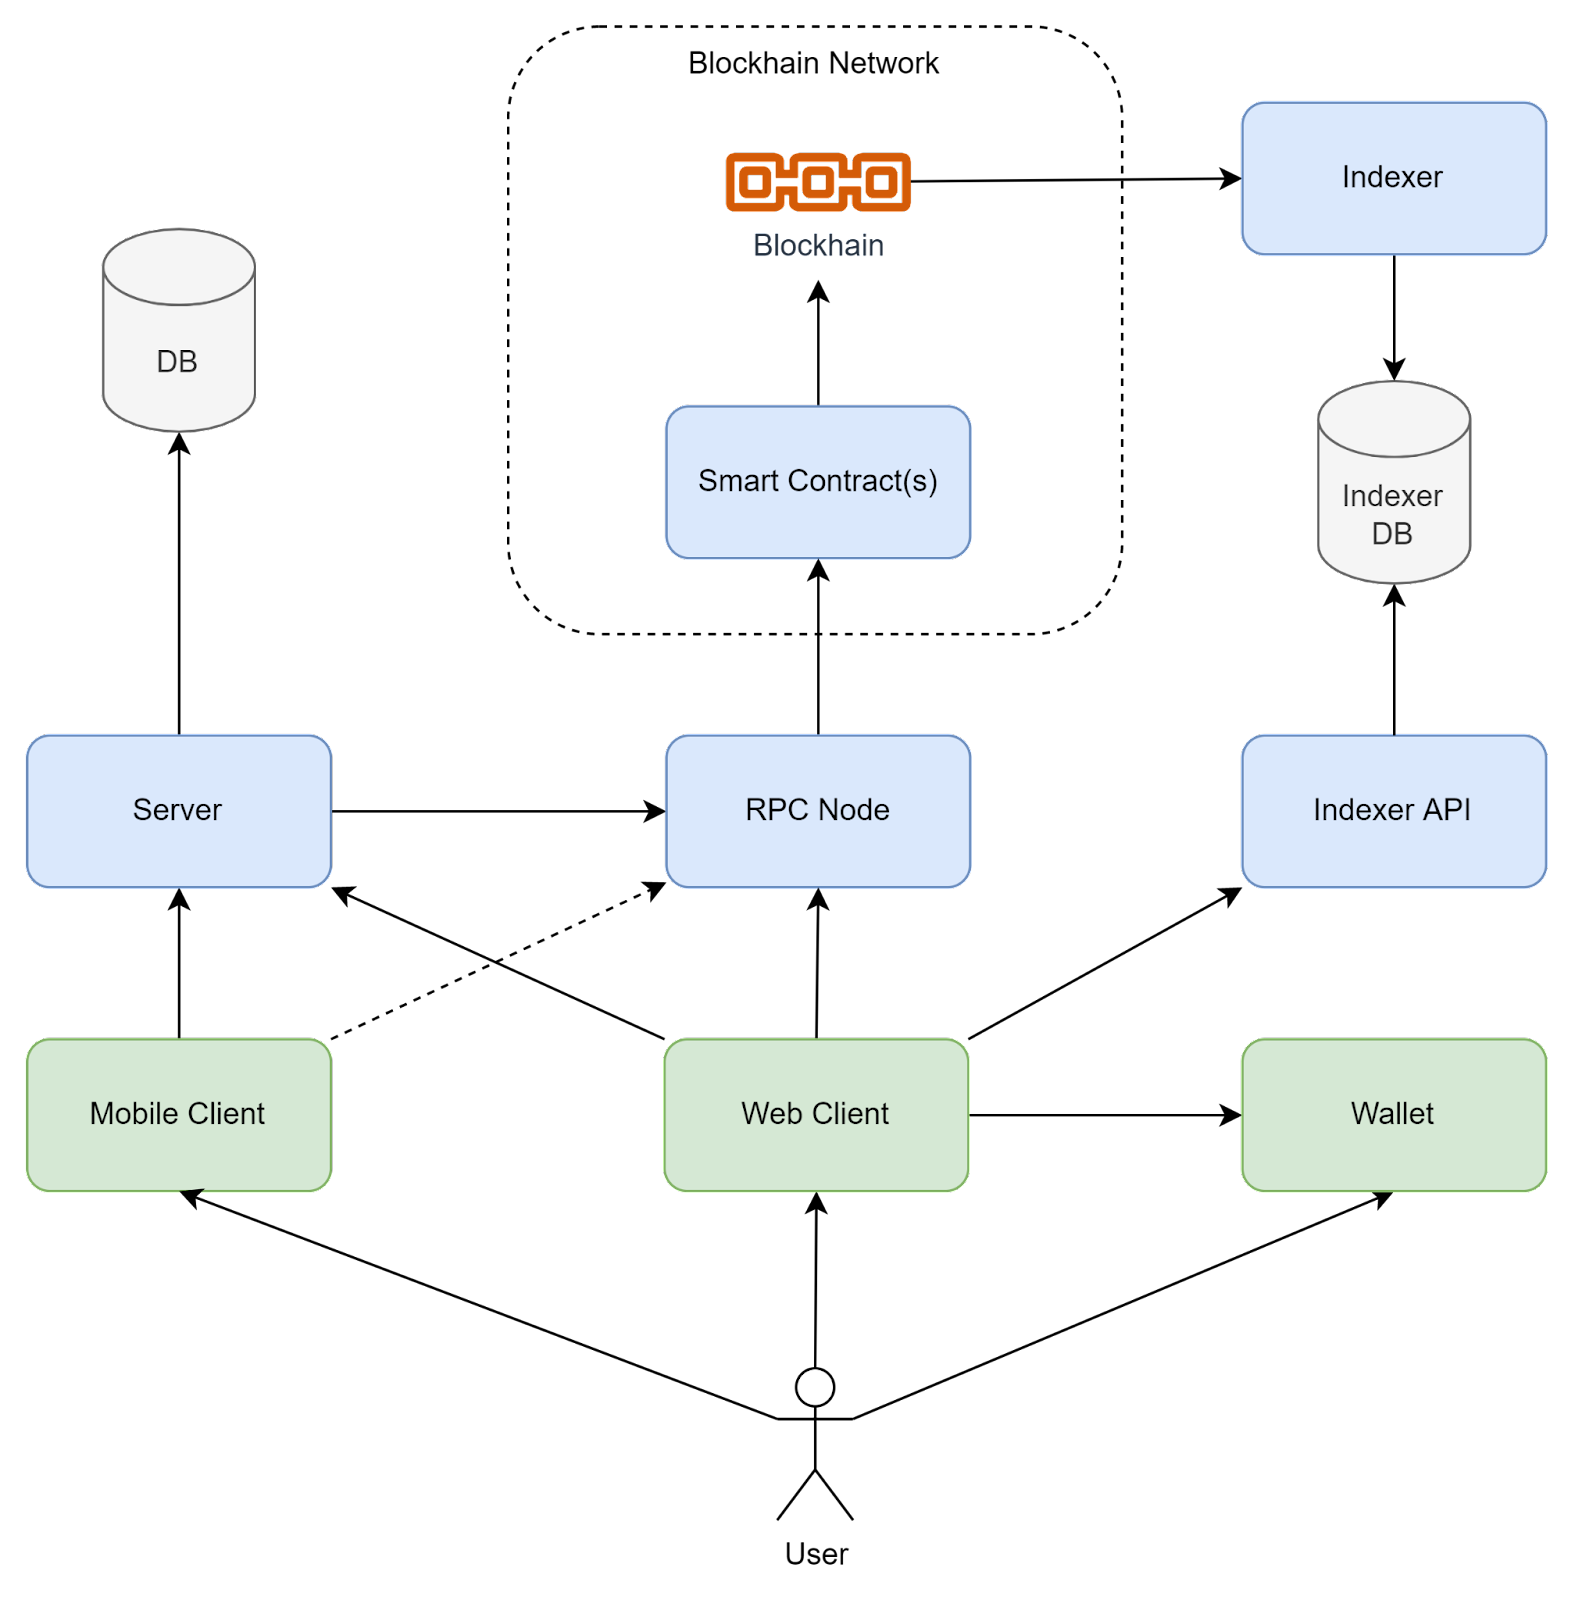
By now, every building-block is in place and we can start exploring how to implement this architecture in practice.
NFTs in Web 2 Applications
In order to implement a fully functional application using a hybrid Web 2 - Web 3 architecture, a lot of technological challenges have to be addressed, like authentication and authorization, seamless NFTs usage in client and server, and proper NFT storage model. In the following sections we’ll take a closer look at this and describe common patterns and approaches.
Authentication and Authorization
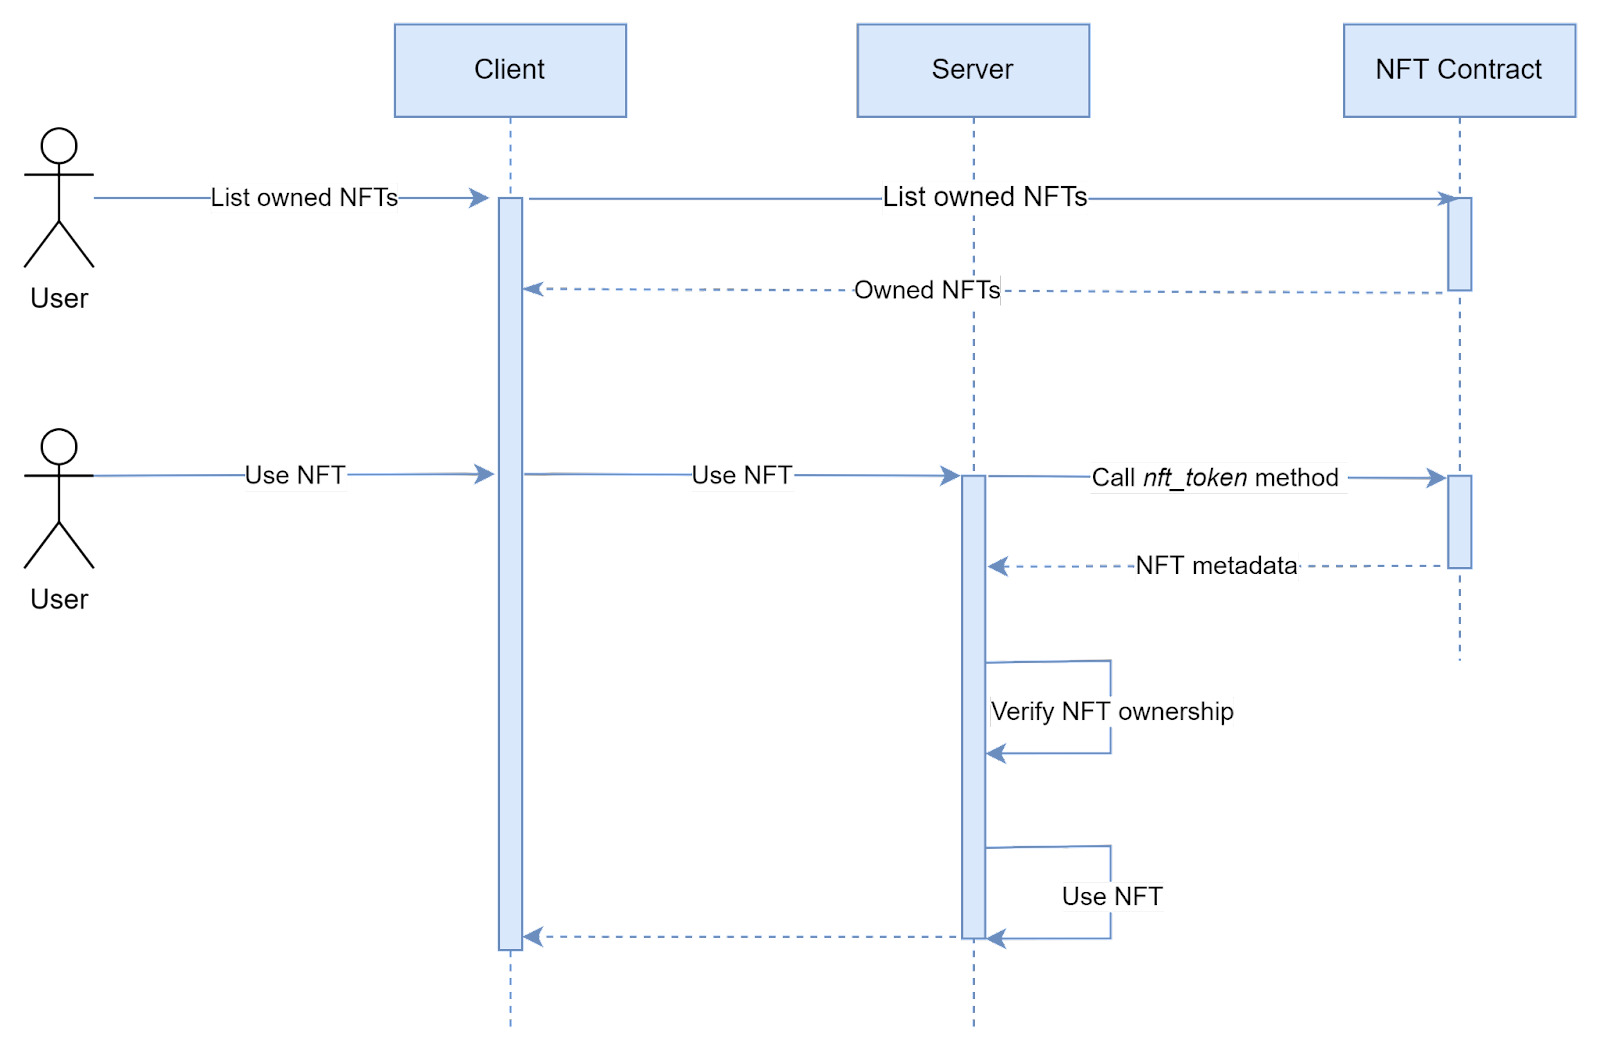
Since our digital assets are represented as NFTs on blockchain, in order to use them in our Web 2 application, a server needs a way to authorize their usage. The basic idea is pretty simple - it can just read data from blockchain by calling a smart contract method and check an owner’s account id. For such flow, we have 3 actors:
- Client that wants to use some digital asset (NFT).
- Smart Contract for NFTs. Should be implemented according to NEAR NFT standards.
- Server that verifies ownership of NFT and uses it in its internal logic.
A general flow looks like this:
However, such an authorization process cannot be performed without authentication, so the server also needs a way to authenticate a user.
Recall that the user's identity on a blockchain is represented by a key pair. However, since in NEAR a user may have multiple key pairs and an account is a separate entity, the authentication procedure is a bit more complicated.
To authenticate our requests, we can use public-key cryptography - a client can sign a request using a user’s private key, and then a server can verify the signature and key ownership. A typical request with authentication may look like this:
{
	"payload": { /* request-specific payload */ },
	"accountId": "account.near",
	"publicKey": "...",
	"timestamp": 1647091283342,
	"signature": "..."
}
where:
accountId– user’s account id on NEAR.publicKey- public key of the key pair used for signature, must be either Functional or Full access key for the provided account.timestamp- current datetime, must be verified on server. It’s needed to prevent replay attacks. Alternative to timestamps is usage of nonce, but it’s more complicated.signature- signature of the request payload and other fields. Usually, a payload is hashed beforehand.
Depending on the implementation, request body, headers, or other side channels can be used to transfer authentication data - exact implementation depends on used technologies and protocols.
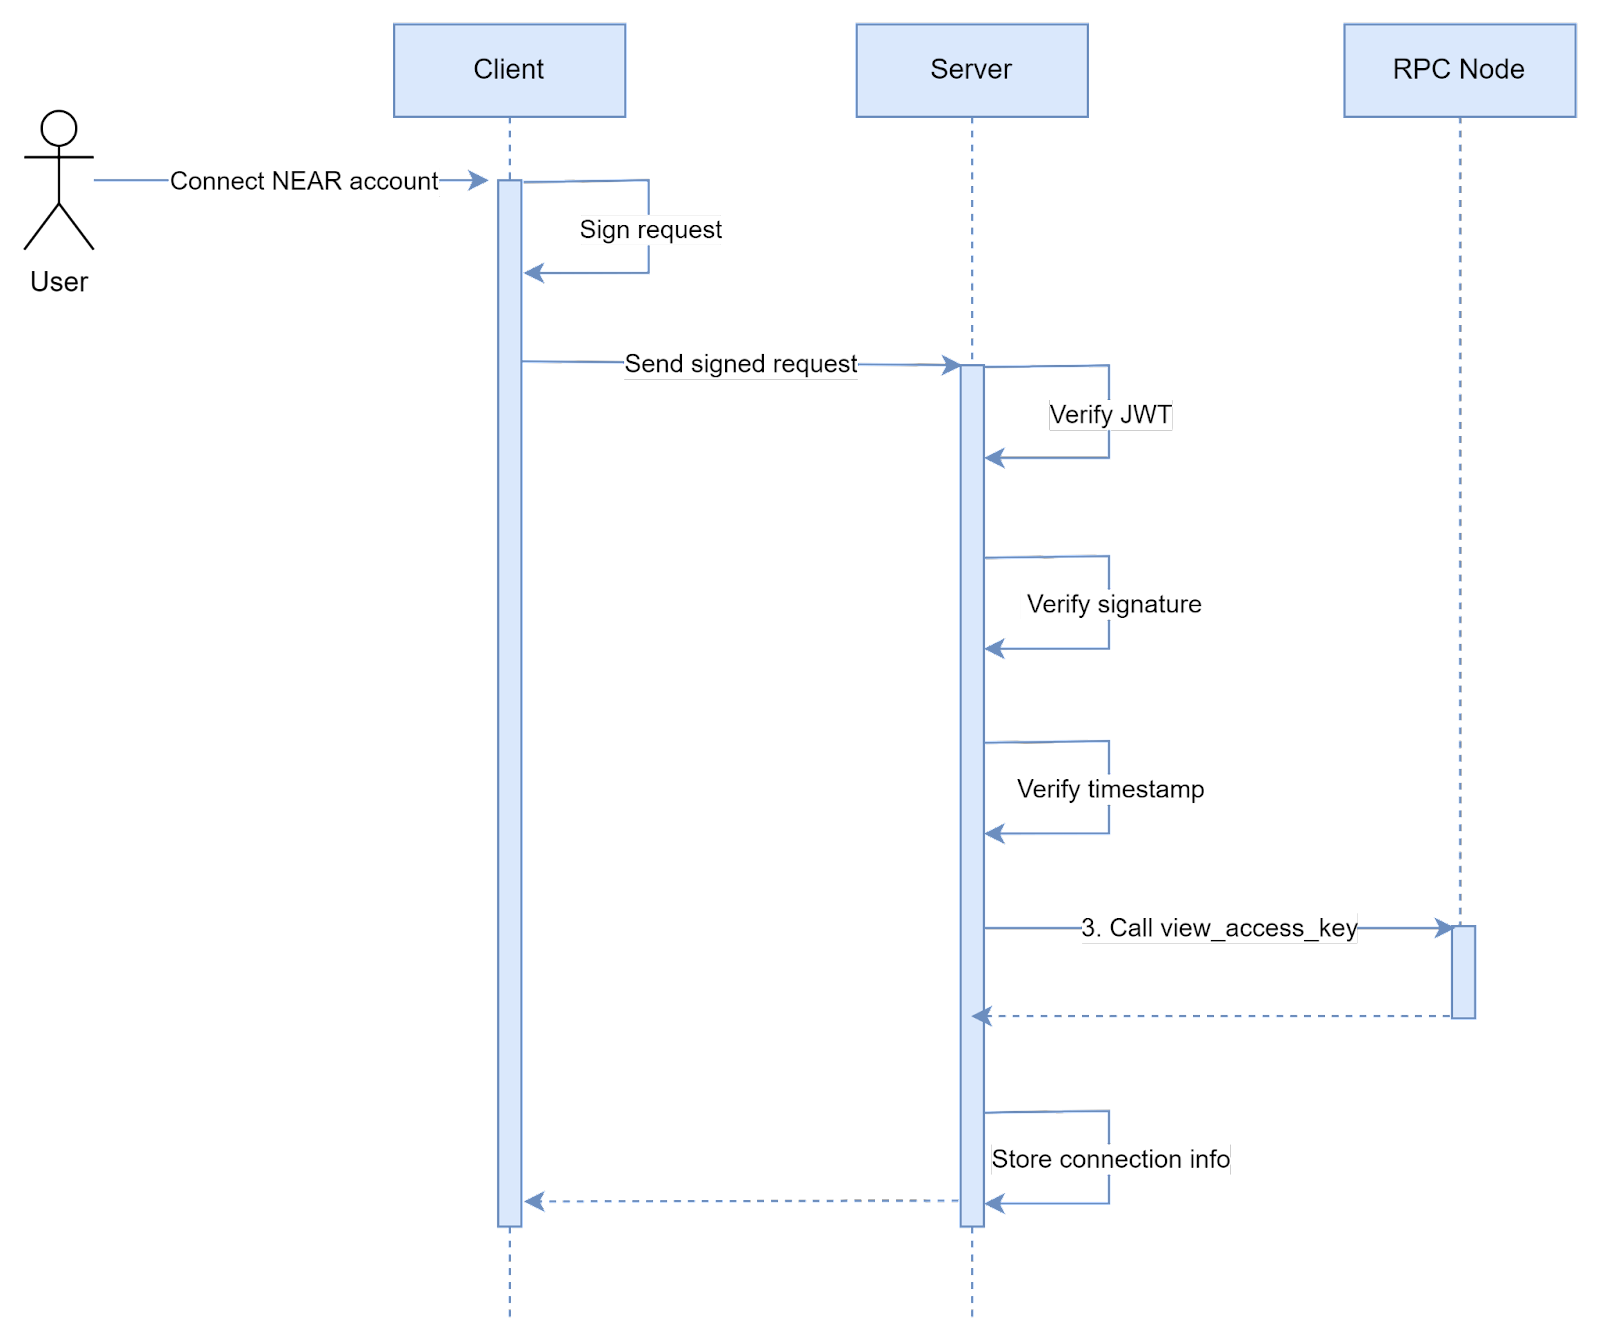
Server can use this data to authenticate a request using the following approach:
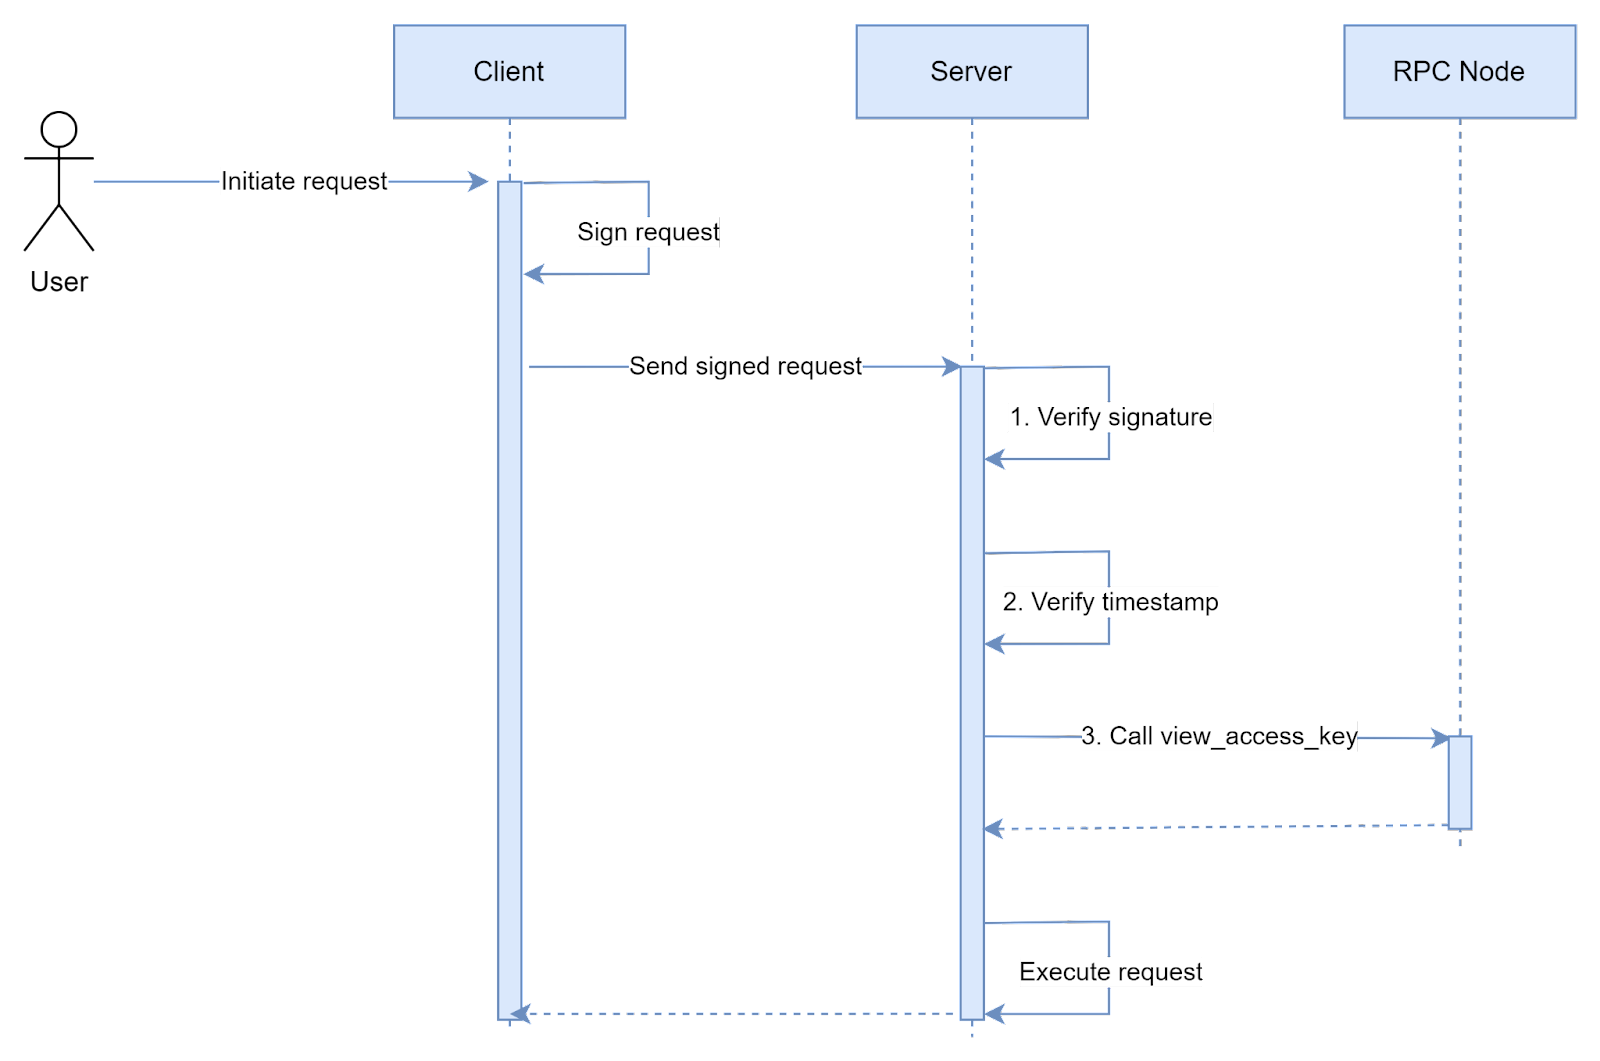
3 authentication steps are performed on the server:
- Signature verification - if the signature is correct, we are sure that the client really has the private key for the provided public key. Also, this proves that request data hasn't been modified in transit.
- Timestamp verification - prevents replay attacks. Server can verify that the request’s timestamp is not too old (e.g. has been created no more than 10 seconds ago).
- Public key ownership verification - by calling view_access_key method, we can make sure that the provided public key is really associated with the provided account.
Such authentication approach is the simplest one, but has a few major drawbacks:
- Performing a REST API call to RPC Node is quite expensive to do each time from the performance perspective.
- We can’t sign requests from the mobile client, since it usually should be disconnected from the blockchain due to store policies, and hence doesn’t have a key pair.
- A NEAR account is required in order to start using the application, which complicates the onboarding process.
To solve the first problem, we can simply issue a JWT token or authenticate connection in some other way after a successful NEAR account authentication, so the it will serve as “login” of sorts:
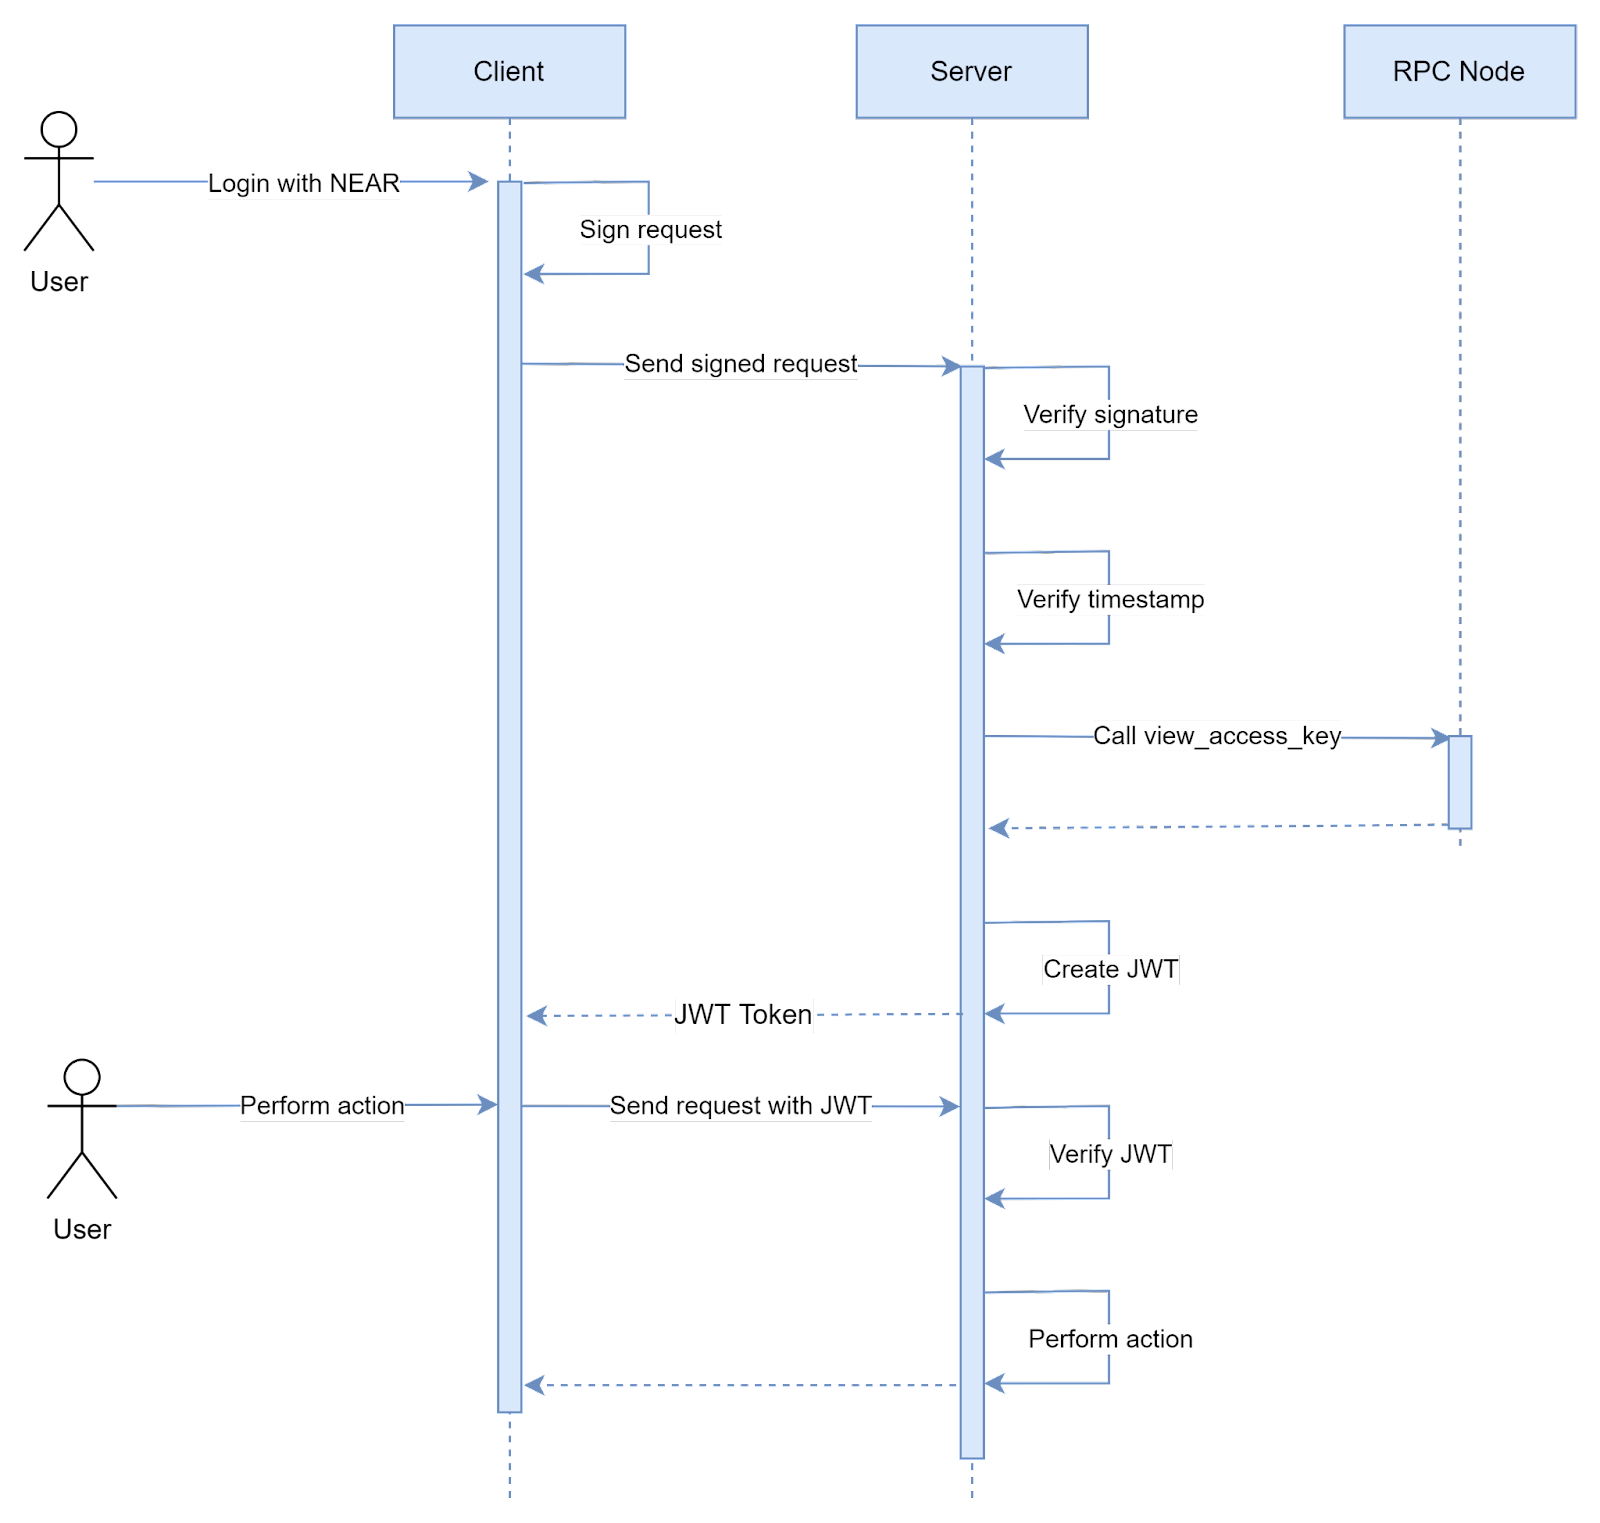
While this may be enough for some applications, it doesn’t address the last 2 problems. In order to solve all of them, we can use a hybrid authentication approach with 2 accounts:
- “Classic” Web 2 account - all clients can use this account to call a server. For example, this can be a simple username/password or OAuth 2 login with a JWT token.
- NEAR account - can be used from non-mobile clients only. Instead of performing NEAR account auth each time we need to use it, we can do it a single time in order to “connect” this account to our primary Web 2 account and store Classic-NEAR account connection in our server database. In this way we solve all problems - server doesn’t need to authenticate NEAR account each time it wants to perform an authorization, instead it can read an associated NEAR account from its own database.
With such hybrid approach, different authentication methods are used for blockchain and server:
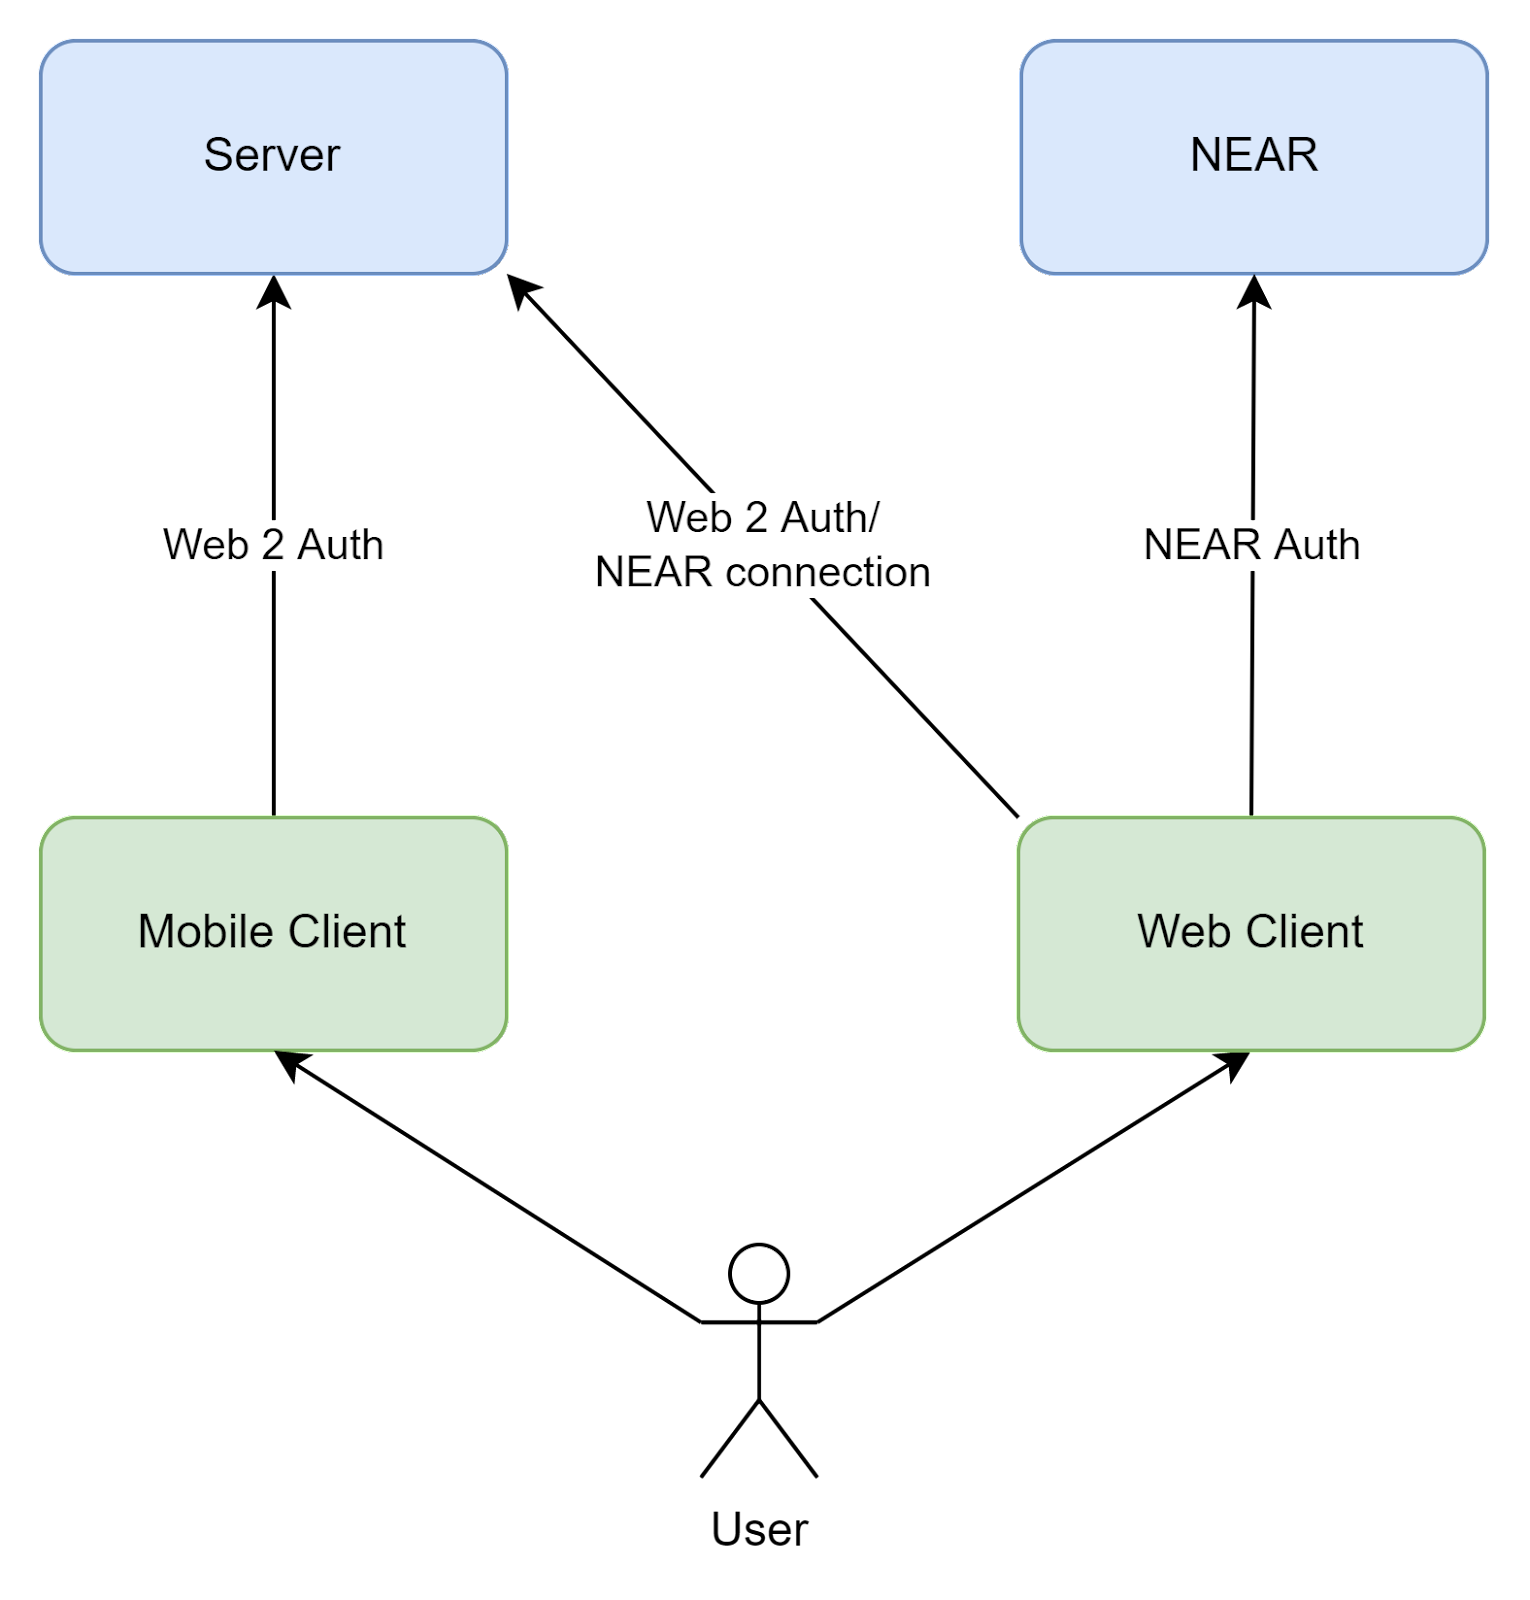
NEAR account connection sequence can be implemented in a very similar way to the already described NEAR authentication method, where at the end we store an authenticated account in our database:
There’s one more improvement we can make to this flow. Since a Web Client uses both accounts, a user is forced to login using both Web 2 login method (e.g. login/password) and NEAR Wallet. This is not ideal from the UX perspective, so we can simplify it by introducing a “Login with Wallet” method to our server, which would work when a user already has a wallet connected. We can do this in a similar way to the account connection flow:
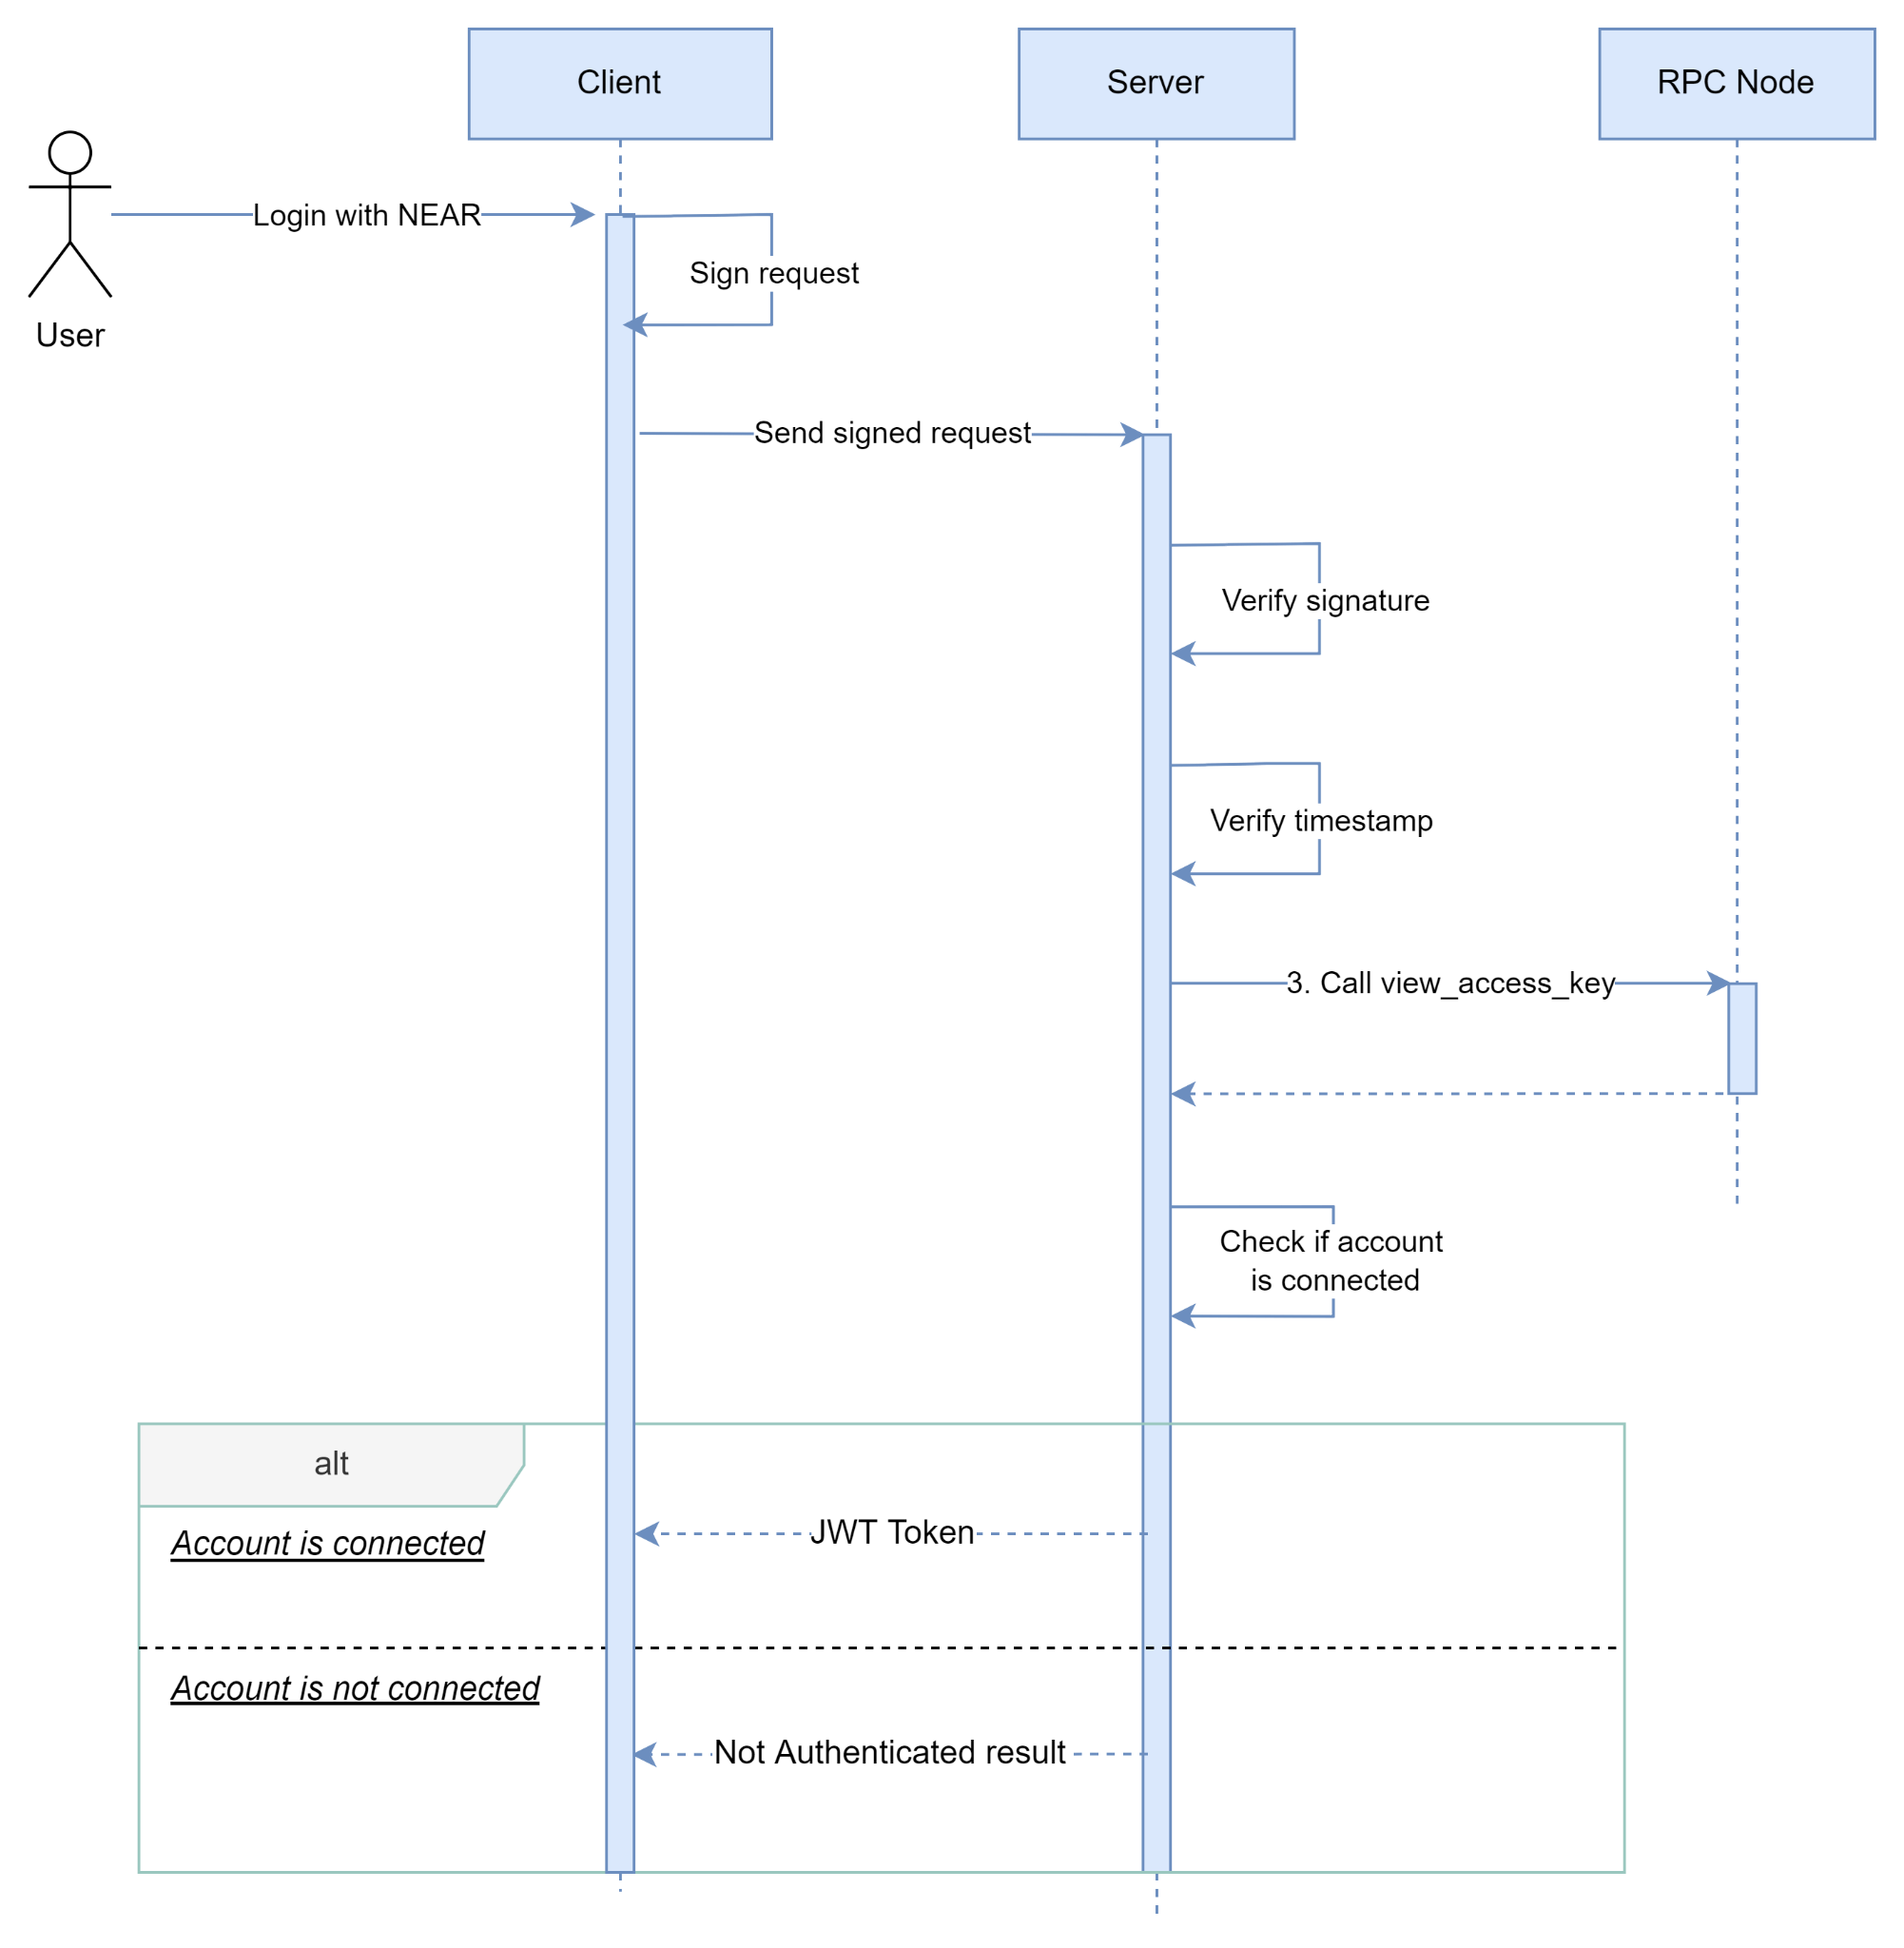
Now, as we’ve discussed possible approaches for authentication, let’s summarize it as an overall login flow for our clients:
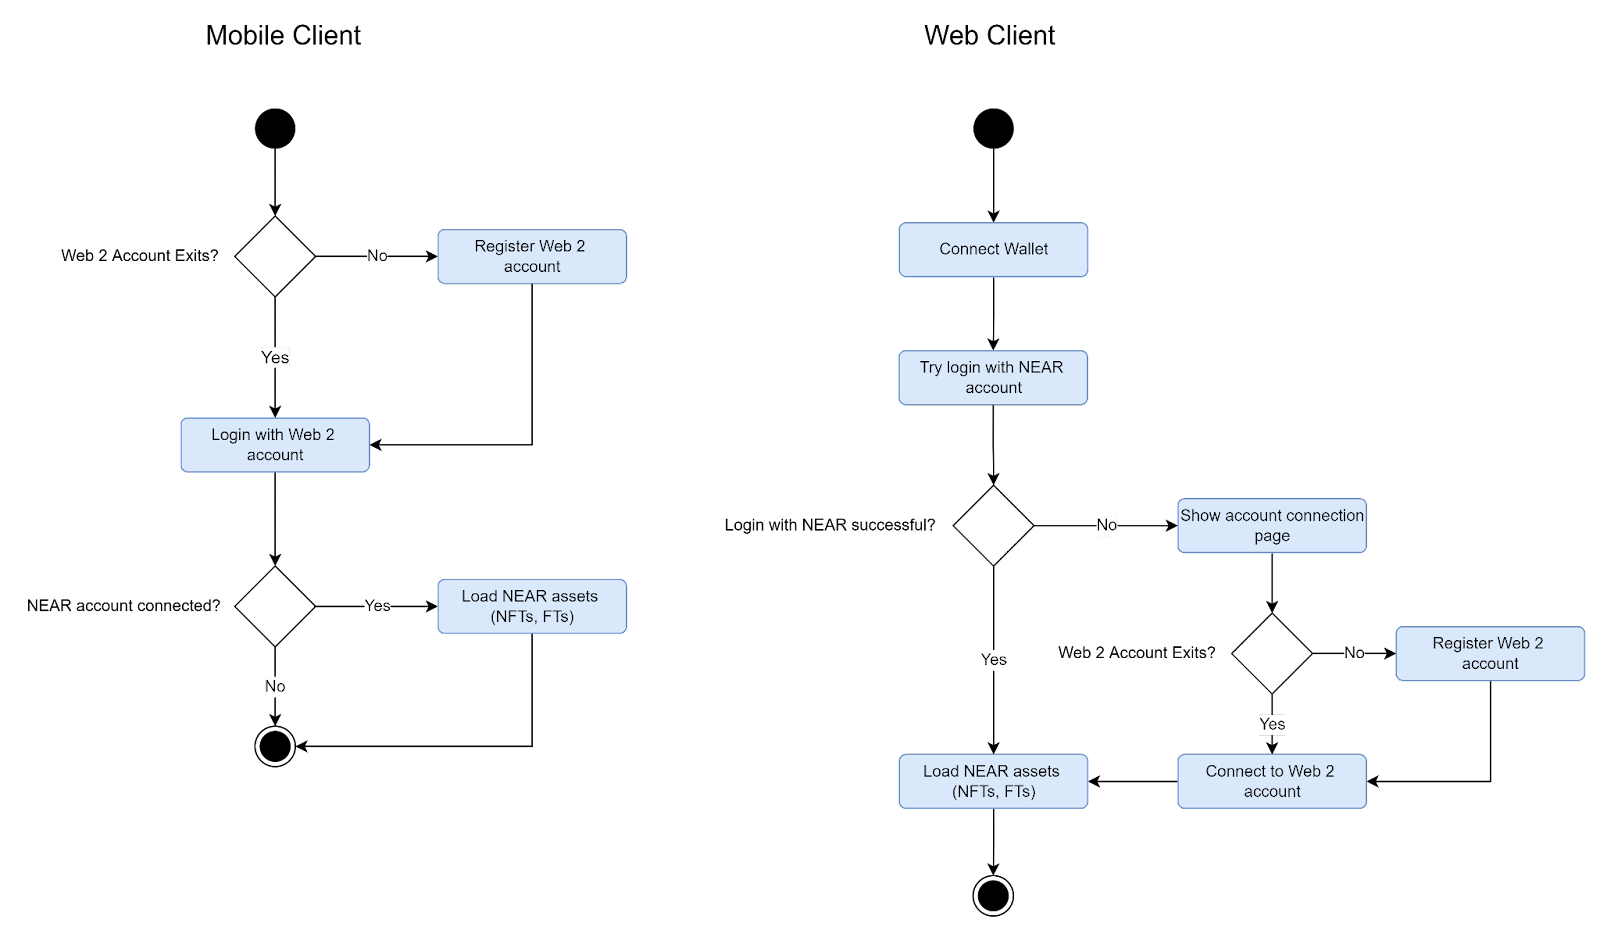
Of course, this is just one possible flow, and a different solution can be assembled from described building blocks. The most important considerations for choosing right authentication flow are following:
- Type of your client - for web/desktop clients, or sideloaded Android clients, it’s possible to use Wallet as a single authentication method. For mobile clients installed from a store, a hybrid approach with multiple auth methods should be used.
- Target audience - if you target regular users that are not familiar with blockchain technologies, having a hybrid auth method to simplify onboarding might be better than forcing users to learn blockchain before trying your application.
Blockchain Auth & Auth
So far, we’ve discussed authentication and authorization on the Web 2 server’s side. But what about Web 3 smart contracts? Everything is much more straightforward in this case.
Since everything is public data on the blockchain, we don’t need any authentication for read calls. For transactions, each is signed by an account’s private key, and authentication is performed by the network. More details on transaction signing can be found in the docs.
Authorization, on the other hand, must be performed on a smart contract itself, the simplest way is just to check whether caller is allowed to perform an action:
assert_eq!(
            env::predecessor_account_id(),
            self.tokens.owner_id,
            "Unauthorized"
        );
NFT usage
After we’ve learned how to authenticate users and how to authorize NFTs usage, let’s find out how we can actually use them in our application.
Since we essentially have two backends in our application - server and smart contract(s), they both can use NFTs for different purposes:
- Server usually uses NFTs for actual functional purposes, e.g. by treating NFT as an in-game character, it can read its properties and stats and apply them using some logic.
- Smart contract is responsible for NFTs ownership, as well as NFTs creation, modification and burning (destruction).
This is the point where the NFT data storage model comes into place. Let’s recall, that there are 3 possible options:
- Store data in a smart-contract (on-chain).
- Store data in an off-chain decentralized storage, like IPFS (off-chain).
- Store data in an application itself (in-application).
First 2 approaches provide good decentralization, but make NFT harder to work with, especially if we need to modify its properties. Let’s consider usage options depending on a storage model used:
- On-chain storage:
- Server can read data from the blockchain by making an API call. Server can’t directly modify data, it should make a smart contract call instead (by issuing a transaction).
- Smart contract can directly read/modify NFT data.
- Clients can read all data directly from the blockchain.
- Off-chain storage:
- Server can read data from storage by making an API call. Data on the off-chain storage is usually immutable, so no modifications are possible.
- Smart contract cannot read data directly, an Oracle should be used. Data cannot be modified from it.
- Clients should read data from both blockchain and off-chain storage.
- In-application storage:
- Server can read/modify data from its own database.
- Smart contract cannot read data directly, an Oracle should be used. Data cannot be modified from it.
- Clients should read data from both blockchain and server.
Depending on a particular use case, any approach, or combination of them, can be used. The simplest case is when we don’t have any dynamic NFT data, and we can easily divide data by domains:
- Data that is used by smart contracts is stored on-chain.
- Other data is stored either off-chain or in-application.
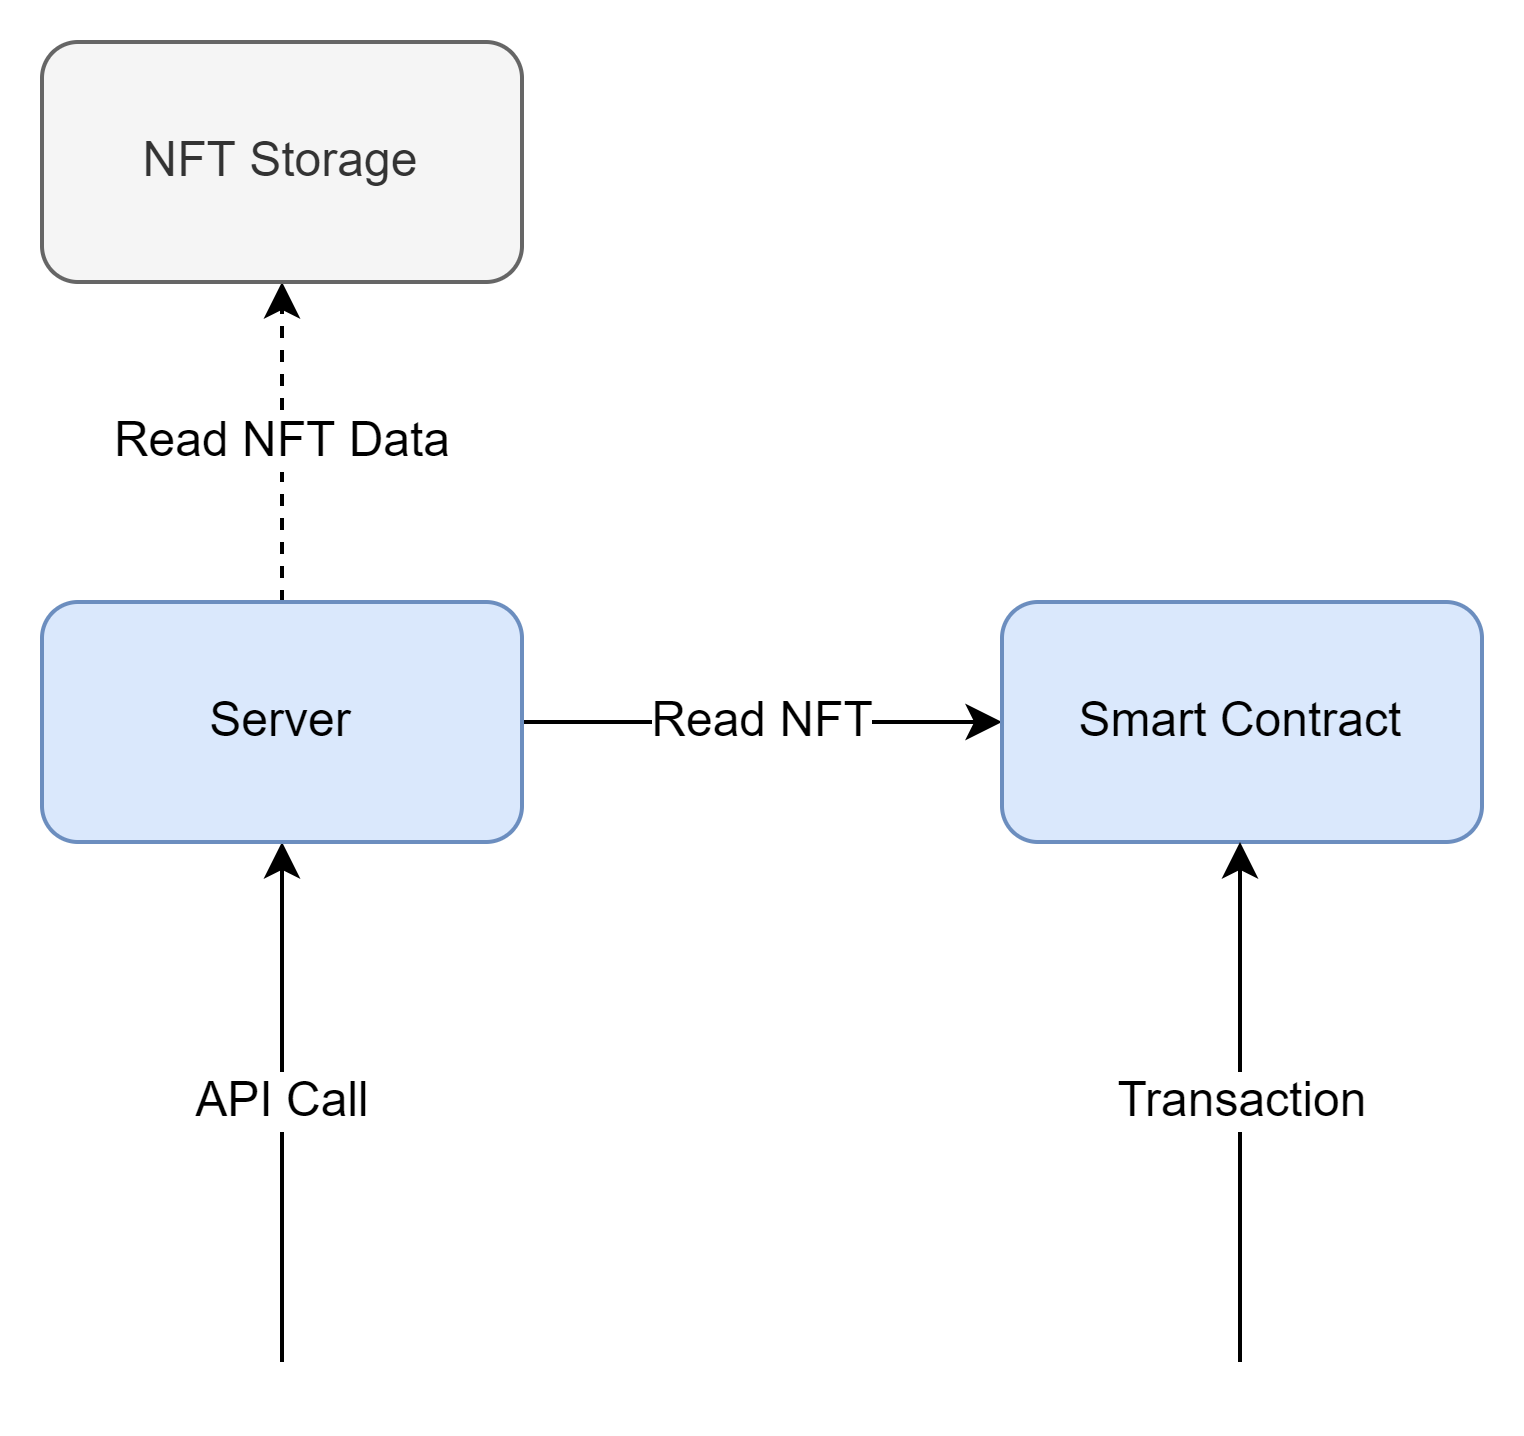
In this approach the server needs to read data from the smart contract, and, optionally, from an off-chain storage (like IPFS or Database).
This will work well for simple use cases, but everything becomes more complicated if we need to have some dynamic data associated with NFTs. E.g we may want to have experience points associated with our game character. Such data can be stored either on-chain or in-application (off-chain storage is also possible, but it’s more involved, so we won’t discuss it here).
In case of in-application storage, data can be modified by a server without any problems, but there are few drawbacks:
- In order to read this data, clients should make an API call to the server. This adds a centralized point for our NFT, and may not be suitable for all applications.
- If a smart contract requires this data, a server should serve as a Blockchain Oracle, which complicates things.
If we want our server to serve as an oracle for our smart contract, the easiest way is to cryptographically sign server’s data and verify it on the contract’s side (server’s public key that was used for signing should be stored in a contract in this case).
In order to prevent replay attacks, signed data should include a timestamp, which should also be verified. However, there’s one trick to this - smart contracts can’t access current time, since it would make them non-deterministic. Instead, transaction signature time can be used - it can be accessed using env::block_timestamp() function.

In order to avoid all these complications, we can instead store dynamic data on-chain, and use smart contract calls to update it.
Such an approach has one drawback - in order to call a smart contract’s method, a transaction should be created by the server, and in order to create a transaction it must be signed using an account’s key. That’s why a separate NEAR account should be created to be used by the server. Actions on the smart contract can be configured to authorize only this account, so regular users will be disallowed from modifying such data.
Yet another option is to store data on the server-side, but a smart contract can authorize only a server account for calls that rely on this data. As with the previous scenario, the server must have its own NEAR account.
In general, the approach of storing dynamic data on the Smart Contract side is much easier, but an important constraint should be considered - storing data on the blockchain is not cheap, so an appropriate method can be chosen depending on a scenario.
By now, we’ve covered methods to store and interact with NFTs from our application, an exact strategy should be chosen depending on use cases and constraints. A few things to remember:
- Storing NFTs data in a centralized storage (like an application's database) goes against Web 3 philosophy, and should be used sparingly and with care.
- Storage on the blockchain is not cheap, so decentralized off-chain storages can be used to store large data.
- Storing and using dynamic NFT data is quite tricky, and should be carefully designed. If such dynamic data is needed by smart contracts, it’s better to store it inside this contract if possible.
NFT minting
So far, we’ve discussed only how to use NFTs in the application, but how do they get created?
In the blockchain world, creation of new NFTs is usually called minting. And as with traditional digital assets, there are few ways how to create them:
- Users can mint them directly. This can be done by either allowing creation of NFTs from scratch, or by using more complex processes, like breeding or upgrading. The most famous example of such process is breeding in CryptoKitties game - new NFTs are created by combining existing ones. With this approach users usually have to pay to cover the storage and gas cost of NFTs creation.
- NFTs can be distributed by the developer to a set of users - it is usually called NFTs airdrop. Most often this is used as a marketing strategy to kickstart NFTs usage in applications. Storage and gas costs in this case are covered by developers.
- NFTs can be bought on a market or obtained from the lootbox. Depending on an exact strategy, costs can either be paid by a user or by developer. Also, in this case NFTs sometimes can be minted on-demand, to avoid paying upfront costs.
An exact strategy used for NFTs minting depends on application use cases. However, almost always there’ll be an nft_mint _function defined in a smart contract, which will handle creation of new tokens. This function itself isn't defined in the standard and is up to the application to implement, but the standard library provides a core implementation for it - mint_internal. On top of this function an additional logic, e.g. for authorization, can be added:
#[payable]
pub fn nft_mint(
    &mut self,
    token_id: TokenId,
    receiver_id: AccountId,
    token_metadata: TokenMetadata,
) -> Token {
    assert_eq!(
        env::predecessor_account_id(),
        self.tokens.owner_id,
        "Unauthorized"
    );

    let token = self
        .tokens
        .internal_mint(token_id, receiver_id, Some(token_metadata));

    return token;
}
This approach is quite simple, but everything becomes a bit complicated if we want to provide some on-demand minting functionality to avoid paying upfront costs. For example, we may want to create a lootbox with a set of predefined items appearing with some probability.
One approach is to handle this logic on a server side, in this case the server will call nft_mint function with computed parameters. However, in this case developers will have to pay the cost of minting. If we want to avoid this, loot box logic can be moved into the smart contract itself. If users want to open a loot box, he can call a smart contract function and pay for this action (e.g. by using NEAR or Fungible Tokens). Developers would only need to pay for a lootbox configuration costs, like possible items and their probabilities.
Blockchain Onboarding
Before designing an onboarding strategy, the target audience should be carefully analyzed. As we briefly mentioned before, users can be divided into two broad buckets:
- Users that are already familiar with blockchain, have their own wallets and understand cryptocurrency basics.
- “Casual” users that aren’t familiar with blockchain and don’t know much about it.
If only the first category is targeted, then everything is quite simple - users are already familiar with main concepts, and will have no problem connecting their own wallet or creating a new one. However, if we want to target the second category of users as well, a strategy has to be developed to make onboarding into the blockchain world as smooth as possible. While a lot relies on proper UX and is very application-specific, a few architectural patterns and technologies exist to simplify this process: custodial wallets, NEAR drops, Prepaid Gas and Implicit Accounts.
Custodial Wallet is a wallet which is managed by a third party. In our case, a wallet can be created and stored on a server side, and all blockchain operations could be done using the server as a proxy.
In this way, users can remain unaware about the intricacies of blockchain until they are comfortable enough to claim ownership of this account. Once they are ready, the server can transfer the account's ownership and remove it from the server. However, despite simplifying UX for the users, such approach has a few significant drawbacks:
- Users should trust our application to manage their accounts.
- Accounts creation is not free, so unless developers want to pay for it, funds should be transferred from a user to cover this cost. Traditional payment methods can be used, like PayPal or Apple/Google Pay. However, such an approach should be used with care for mobile applications due to app stores policies. Alternatively, NEAR Implicit Accounts can be used to avoid paying for account creation.
- Unless we want to leave a custodial wallet as the only supported wallet type, we need to support both types of wallets (custodial and non-custodial) in our application. This will increase implementations complexity, since we need to support 2 transaction types:
- Server-signed transactions in case of custodial wallet.
- Client-signed transactions in case of non-custodial wallet.
As we mentioned above, Implicit Accounts can be used to avoid paying account creation costs. This is especially useful for custodial wallets, since it allows us to create a NEAR Account free of charge. Basically, they work like an Ethereum/Bitcoin-style account by using a public key as an account id, and later can be converted to a full NEAR account. However, they have drawbacks as well. First of all, human-readable account names cannot be used. Also, if we want to convert it to a proper NEAR account, which can support Functional Call keys, the account creation fee still has to be paid.
While being very powerful, custodial accounts are quite complex and tricky to implement. An alternative approach to ease users onboarding is to simplify creation of a wallet itself. In NEAR, we can do this using NEAR Drops. It allows us to generate a link that guides users through a quick wallet creation process. However, the same problem as for the custodial accounts applies - creation of an account is not free. That’s why, such a link has NEAR tokens attached to it to cover account creation cost and to serve as an initial balance for a newly created wallet. And as with custodial accounts, funds should be transferred from a user to cover this cost using traditional payment channels.
Another option to simplify onboarding is usage of the Prepaid Gas concept. For example, we can issue a Functional Call key that allows users to interact with blockchain without having an account created. In this case funds will be drawn from the developer's account. This can be used for demo purposes, or to allow users without a NEAR account to perform some smart contract actions.
NFT Marketplace
At this point, we’ve covered in detail how to integrate NFTs into our Web 2 application, but we’ve stayed away from the economy part. The essential part for having a functioning economy is a marketplace where users can freely trade and exchange their NFTs. Such a marketplace usually consists of a smart contract and a client application. This smart contract is closely integrated with a NFT’s smart contract using the cross-contract calls. The reason for having a separate smart contract is two-fold:
- This provides a better separation of concerns - we can modify and upgrade our marketplace independently from the NFT contract.
- Multiple marketplaces can be used - e.g. we can have an internal marketplace, and in addition to it users can list their NFTs on external marketplaces. This is possible because a common NFT standard exists that all marketplaces can rely on.
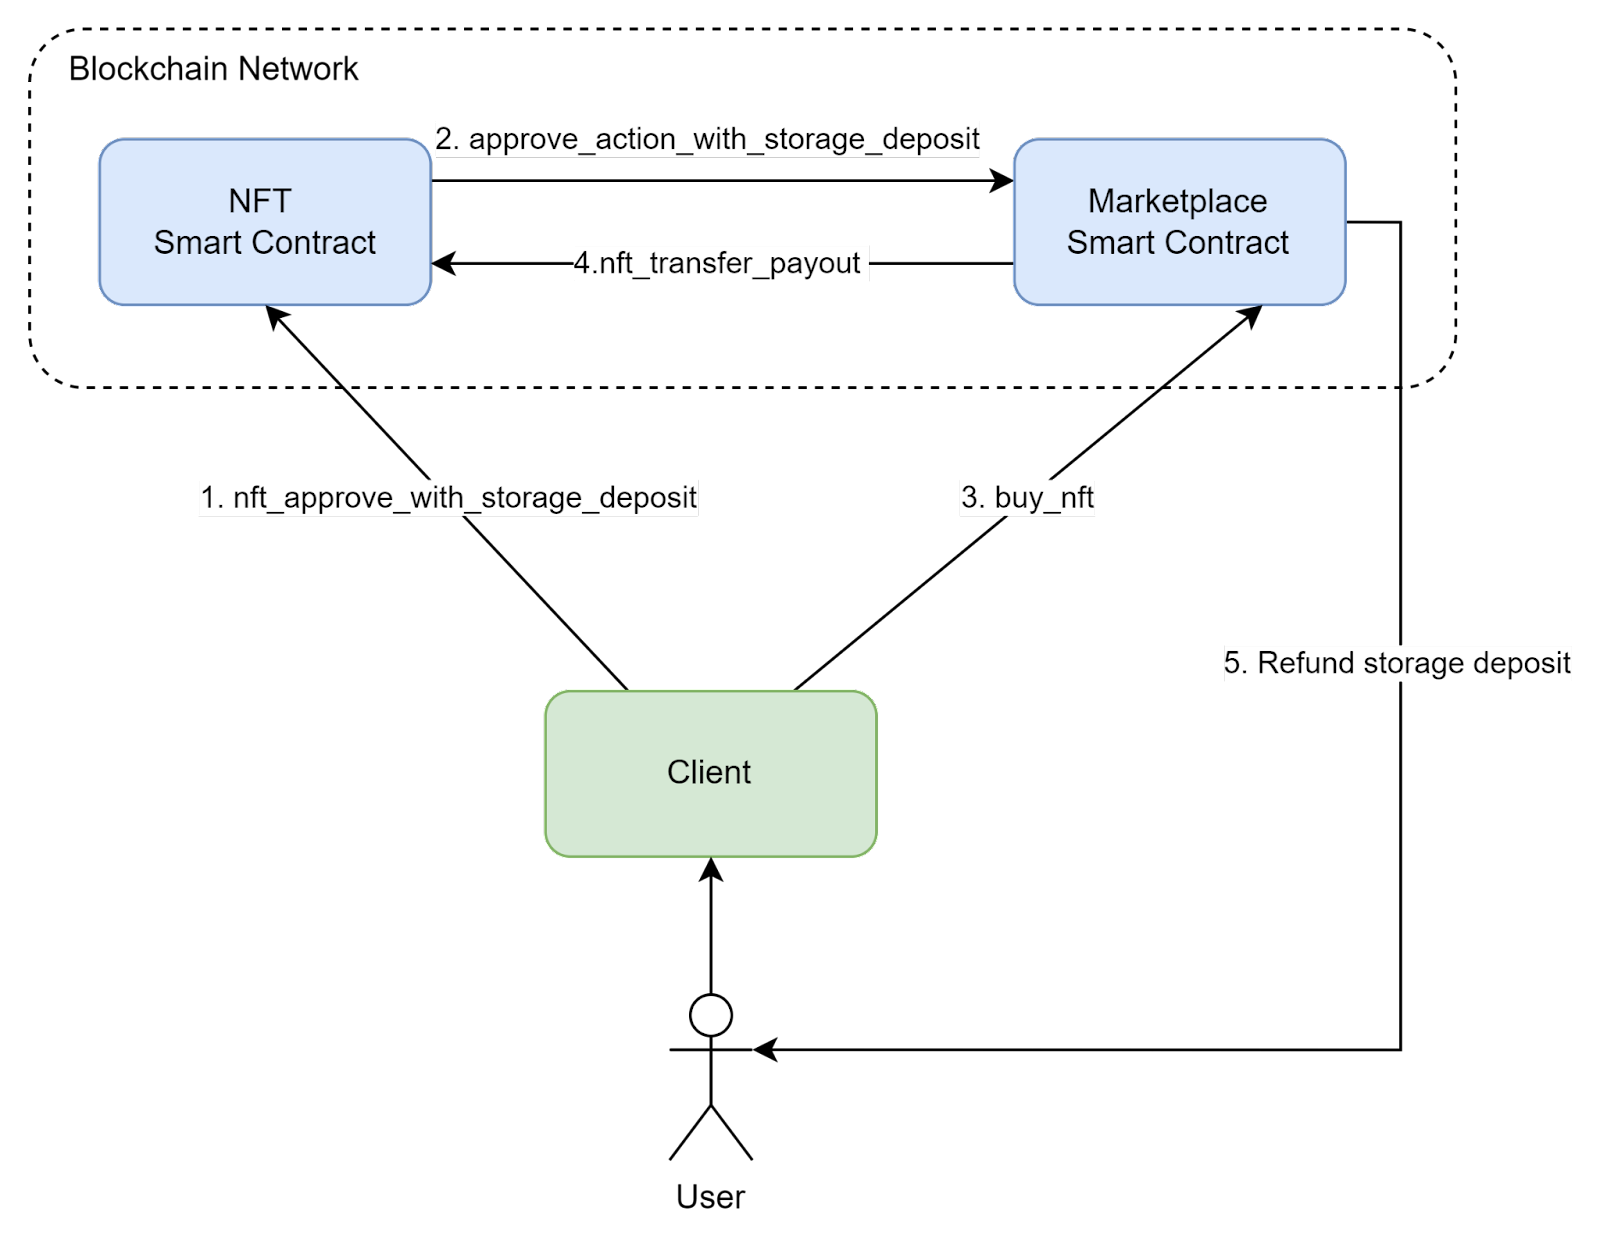
General flow of a simple marketplace integration can look like this:
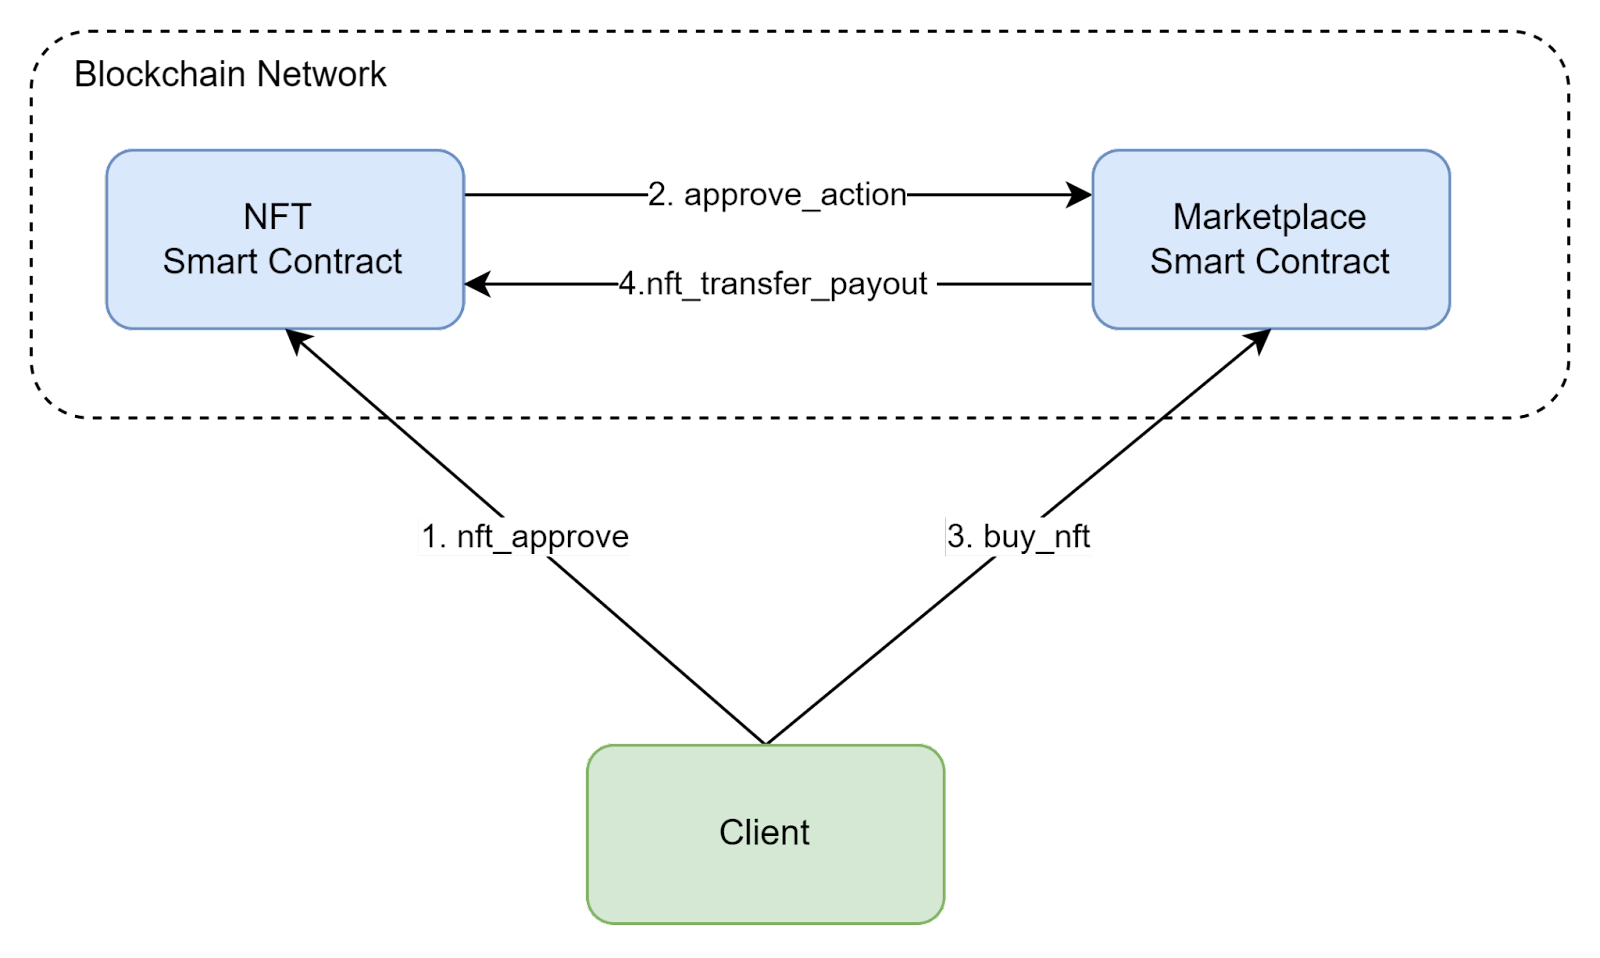
- Client calls the nft_approve method on the NFT smart contract. This will approve Marketplace Smart Contract to sell this NFT.
- After approving an account, NFT smart contract issues a cross-contract call to the Marketplace to create a sale object. Arguments for this call are provided as part of the
nft_approvecall. - Another user wants to buy the NFT on sale, so he issues a call to the marketplace contract offering to buy it. An exact call signature for such action is not standardized and depends on marketplace implementation.
- If an offer to buy a NFT is valid, Marketplace issues an nft_transfer_payout call to transfer the NFT and return payout information. This information is used by the Marketplace to distribute profits from the sale between recipients. In the simplest case, all profits go to a seller.
Such flow looks relatively simple, but a few important details are missing.
First of all, in order to create a sale, storage needs to be paid for. Usually, the seller is the one who needs to pay for it, but other models are possible - e.g. marketplace or application developers could cover the cost. If we want users to pay for a sale, an approach with storage reservation can be used:
- Before approving NFT for sale, a user should reserve storage on the Marketplace contract to cover sale storage requirements.
- After the NFT is bought or delisted, the user can withdraw storage reservation (remember, that in NEAR storage staking model is used, so data can be deleted and locked tokens refunded).
While this model is relatively straightforward, it’s not ideal from the UX perspective - users must make a separate action to reserve storage if they want to sell their NFTs. To improve this, we can combine nft_approve call with storage reservation, and automatically refund back the storage cost after the sale is removed.
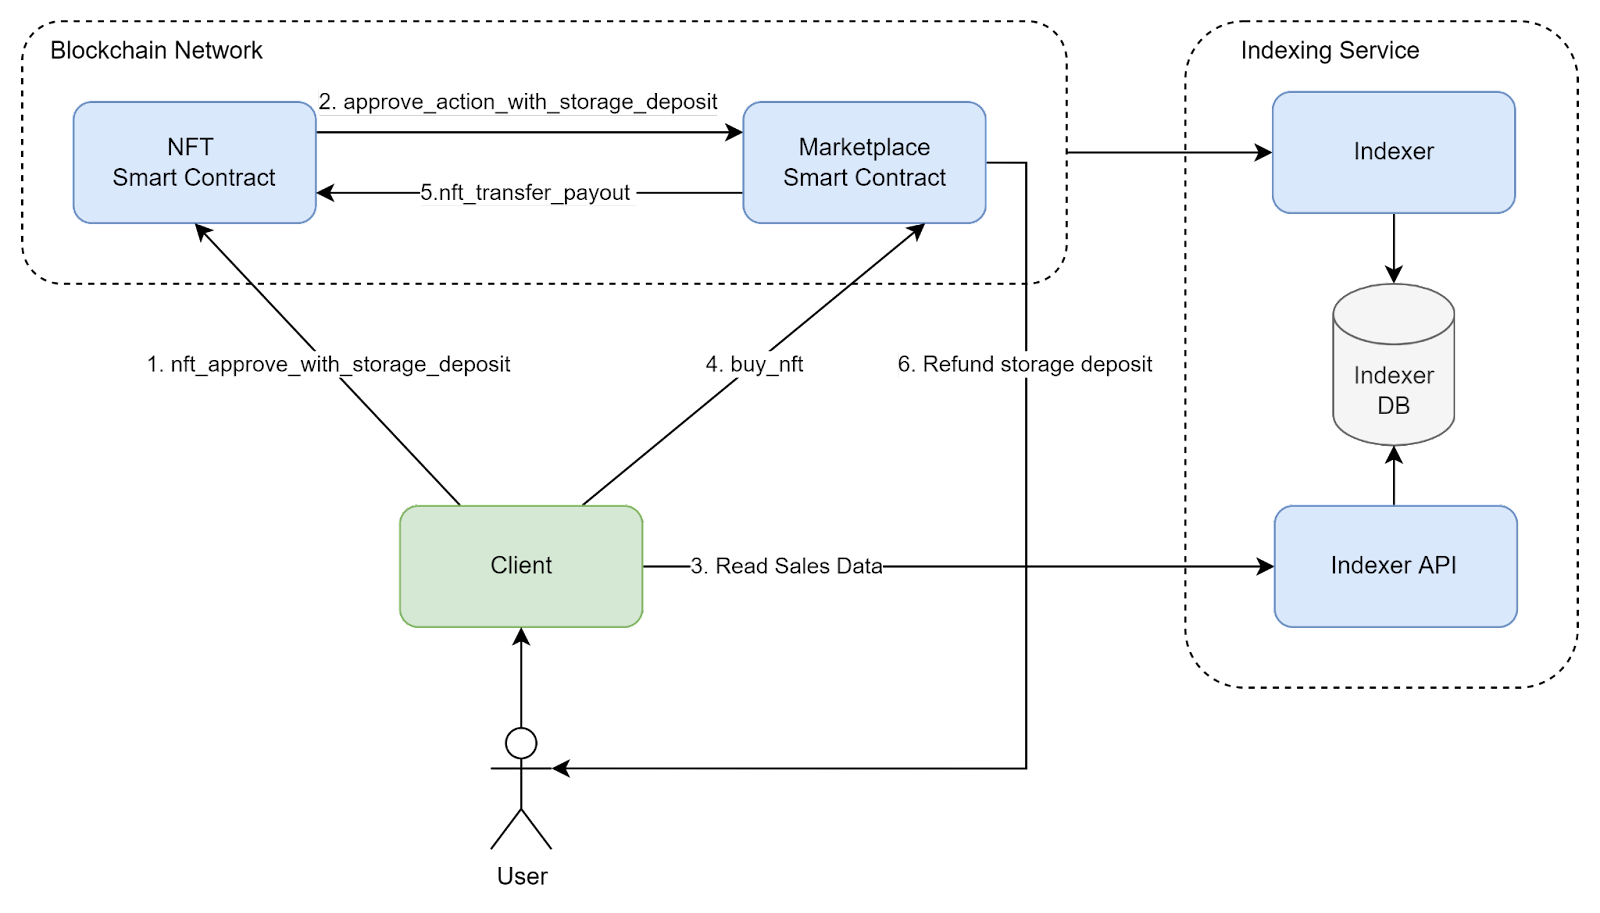
Another missing thing is how a client can read data about available sales. Of course, sales information can be read directly from a smart contract, but available data structures are not optimized for searching or filtering. Also, we would have to join data from the NFT and Marketplace contracts on the client side, which isn’t efficient. In order to solve these problems, an indexer can be used to aggregate data into a suitable database, where data can be stored in a way optimal for retrieval (e.g. a relational database or an ElasticSearch index can be used).
This is just one example of how a marketplace can be designed, but with it we’ve covered all basic concepts and problems. Most important points to remember:
- It’s better to implement a marketplace as a separate contract.
- Storage management should be carefully designed, with UX in mind.
- In order to implement a proper searching/filtering functionality, a separate indexing service is needed.
An example of a simple marketplace can be found here. A more sophisticated marketplace may allow purchases with Fungible Tokens as payment.
Implementing Components
Now, let’s explore our choice of libraries, frameworks and third-party solutions that can be used to implement our architecture.
Client & Server
First of all, how can we interact with blockchain from our clients?
If we need read-level access only, we can simply use the REST API, so it can be integrated into any language and technology without any problems. But everything becomes more complicated if we need to post transactions from a client. Remember, that transaction should be signed with a private key which is stored in a wallet:
- In case of a Functional Call key, it can be obtained from the wallet and used directly by the client.
- In case of a Full Access key, the user should be redirected to the wallet to approve a transaction.
A JavaScript API exists to cover all of these scenarios. It has all of the necessary functionality to integrate Web/Node.JS applications with blockchain. This SDK is a perfect choice for the Web-based clients, but it’s not suitable for desktop or mobile based clients. Other libraries can be used for them:
- .NET Client - suitable for Unity or Xamarin.
- Swift
- Python
- Unity
Same SDKs and libraries can be used for servers. The only difference is that a server cannot interact with a Wallet, so it must have access to a Full Access key, which should be stored and accessed in a secure way.
Also, another solution is available if a server uses a technology that doesn’t have NEAR SDK available for - we can create a separate (micro)service using the Node.js, which would handle all blockchain interactions:
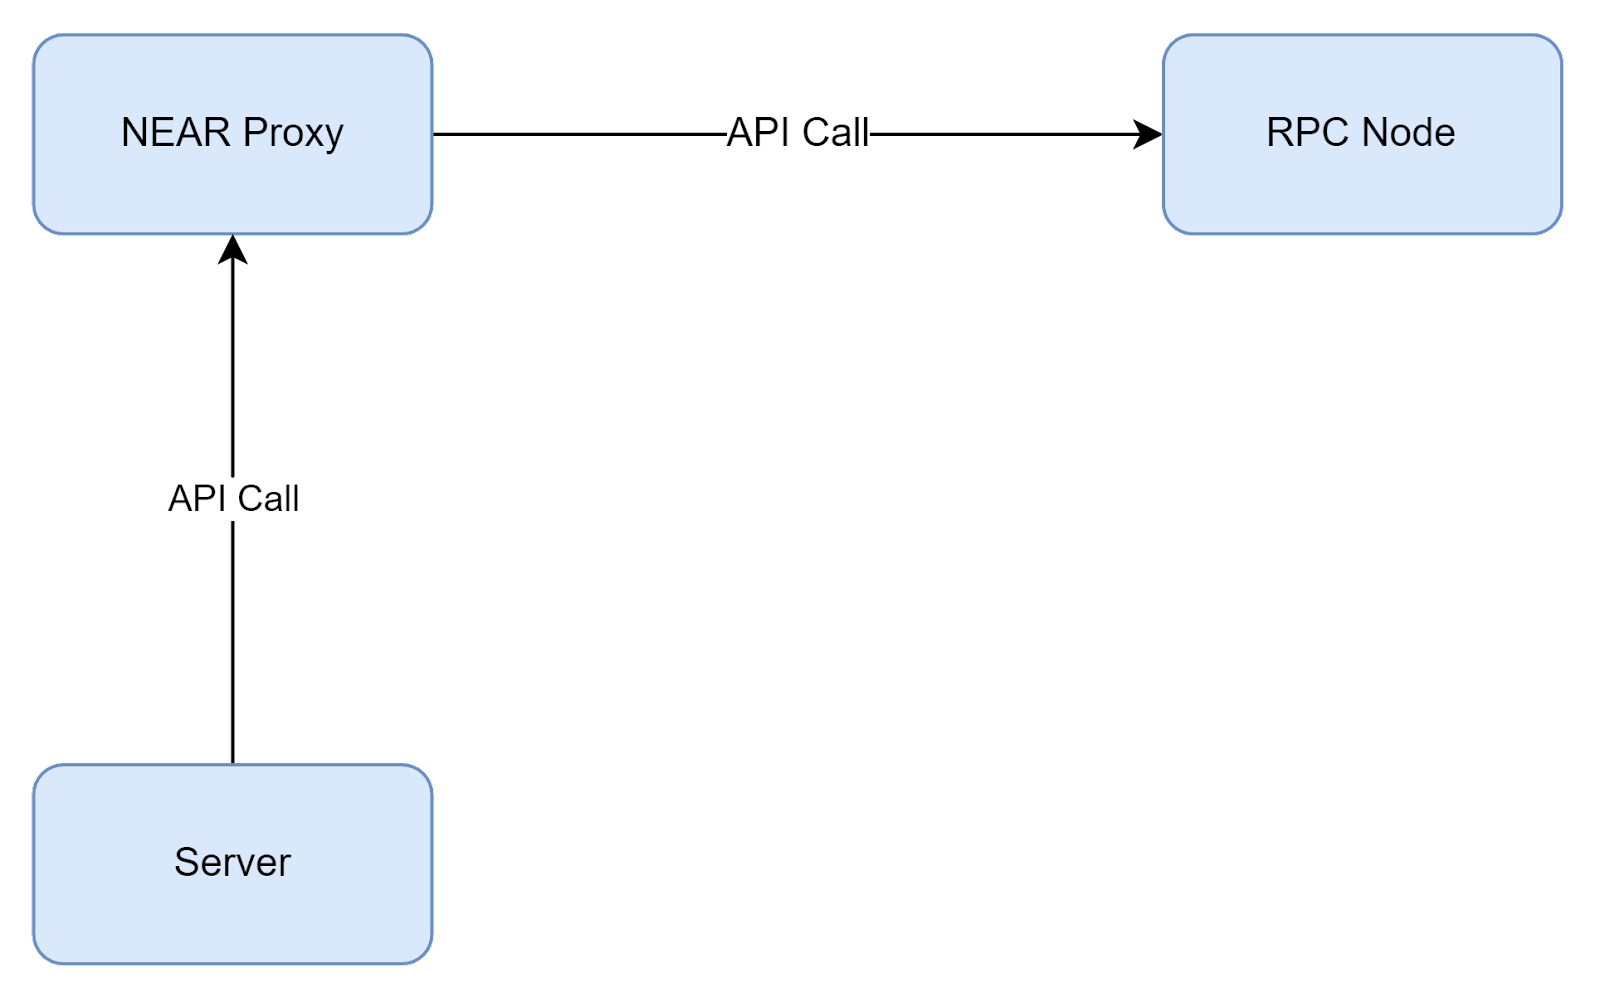
An example of such a proxy server can be found here.
Contracts
As we discovered in a previous section, for our application we need two smart contracts: for NFT and for Marketplace. There are two options on how to get them - use in-house implementation or some third-party/SAAS solution. Both options are viable and have different pros/cons.
If we want to create our own contract, we are fully in control and can implement anything we want. An obvious drawback, of course, is that it will take time and money to build it. Third-party solutions, on the other hand, are limited in their functionality and often cannot be easily extended. Also, they usually have some upfront costs and/or usage fees.
For an in-house NFT contract implementation a few resources can be used as a starting point. First of all, a Rust library is available which implements most of the standard. Another option is to build an entire contract from scratch, a good guide on how to do this is available by this link.
Implementing an own Marketplace contract is more involved since there is no standard implementation. A few examples:
- Basic marketplace example
- Paras marketplace contract - source.
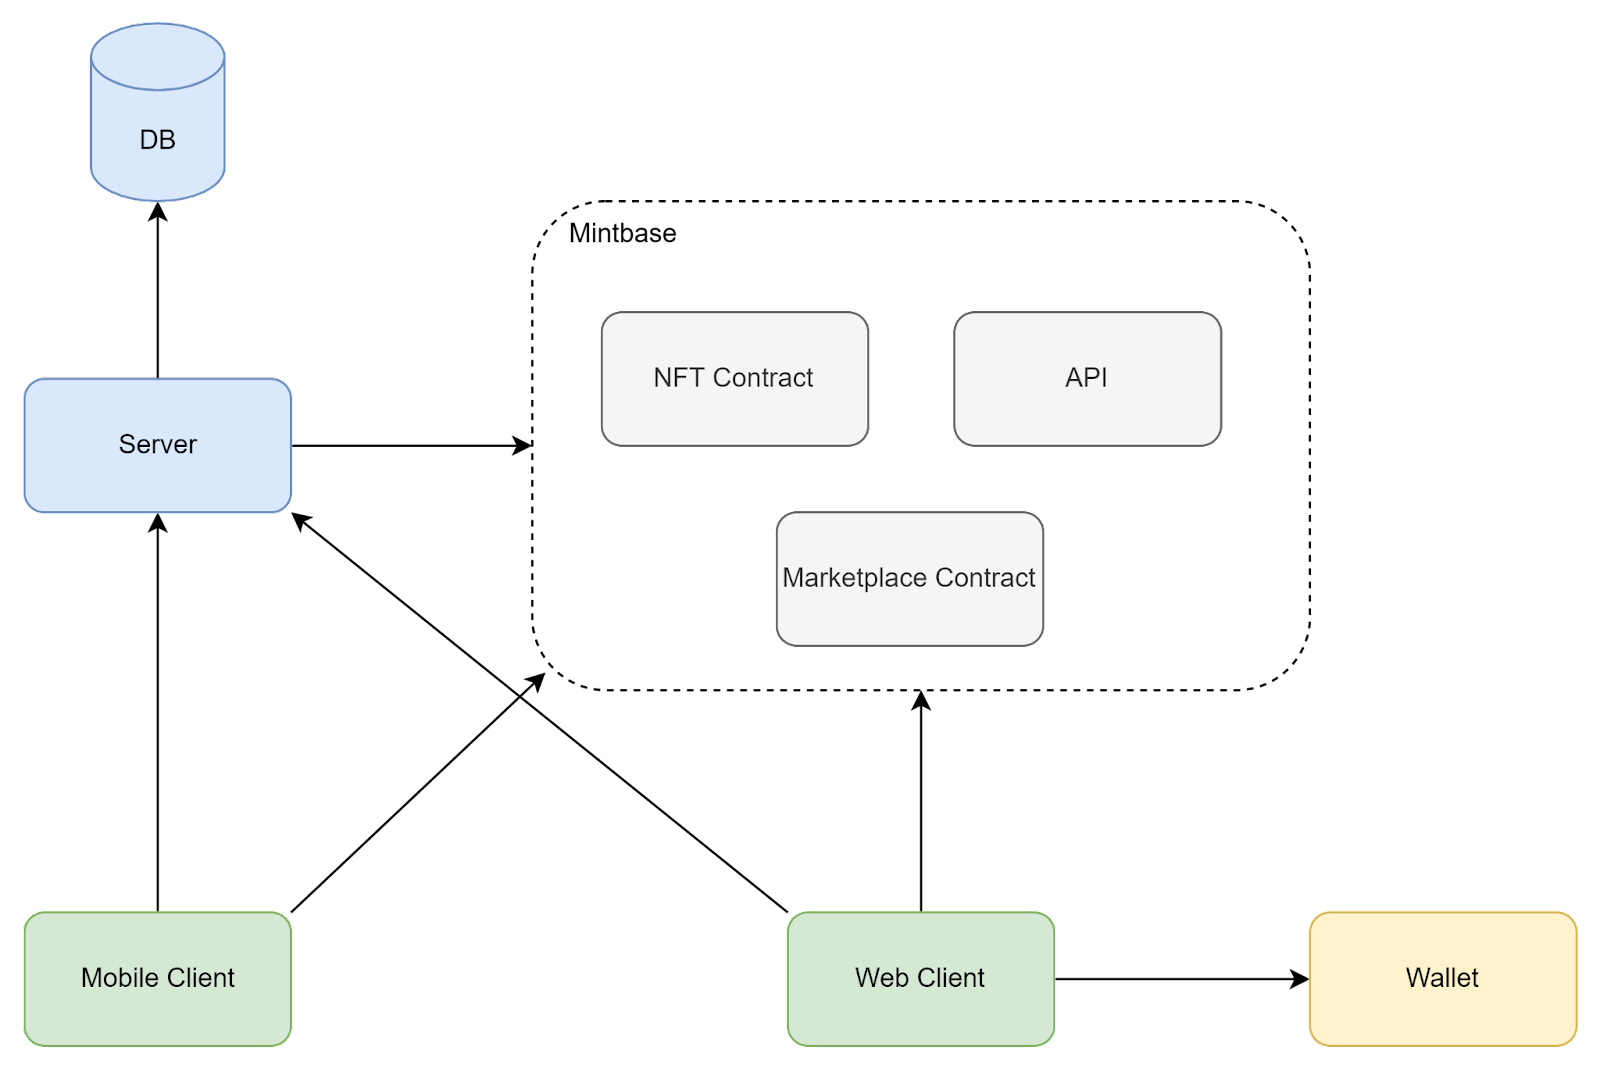
As for third-party solutions, the most complete one is Mintbase, which provides a full suite of components for NFTs integration - including contracts, indexer, API and a web client:
Another option is to roll-out an own NFT contract and integrate with one of the third-party marketplaces, e.g. with Paras (integration docs).
The major advantage of an external marketplace is the fact that they usually run their own indexer and expose collected data via an API, so we don’t have to implement these components. However, they usually have their fee for providing them, so a cost-benefit analysis should be conducted before using them.
Off-chain storages
Previously, we’ve discussed that storage on the blockchain is not cheap, so in most cases some decentralized storage solution should be used. A few options are available:
- IPFS - one of the first decentralized storage solutions, which is widely used in the blockchain world. However, in order to make sure that data is preserved on the network, an IPFS node(s) should be maintained.
- Arweawe - blockchain-based decentralized storage.
- Filecoin - another blockchain-based storage.
- nft.storage - a free service built on top of the IPFS and Filecoin.
A more in-depth overview of such solutions is available in the docs. In general, there's no “silver bullet”, so different solutions should be evaluated and the most suitable chosen. The main concerns while choosing a solution are availability guarantees, and cost.
Indexer
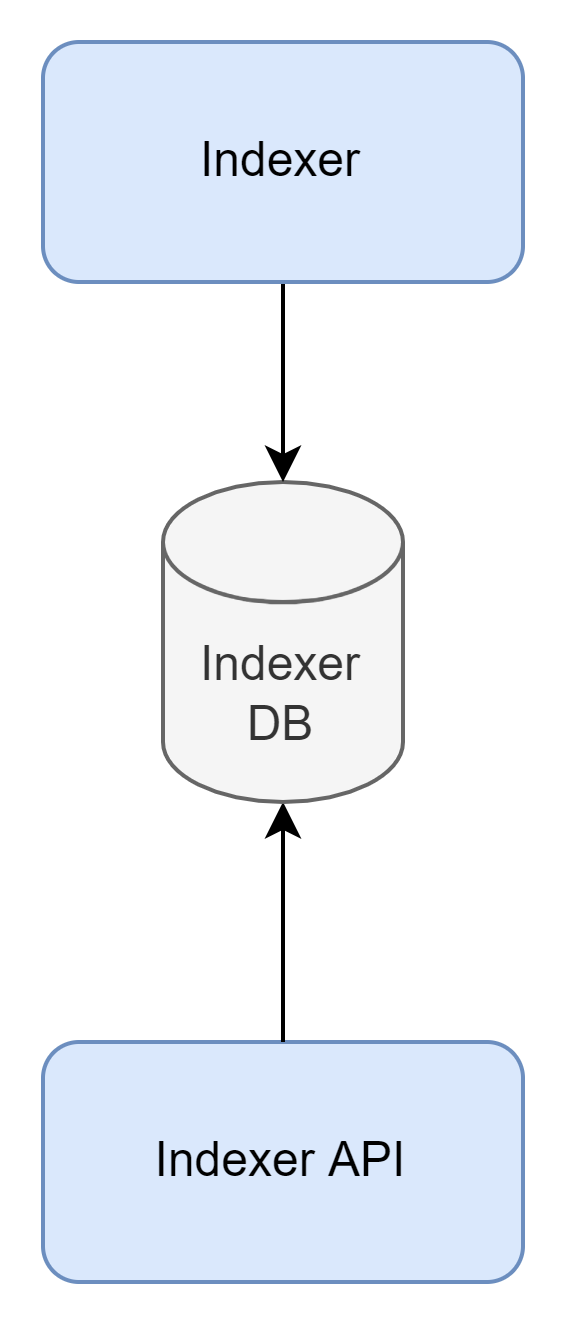
As we already determined, an indexing service is needed in order to support marketplace functionality. It usually consists of 3 components:
- Indexer - processes transactions from a NEAR network and puts extracted data into a database.
- Database - database of choice to store extracted data.
- Indexer API - an API layer on top of the database.
While any technology of choice can be used to implement Database and API, an indexer itself is can be implemented using both Rust and JavaScript. See this example written in Rust.
Usually, an indexer works by extracting data from Events, which are basically just structured log messages written during contract execution.
The Graph is an alternative to building an indexer from scratch. This is an Indexer-as-a-Service solution, which simplifies their creation and deployment. Guide on how to create a NEAR indexer is available by this link.
Automated Testing
Automated testing of the code is one of the pillars of modern software development. But how do we test our dApp?
Recall that a smart contract is a pure function, which can be easily tested using Unit Tests. Guide on how to write them is available here, and some examples can be found here. Another important kind of tests that is supported by NEAR are E2E tests, they can be executed either deploying contract code to either the local network environment (more info here), or directly to testnet, more info here).
Having both types of tests is equally important to ensure continuous quality of smart contracts, especially since contract upgrades usually aren’t easy to perform (remember, that in DAOs upgrade itself might be governed by a community vote).
Non-Functional Concerns
Last, but not least, let’s cover important non-functional concerns for our architecture.
Security
The most important thing to remember during the entire development is security, and especially the security of smart contracts. Since their code is public and an upgrade procedure is not trivial, it should be carefully audited for security issues and logical exploits.
Another important thing that should be kept secure is a user's private key. In most cases, only Functional Call keys should be directly accessed from a client, and Full Access keys should be kept in a wallet. However, in some cases a Full Access key might have to be used directly (e.g. in case of server transaction signing scenarios). In such a case, it must be kept in a secure location and treated as a most sensitive secret, since its compromise might lead to a full account takeover.
In general, before deploying an application to the NEAR mainnet, it’s a good idea to conduct a full security audit.
Scalability and Availability
Another concern is scalability and availability of a solution. There are a lot of ways to scale traditional servers, but how do we scale our blockchain and make sure it’s always available?
Since blockchain is decentralized, it provides us with high-availability by design, and NEAR provides a great scalability by employing Proof-of-Stake consensus and sharding. However, in order to interact with a network, we need an RPC Node. NEAR maintains publicly available nodes for its networks (listed here), but it doesn't provide any performance or availability guarantees for them. So, in order to make sure our architecture is scalable and fault tolerant, we need to maintain our own cluster of RPC nodes, typically behind a load balancer.
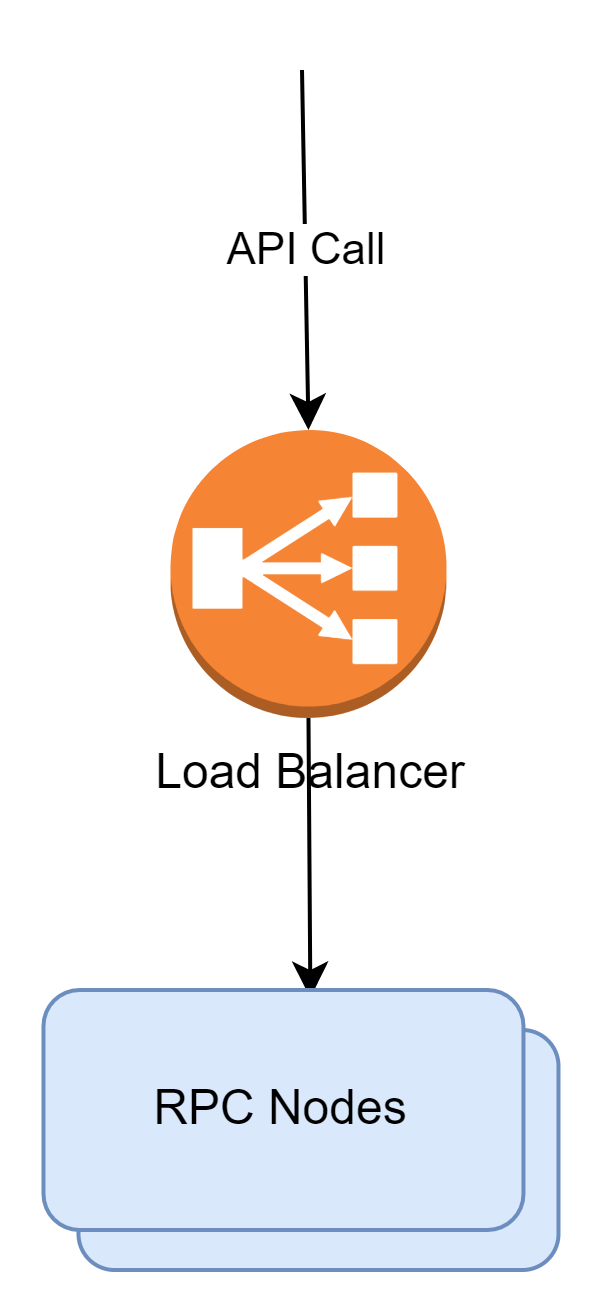
Information on how to set up an RPC node is available here.
Also, to guarantee availability and scalability of a whole system, all used third-party services should be reviewed as well. For example, if IPFS is used as a storage for NFTs, pinning nodes and IPFS gateway should be scalable and fault tolerant.
Costs
When building a Web 3 application, it’s important to remember that cost calculation is somewhat different from Web 2 applications. Additional costs can be broken down into several categories:
- Smart Contracts deployment costs. While deploying on NEAR testnet or local environment, it’s essentially free of charge. However, when deploying into the mainnet, developers will be charged for storage and gas cost. Gas cost for a contract deployment transaction is relatively small (around 0.04$ at the time of writing). On the other hand, storage costs can be quite substantial, e.g. a 150KB contract (compiled) will cost around 20$.
- Smart Contracts usage cost. In Web 3, users pay for smart contract calls, so in order to make sure users aren’t discouraged to interact with a contract due to a high cost, it should be optimized to incur the lowest cost possible. This is especially important for storage costs, since gas is relatively cheap.
- If we want to use a privately hosted RPC node for better availability, its operational costs should be taken into account as well. Cost breakdown can be found here, a rough estimation is about 290$ per node per month (and remember that we need at least 2 nodes for redundancy).
- Cost of a privately hosted indexer (if it’s used). More information can be found here, a rough estimation for the costs is about 100$ per month.
- Third party services costs.